
If you are following our Raspberry Pi Pico tutorial series, then you must have read the tutorial on how to interface an OLED display module with a pico board in which we measured the ADC value from the ADC channel of the pico board. In this tutorial, we will interface an ultrasonic sensor with the pico board and we are going to measure the distance of an object and then we will display the distance on the OLED display module using MicroPython.
Hardware Required to interface an Ultrasonic Sensor with the Pico Board
We need the following components to interface an Ultrasonic Sensor with the Raspberry Pi Pico-
- Raspberry Pi Pico
- Ultrasonic Sensor
- OLED Display
- Connecting Wires
What is an Ultrasonic Sensor and how it works?
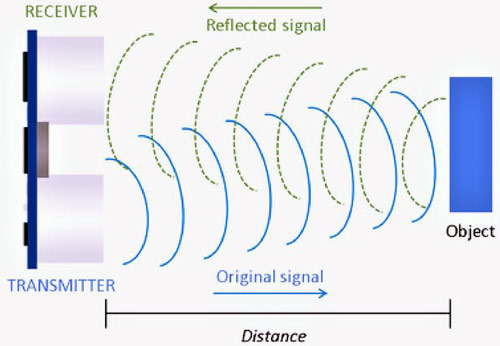
If you are new to electronics, you might have so many questions like what is an Ultrasonic sensor? How it can measure the distance of any object? In this section, we will try to find the answers to such questions. Once you have all the required components with you, you can follow the steps mentioned below and work on the project. Take a look at the picture of an ultrasonic sensor below. On the left, we have the front view of an ultrasonic sensor and on the right side, we get to see the backside view of the ultrasonic sensor. We have two transducers at the front of this sensor that you can see in the first image.

One transducer is used to transmit, the ultrasonic burst at 40kHz and the another one receives the reflected ultrasonic burst. We have 2 pins (i.e. Vcc and GND) for powering up the sensor and 2 pins (i.e. Trigger and Echo) for measuring the distance.
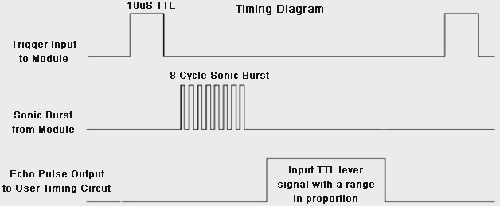
Now, let’s try to understand the working with the help of timing diagram below. At first, we need to set the Trigger pin of the ultrasonic sensor HIGH(5V) for at least 10 micro seconds(us). This will cause the sensor to send an 8-cycle ultrasonic burst at 40kHz and wait for the reflected ultrasonic burst. When the sensor detects reflected ultrasonic from the receiver, it sets the Echo pin to high (5V) and delays for a time (width) proportional to the distance. We need to measure this width of the Echo pin in time (in micro seconds) and then we will use this time to calculate the distance by using the distance formula. Here, we know the speed of the sound is 340 meter per second. This corresponds to around 29.412 microseconds per centimeter. It's a basic school math that you can do very easily. To calculate the distance in centimeter, we need to use the following formula where the units of the Distance and Time are Centimeter and Micro Seconds, respectively.
Distance = (Time/2) / 29.412
We are dividing the time taken by the echo pin by 2 because the ultrasonic wave had to covered the distance twice by travelling towards the object and reflected back to the sensor.
Connection Diagram for the Ultrasonic Sensor with the Raspberry Pi Pico
You can use the following circuit diagram to interface an Ultrasonic Sensor with the Raspberry Pi Pico board. As you can see, we have used the VBUS pin of the pico board to provide the 5V power to the Ultrasonic Sensor Module and for the OLED display module, I used the 3.3V pin of the Pico board. The trigger pin and the echo pin of the ultrasonic sensor is connected to the GPIO3 and GPIO2 respectively. The SDA and SCL pin of the OLED display module is connected to the GPIO16 and GPIO17 pins, respectively. The Ground Pin of the Ultrasonic Sensor and the OLED display module is connected to the Ground pin of the Raspberry Pi Pico board.
|
Pin of the Ultrasonic Sensor |
Pin of the Raspberry Pi Pico |
Pin of the OLED Display module |
|
VCC |
VBUS (PIN: 40) |
- |
|
Echo |
GPIO2 (PIN: 4) |
- |
|
Trigger |
GPIO3 (PIN: 5) |
- |
|
GND |
GND (PIN: 38) |
GND |
|
- |
3.3v (PIN: 36) |
VCC |
|
- |
GPIO16 (PIN: 21) |
SDA |
|
- |
GPIO17 (PIN: 22) |
SCL |

Programming Raspberry Pi Pico using MicroPython
At first, download the code files form our GitHub repository on Raspberry Pi Pico. Then open the “T4_Interfacing_HC-SR04_Ultrasonic_sensor” folder. This folder contains two subfolders - “codes” and “images”. In the “codes” folder, we have two python files. i.e. main.py and ssd1306.py.
Inside the main.py we have the machine.py library and the ssd1306.py library. Machine library is the built-in MicroPython library which has the functions for the basic operations like I2C, ADC, SPI, etc. We will be using 3 important classes like Pin, I2C. The ssd1306.py library is used for the OLED display. We have already discussed about this library in our previous tutorial on how to interface the OLED display module with the Raspberry Pi Pico. The utime.py library is used to give time delays in the program.
from machine import Pin, I2C
from ssd1306 import SSD1306_I2C
import utime
The “trigger” and “echo” variable is used as an object for the respective pin functions. The trigger pin is the pin that is connected to the GPIO 3 of the pico board, is set as OUTPUT by using the pin.OUT, whereas the echo pin is set as INPUT by using the pin.INPUT.
trigger = Pin(3, Pin.OUT)
echo = Pin(2, Pin.IN)
The ultrasonic() function can be used to calculate the response time of the echo pin of the ultrasonic sensor. Inside the function, the trigger pin is set to LOW. I have provided a delay of 2 micro seconds and I set the trigger pin HIGH for 10 microseconds. Then I turned it LOW again. Thereafter, I captured the difference of the signalon and signaloff variable which were used to store the time when echo pin is HIGH and LOW, respectively. I used the timepassed variable to return the difference of the both signalon and signaloff variable.
def ultrasonic():
    timepassed=0
    trigger.low()
    utime.sleep_us(2)
    trigger.high()
    utime.sleep_us(5)
    trigger.low()
    while echo.value() == 0:
        signaloff = utime.ticks_us()
    while echo.value() == 1:
        signalon = utime.ticks_us()
    timepassed = signalon - signaloff
    return timepassed
We have discussed on how to display a text on OLED display in our previous tutorials. The code given below is used to initialize the I2C communication and the OLED display. You can refer to our “ADC on Raspberry Pi Pico Using MicroPython” tutorial to understand about the code below.
WIDTH  = 128                                          # oled display width
HEIGHT = 64                                            # oled display height
i2c = I2C(0, scl=Pin(17), sda=Pin(16), freq=200000)       # Init I2C using pins GP8 & GP9 (default I2C0 pins)
print("I2C Address      : "+hex(i2c.scan()[0]).upper()) # Display device address
print("I2C Configuration: "+str(i2c))                   # Display I2C config
oled = SSD1306_I2C(WIDTH, HEIGHT, i2c)                  # Init oled display
The oled.fill(0) method is used to clear the OLED display screen in the following code. Then, using the oled.text() function, we show some text at the corresponding place. Those messages will be shown on the OLED display using the oled.show() method. Then utime.sleep(4) is used to provide delay of 4 seconds.
oled.fill(0)
# Add some text
oled.text("CIRCUIT DIGEST",5,8)
oled.text("INTERFACING THE",5,30)
oled.text("ULTRASONNIC",28,40)
oled.text("SENSOR",50,50)
# Finally update the oled display so the image & text is displayed
oled.show()
utime.sleep(4)
In the while loop below, you can find that the ultrasonic() function is being called to return the response time in between a trigger pulse and an echo pulse. Then distance_cm variable is used to calculate the distance by using the distance formula. The round() function is used to fix the decimal places of the measured distance up to 2nd decimal places. Then the distance is being displayed on the OLED display by using oled.text() function.
while True:
    oled.fill(0)
    measured_time = ultrasonic()
    distance_cm = (measured_time * 0.0343) / 2
    distance_cm = round(distance_cm,2)
    oled.text("ObjectDistance:",0,8)
    oled.text(">> "+str(distance_cm)+" cm",2,25)
    oled.show()
    utime.sleep(1)
Open the “main.py” and “ssd1306.py” files in the Thonny IDE. To begin, click the “ctrl+shift+s” buttons on your keyboard to save the “ssd1306.py” file on the Pico board. Make sure your Pico board is connected to your laptop before saving the data. When you save the code, a popup window, like below, will open. You must first choose the Raspberry Pi Pico, then save the code as "ssd1306.py". Repeat the process for the “main.py” file. This technique allows you to run the software whenever you switch on the Pico.

In the video below, we have used MicroPython in the Raspberry Pi Pico to show the measured distance of an item on the OLED display module. Also, the entire coding process is explained in depth.
Complete Project Code
from machine import Pin, I2C

from ssd1306 import SSD1306_I2C

import utime

trigger = Pin(3, Pin.OUT)

echo = Pin(2, Pin.IN)

def ultrasonnic():

    timepassed=0

    trigger.low()

    utime.sleep_us(2)

    trigger.high()

    utime.sleep_us(5)

    trigger.low()

    while echo.value() == 0:

        signaloff = utime.ticks_us()

    while echo.value() == 1:

        signalon = utime.ticks_us()

    timepassed = signalon - signaloff

    return timepassed

WIDTH  = 128                                            # oled display width

HEIGHT = 64                                            # oled display height

i2c = I2C(0, scl=Pin(17), sda=Pin(16), freq=200000)       # Init I2C using pins GP8 & GP9 (default I2C0 pins)

print("I2C Address      : "+hex(i2c.scan()[0]).upper()) # Display device address

print("I2C Configuration: "+str(i2c))                   # Display I2C config

oled = SSD1306_I2C(WIDTH, HEIGHT, i2c)                  # Init oled display

 # Clear the oled display in case it has junk on it.

oled.fill(0)

# Add some text

oled.text("CIRCUIT DIGEST",5,8)

oled.text("INTERFACING THE",5,30)

oled.text("ULTRASONNIC",28,40)

oled.text("SENSOR",50,50)

# Finally update the oled display so the image & text is displayed

oled.show()

utime.sleep(4)

while True:

    oled.fill(0)

    measured_time = ultrasonnic()

    distance_cm = (measured_time * 0.0343) / 2

    distance_cm = round(distance_cm,2)

    oled.text("<ObjectDistance>",0,8)

    oled.text(">> "+str(distance_cm)+" cm",2,25)

    oled.show()

    utime.sleep(1)
