
This project is the perfect combination of my hobby and my profession. I am an electronics hobbyist and professional automation engineer at Adani Port(Dahej). I used to make Arduino and raspberry pi for home automation and for fun & learning new technology. We have installed 1MW on-grid roof top solar power plant at my company. Plant is installed at three different locations having 4 km distance each. After installation of plant we have started daily monitoring of Plant to calculate daily generation. We started facing problems mentioned below
- Our team struggling to monitor all inverters as those are installed at various location.
- During tripping of grid side power breaker whole system stop generating energy and we are not getting any information about it until next reading was taken. We have to travel a lot to take readings.
- Team needs to climb on the roof for checking whether cleaning is required or not which is unsafe.
- We didn’t get information of single or multiple inverter tripping which creates a loss of energy.
- Monitoring system suggested by OEM is also possible to implement as it’s based on the internet only and we are not interested to post our data on cloud server. After facing lots of problems I decided to use My Hobbyist skills to solve this problem.
I came up with ESP8266 based data logger system which provides wireless connectivity that suits our plant location. In this project I have learned about Modbus protocol decoding, electronic designing, Programming, Wi-Fi, Fibre and Ethernet Network designing & dashboard designing etc. System which I have implemented is not only data logger but its whole solution including data archiving, Data visualizing, Historical data monitoring, alarm generating and cloud monitoring. We have run this system for a couple of months and this system solves all problems we faced. Main benefit of this project is we get live notification in case any inverter is not working. We decide when and where we have to clean panels for maximum utilization of plant using historical data.
You can also check our other Power Electronics based Projects and Solar power projects by following the links.
Component Required for ESP8266 Solar Plant
Project Used Hardware
- ESP12F,
- 485-TTL,
- 3.3V REGULATOR,
- AIRLIVE WIFI GATEWAY,
- D-LINK FO-TCP MEDIA CONVERTER,
- D-LINK ETHERNET SWITCH,
- DESKTOP PC
Project Used Software
- ARDUINO IDE,
- OPENHAB,
- MOSQUITTO,
- INFLUXDB,
- GRAFANA,
- KEPWARE
Project Hardware Software Selection
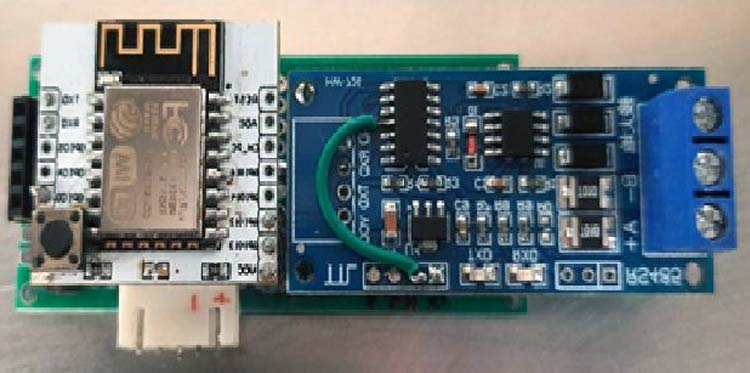
ESP12F:- Used as wifi gateway which reads data from inverter using Modbus protocol and converts data into JSON string and sends data to the server using MQTT protocol.
485-TTL Converter:- ESP12f work on TTL logic level but Goodwe make inverter provides data with RS485 standard. to convert data from 485 to TTL i have used this device.
Desktop PC with Ubuntu:- I have chosen Openhab as server which runs on Linux. I have used an old desktop pc and installed Ubuntu on it. This PC runs all necessary software required for data gathering, archiving & for User interface for live as well historical data monitoring.
Airlive make WIFI Router:- These routers are acting as AP on which all ESP12f module connects. This AP is also connected with an Ethernet switch for server side connectivity.
D-Link make Ethernet-Fiber converter:- This device converts Ethernet to Fiber. I have used a fiber network for server connectivity as the distance from the plant to control room is about 4 km. and fiber cables are already available at all location previously.
D-Link Ethernet Switch: - used to connect Openhab server to ESP12f for data gathering and also provide connectivity with WINCC (SCADA) and all other client PC.
Arduino IDE:- Used for programming ESP12f Module.
Mosquitto Broker:- This software is MQTT broker & installed on Ubuntu PC. ESP12f and Openhab connect and share data using MQTT broker only.
Openhab3.1:- This is main server installed on Ubuntu PC it provides interactive web based user interfaces. it reads data from ESP12 module using MQTT protocol. Parse json string and store each data in to respective items (Tags). Openhab host web server, user can monitor live data as well historical data by opening webpage. Openhab provide connectivity with influxdb for data archiving.
Influxdb:- Influx DB installed on Ubuntu PC. it is used as archiving server. Openhab connects with influxdb and store all data in to influxdb.
Grafana:- Grafana is installed on Ubuntu PC. Grafana is used to monitor historical data from archive server which is influxdb in my case. Grafana connects with influx db and we can develop dashboards for data monitoring. It also provides live data monitoring as well notification generation.
Kepware:- Kepware is used to share data with WinCC Scada. WinCC is already used in our plant for centralised monitoring. WinCC is Industrial application known as SCADA. WinCC is used to control our plant. i have interface Solar monitoring system with WinCC as proof of concept only.
Arduino ModbusRTU library: - This library is used to for to read data from modbus clients. ESP12f act as modbus master.
Arduino Json Library:- This library used to convert all data in to single json string which is further send to server using mqtt protocol.
Arduino Pubsub Library:- This library is used to establish a connection between ESP12f and MQTT broker.
Arduino ESPAsyncWebServer:- This library is used to create a diagnostic webpage for ESP12F. ESP act as webserver and host diagnostics webpage showing wifi and MQTT connectivity and display local IP.
Arduino OTA:- This library is used to provide OTA Over to Air feature to ESP12F. I used this library to provide over to air firmware update feature.
Arduino ESP8266WiFi:- This library provides Wifi functionality to ESP12F.
Circuit Diagram

Circuit designed using EasyEda. as fewer componants are used I make the final pcb using perf board.
Complete Project Code
#include "ESPAsyncWebServer.h"
#include <WiFiUdp.h>
#include <ModbusRTU.h>
#include <SoftwareSerial.h>
#include <ArduinoJson.h>
#include <ESP8266WiFi.h>
#include <PubSubClient.h>
#include <ESP8266mDNS.h>
#include <WiFiUdp.h>
#include <ArduinoOTA.h>

uint16_t Mread[20];
uint16_t Mread1[1];
int Call_Stp = 1;
int Slave_ID = 1;

ModbusRTU mb;
WiFiClient Goodwe_MT;
PubSubClient client(Goodwe_MT);
#define MQTT_MAX_PACKET_SIZE 512

#include "Settings.h"
#include "IntToFloat.h"
#include "Data_Structure.h"
#include "Webpage.h"
#include "WebserverSetup.h"
#include "MoveData.h"
#include "Modbus_callback.h"
#include "JsonPack.h"
#include "Modbus_Slave_Query.h"
#include "MQTT.h"
#include "WIFISet.h"
#include "OTA.h"

SoftwareSerial S(Rx, Tx);

void setup() {
  Serial.begin(115200);
  Serial.println();
  pinMode(LED, OUTPUT);
  digitalWrite(LED, HIGH);
  S.begin(9600, SWSERIAL_8N1);
  Slave_ID = Start_ID;
  mb.begin(&S, DE_RE);
  mb.master();
  if (MQTT_Enable) {
    setup_wifi();
    asynkweb_setup();
    client.setServer(mqtt_server, 1883);
    client.setCallback(callback);
    String MQTT_Topic_s = MQTT_Topic;
    MQTT_Topic_s = MQTT_Topic_s + "-%ld";
    MQTT_Topic_s.toCharArray(MQTT_Topic, (MQTT_Topic_s.length() + 1));
    Serial.println((MQTT_Topic_s.length() + 1));
  }
  otasetup();
}
void loop() {
  ArduinoOTA.handle();
  if (millis() - LastScan > Interval) {
    MBslaveQuery(Slave_ID);
    ArduinoOTA.handle();
  }
  if (MQTT_Enable) {
    if (!client.connected()) {
      long now = millis();
      if (now - lastReconnectAttempt > MQTT_Re_Connect_Interval) {
        lastReconnectAttempt = now;
        if (reconnect()) {
          lastReconnectAttempt = 0;
        }
      }
    }
    else client.loop();
  }
  mb.task();
  yield();
}
