 Programming In Arduino IDE")
OTA (Over the Air) Programming is a feature of any WiFi-enabled microcontroller like ESP32 and ESP8266 that allows these devices to upgrade their firmware or software wirelessly without any physical access. This feature can be used to reprogram the devices that are fixed on a roof or any other place where connecting cable is difficult. Using OTA, you can send an update to multiple microcontrollers or devices that are on the same network. For example, this feature can be used to send updates for resolving the bugs, adding some features, etc. to multiple microcontrollers, cellphones, computers, set-top boxes, etc. The OTA updates are also playing an important role in IoT. It is used for remotely updating internet-connected devices with new settings, software, and firmware.
We previously learned to program ESP8266 NodeMCU using OTA. In this tutorial, we are going to use over-the-air (OTA) programming with the ESP32 using the OTA Web Updater in Arduino IDE.
Components Required
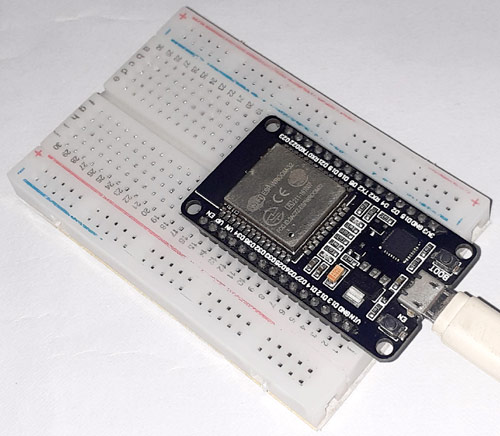
- ESP32
- Arduino IDE
How does OTA Programming Work?
To use the Over the Air (OTA) programming feature, first, you need to upload a sketch via serial port. This sketch contains the HTML code to create an OTA Web Updater so that you can upload code later using the browser. When the code is uploaded via serial port, it creates a web server where you can choose and upload a new sketch via a web browser.
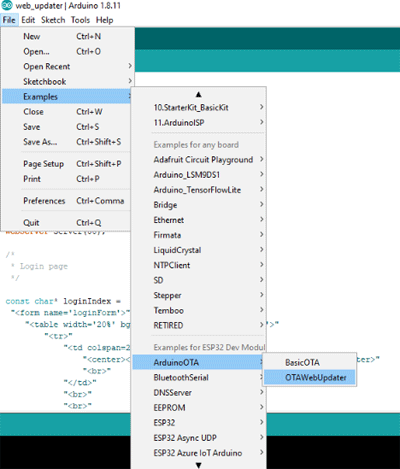
To upload the first code, connect the ESP32 to the laptop and open the Arduino IDE, select the Board Type as ESP32 Dev Kit, and select the correct serial port.
Then go to File > Examples >ArduinoOTA> OTAWebUpdater
Change the Wi-Fi name and password in the original code.
const char* ssid = "Your WiFi Name";
const char* password = "Password";
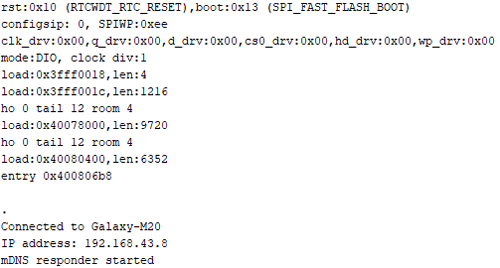
Upload the code to your ESP32 board. After uploading the code successfully, open serial monitor. Change the Baud Rate of 115200 on Serial Monitor and press the Reset button on ESP32 and it should print the ESP32 IP Address.
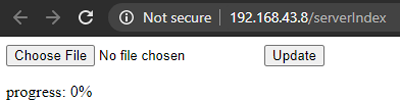
Now open the default browser and paste the ESP32 IP Address. It should open the Web server for Over the Air programming as shown in below image:
Default Username and Password is admin.

Then enter the username and password and click on the login page, a new tab opens. This is where you can upload the code.
Here we are going to upload a simple LED blinking code. Every code that you upload over the air should have an OTA code in it. So add the blink part in the original OTA code. The complete code is given at the end of the page.
void loop(void) {
  server.handleClient();
  delay(1);
  digitalWrite(led, HIGH);
  delay(600);
  digitalWrite(led, LOW);
  delay(600);
 }
Save your code with a new name and then go to Sketch > Export compiled Binary. This will create a new .bin file in your sketch folder.

Now go to the OTA web page and then click on the ‘Choose File’ button and select the .bin file. After this, click on the ‘Update’ button to upload the sketch.
This is how ESP32 can be programmed using OTA without using serial communication.
Complete Project Code
#include <WiFi.h>
#include <WiFiClient.h>
#include <WebServer.h>
#include <ESPmDNS.h>
#include <Update.h>
const char* host = "esp32";
const char* ssid = "Galaxy-M20";
const char* password = "ac312129";
//variabls to blink without delay:
const int led = 2;
WebServer server(80);

/*
 * Login page
 */
const char* loginIndex =
 "<form name='loginForm'>"
    "<table width='20%' bgcolor='A09F9F' align='center'>"
        "<tr>"
            "<td colspan=2>"
                "<center><font size=4><b>ESP32 Login Page</b></font></center>"
                "<br>"
            "</td>"
            "<br>"
            "<br>"
        "</tr>"
        "<td>Username:</td>"
        "<td><input type='text' size=25 name='userid'><br></td>"
        "</tr>"
        "<br>"
        "<br>"
        "<tr>"
            "<td>Password:</td>"
            "<td><input type='Password' size=25 name='pwd'><br></td>"
            "<br>"
            "<br>"
        "</tr>"
        "<tr>"
            "<td><input type='submit' onclick='check(this.form)' value='Login'></td>"
        "</tr>"
    "</table>"
"</form>"
"<script>"
    "function check(form)"
    "{"
    "if(form.userid.value=='admin' && form.pwd.value=='admin')"
    "{"
    "window.open('/serverIndex')"
    "}"
    "else"
    "{"
    " alert('Error Password or Username')/*displays error message*/"
    "}"
    "}"
"</script>";
/*
 * Server Index Page
 */
const char* serverIndex =
"<script src='https://ajax.googleapis.com/ajax/libs/jquery/3.2.1/jquery.min.js'></script>"
"<form method='POST' action='#' enctype='multipart/form-data' id='upload_form'>"
   "<input type='file' name='update'>"
        "<input type='submit' value='Update'>"
    "</form>"
 "<div id='prg'>progress: 0%</div>"
 "<script>"
  "$('form').submit(function(e){"
  "e.preventDefault();"
  "var form = $('#upload_form')[0];"
  "var data = new FormData(form);"
  " $.ajax({"
  "url: '/update',"
  "type: 'POST',"
  "data: data,"
  "contentType: false,"
  "processData:false,"
  "xhr: function() {"
  "var xhr = new window.XMLHttpRequest();"
  "xhr.upload.addEventListener('progress', function(evt) {"
  "if (evt.lengthComputable) {"
  "var per = evt.loaded / evt.total;"
  "$('#prg').html('progress: ' + Math.round(per*100) + '%');"
  "}"
  "}, false);"
  "return xhr;"
  "},"
  "success:function(d, s) {"
  "console.log('success!')"
 "},"
 "error: function (a, b, c) {"
 "}"
 "});"
 "});"
 "</script>";
/*
 * setup function
 */
void setup(void) {
  pinMode(led, OUTPUT);
  Serial.begin(115200);
  // Connect to WiFi network
  WiFi.begin(ssid, password);
  Serial.println("");
  // Wait for connection
  while (WiFi.status() != WL_CONNECTED) {
    delay(500);
    Serial.print(".");
  }
  Serial.println("");
  Serial.print("Connected to ");
  Serial.println(ssid);
  Serial.print("IP address: ");
  Serial.println(WiFi.localIP());
  /*use mdns for host name resolution*/
  if (!MDNS.begin(host)) { //http://esp32.local
    Serial.println("Error setting up MDNS responder!");
    while (1) {
      delay(1000);
    }
  }
  Serial.println("mDNS responder started");
  /*return index page which is stored in serverIndex */
  server.on("/", HTTP_GET, []() {
    server.sendHeader("Connection", "close");
    server.send(200, "text/html", loginIndex);
  });
  server.on("/serverIndex", HTTP_GET, []() {
    server.sendHeader("Connection", "close");
    server.send(200, "text/html", serverIndex);
  });
  /*handling uploading firmware file */
  server.on("/update", HTTP_POST, []() {
    server.sendHeader("Connection", "close");
    server.send(200, "text/plain", (Update.hasError()) ? "FAIL" : "OK");
    ESP.restart();
  }, []() {
    HTTPUpload& upload = server.upload();
    if (upload.status == UPLOAD_FILE_START) {
      Serial.printf("Update: %s\n", upload.filename.c_str());
      if (!Update.begin(UPDATE_SIZE_UNKNOWN)) { //start with max available size
        Update.printError(Serial);
      }
    } else if (upload.status == UPLOAD_FILE_WRITE) {
      /* flashing firmware to ESP*/
      if (Update.write(upload.buf, upload.currentSize) != upload.currentSize) {
        Update.printError(Serial);
      }
    } else if (upload.status == UPLOAD_FILE_END) {
      if (Update.end(true)) { //true to set the size to the current progress
        Serial.printf("Update Success: %u\nRebooting...\n", upload.totalSize);
      } else {
        Update.printError(Serial);
      }
    }
  });
  server.begin();
}
void loop(void) {
  server.handleClient();
  delay(1);
  digitalWrite(led, HIGH);
  delay(600);
  digitalWrite(led, LOW);
  delay(600);
 }
Superb...