I got the inspiration to make this thing after the apple event of 23 April 2021 in which apple company launched one of their product which is named as AirTag. When it was launched, after that I searched about it on the internet and I came to know that it is a button like a device under which you can find your keys or your kinds of stuff and you can also keep it in your wallet or purse as a key ring and as a coin. After that, I searched more about it, and on searching, I came to know that when we click on the play sound button, it produces a sound due to which we find that lost thing. So after that, I thought why not make it from NodeMCU. So then I worked on it and I succeeded in it too.
I choose NodeMCU ESP8266 Board to make Airtag. You can also check our previously built ESP8266 projects,
- How not to Build a POV Display Using WS2812B Neopixel LEDs and ESP8266
- Self Watering Smart Pot Using NodeMCU
- Blynk Controlled Automatic Pet Feeder with Timer
- Never Loose your keys again with this IoT Based Smart Key Finder
And now I want to tell you all how I made this. So here we go then,
Step1:- So as you have seen what is needed to make it, I will tell you once again. So first you need NodeMCU Esp8266 Board. Now some of you might be thinking that why only NodeMCU because it already has Wi-Fi module, so then you need Piezo Buzzer Jumper Wires (breadboard) it is optional if you want, you can use it otherwise you can also do soldering.
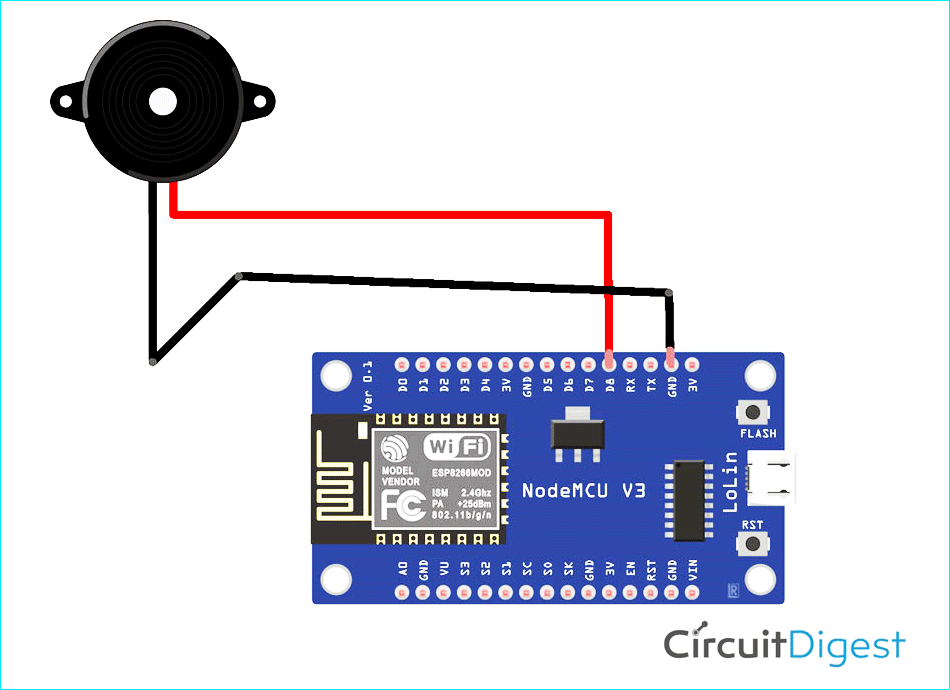
Step2:- Now we will see how to connect it, So the negative wire of the buzzer will go to the GND pin and the positive wire will go to the D8 pin you can use any data pin. just change the pin number in the code.
Step3:- Now you have to download the Blynk App So Blynk was designed for the Internet of Things. It can control hardware remotely, it can display sensor data, it can store data, visualize it, and do many other cool things.
Step4:- After Downloading the Blynk app all you need is to login to the app via Google or Facebook or you can also create an account on that platform
Step5:- After that click on a new project then a pop menu will appear And it will be written that the auth token has been sent to your email id.
Step6:- You have to paste that to your code in the auth part
Step7:- Now in the app as So when you click on a new project on your app one more thing will ask in which you have to select your board as well as connectivity you have to keep nodemcu in board and Wi-Fi in connectivity
Step8:- Then you have to swipe the screen from right to left, a menu will appear, in that you will get different widgets, you have to choose the button from them.
Step9:- Now tap the button you have added once, in that you have to select the pin of the button in which your buzzer is connected, you will see the pin part in the output section, after that you have to select "switch" instead of "Push" and keep one thing in mind that while selecting the pin Let it be digital, don't change it and if you want, you can also change the name of the button.
Step10:- Upload the code to NodeMCU make sure you have entered your SSID which name of your Wi-Fi and Password of your hotspot and also add your Auth Token After that click on the play icon if there is any exclamation like that it means your Board is not connected so for that check it once
Step11:- After all these things now connect your AirTag with any object you can also call it Mini tag as it is my version

Component Required for Creating AirTag
Project Used Hardware
- NodeMCU,
- Piezo Buzzer
Project Used Software
- Arduino IDE,
- Blynk
Project Hardware Software Selection
I have used NodeMCU because NodeMCU is an open-source platform based on ESP8266 which can connect objects and let data transfer using the Wi-Fi protocol. and I have used MLX90614 Infrared Temperature Sensor because it is a very low-cost sensor having a range of up to 5cm. And apart from this, I have used Arduino IDE because It is used to write and admin/admin/upload programs to Arduino compatible boards, but also, with the help of third-party cores, other vendor development boards. and Blynk because Blynk is the most popular IoT platform to connect your devices to the cloud. It is well-known for allowing users to design apps to control their IoT devices, analyze telemetry data, and manage your deployed products at scale.
AirTag Circuit Diagram
Complete Project Code
#define BLYNK_PRINT Serial
#include <ESP8266WiFi.h>
#include <BlynkSimpleEsp8266.h>
// You should get Auth Token in the Blynk App.
// Go to the Project Settings (nut icon).
char auth[] = "YourAuthToken";
// Your WiFi credentials.
// Set password to "" for open networks.
char ssid[] = "YourNetworkName";
char pass[] = "YourPassword";
void setup()
{
  // Debug console
  Serial.begin(9600);
  Blynk.begin(auth, ssid, pass);
  // You can also specify server:
  //Blynk.begin(auth, ssid, pass, "blynk-cloud.com", 80);
  //Blynk.begin(auth, ssid, pass, IPAddress(192,168,1,100), 8080);
}
void loop()
{
  Blynk.run();
}


