
In this project, we are going to build a Lane Detection Car using Raspberry Pi and OpenCV. Before proceeding with this project, make sure that you have a basic idea of how to use OpenCV using python in Raspberry Pi. The lane detection problem is typically framed as a semantic or instance segmentation problem to identify the pixels that belong to the lane class. We need some image processing techniques to implement lane detection on the Raspberry Pi. The OpenCV library has the required image processing techniques to perform lane detection. As the project is really big, I have decided to divide it into two parts. In this part, we will assemble the hardware and take the first drive of our car. You need to follow the steps which are mentioned below. Discover practical AI projects and tutorials designed to help beginners and makers build real-world artificial intelligence applications.
Steps required to make an Autonomous Lane Detection Car
I have divided the whole process into some easy steps that are mentioned below. In this part, we are going to work with the first four steps to drive our car. You need to go through every step very carefully because this seems to be easy while reading the steps but when you will implement those steps in a practical scenario, you will definitely be going to face some issues.
PART 1
- Hardware assembly
- Installing the prerequisite software
- Preparing the Driving Code
- First Test Drive
PART 2
- Detecting lane lines using OpenCV
- Calibrating the Motors with the Lane Detection
- Final Test Drive
So these are the steps you need to follow. Let’s discuss every step one by one. I hope you will not jump any step because it is required to follow every step very carefully. Before getting started with this section, make sure that you have the required components mentioned below. You can check out the Part 2 here.
Components required to make an Autonomous Lane Detection Car
To build the autonomous Lane detection car, make sure you have the following components.
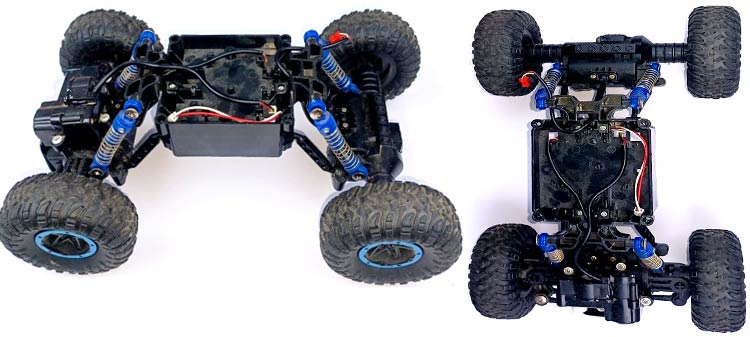
Car Chassis
I used my RC car which I purchased from Amazon. It has 3 DC motors (2 for throttling and 1 for steering). But this car cannot steer at a specific angle like servo-steering RC Cars.

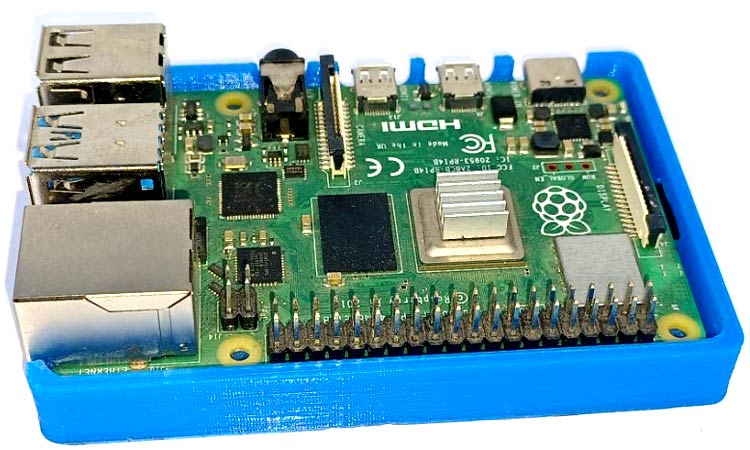
Raspberry Pi 4
I used the Raspberry Pi 4 as the main controlling unit of the car. You can use the Raspberry Pi 3 b+ but it may have some frame lagging issues.
Raspberry Pi Camera Module
It can record in 1080p at 30 frames per second, 720p at 60 frames per second, and 640x480p at 60/90 frames per second. Although it is not the ideal solution for image processing applications, it is enough for our purpose and is relatively inexpensive.

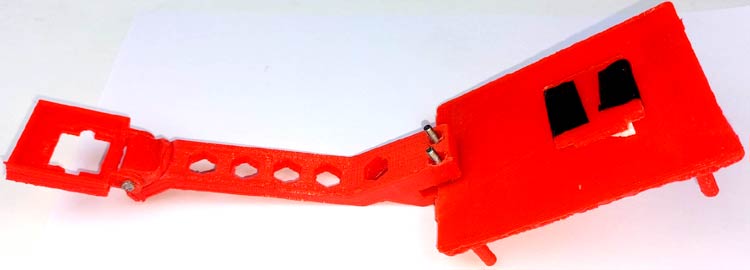
Camera Mounting Stand
I used a mounting stand because it is required to keep the Raspberry Pi camera at a precise angle to get a proper video feed of the complete track. I created a 3D model of the stand by using the 3D printer.
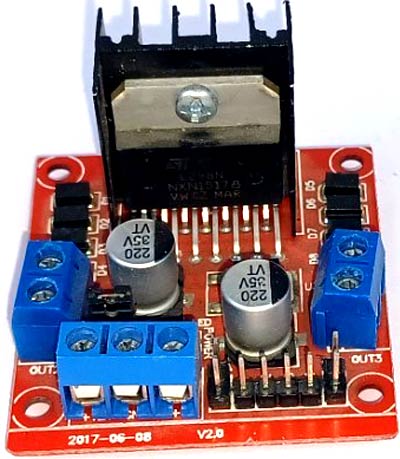
Motor Driver
I have used the L298N motor driver in this project which is utilized to regulate DC motors' directions and speeds. It can operate two DC motors on a single board and can sustain 1.5A of current.
Power Bank
I have used a power bank to power up our Raspberry Pi. If you don’t have a power bank then you can use a 5V battery or you can build a power circuit to convert voltage into 5V with 2.2A current.
18650 2S Battery Pack
To power up our motor driver (L298N), I used 18650 2 Cell battery pack with a voltage of up to 7.4 Volts. Lithium-ion batteries are well-known for their outstanding performance in the realm of robotics and are utilized to supply electricity to the motor driver.
Black Chart Paper and White Tape
I used some black chart paper and white tape to prepare the track. Make sure that you are using the same technique to make the track because it will impact our Lane detection algorithm.
So, these all are the primary components to make your Lane detection Car. I am assuming that you have the common components like connecting wires, screw drivers, etc. which are required in almost every electronics project. Now, let’s understand the steps to make our Lane Detection Car.
Hardware Assembling of Autonomous Lane Detection Car
You need to prepare your car chassis. In my case, I used the RC car so I removed the circuitry, battery pack, and the upper header of the car as you can see in the image below.
Then I designed a mounting stand for the Raspberry Pi 4 in the Fusion 360. And I have already downloaded a mounting stand for the Raspberry Pi camera module. Then I set up the 3D printer to print both of the mounting stands one by one. It took me more than 3 hours to print both stands. In your case, it might be different.
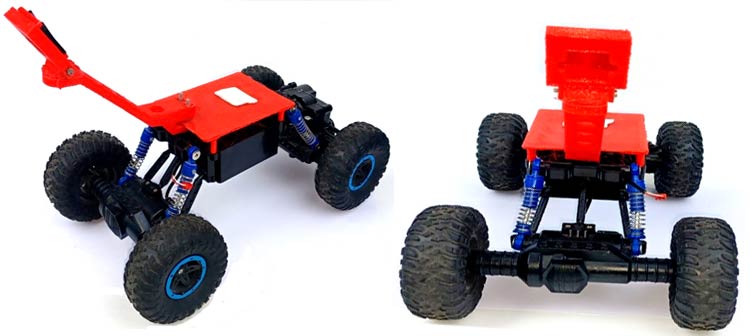
Meanwhile, I have made the wiring connections between the three motors, the motor driver, and the Raspberry Pi 4. The connection is so simple. You can refer to the schematic and images below to make the wiring connection. Make sure that you have properly connected the motors that are used for the throttle with the one side of the motor driver and the motor that is used for the steering is connected to the opposite terminal of the motor driver.

Installing OpenCV on Raspberry Pi 4
Now you need to install the required libraries. I am assuming that you know the basic setup for the Raspberry Pi 4. You can follow the Raspberry Pi tutorials on our website. Before installing the OpenCV and other dependencies, Raspberry Pi needs to be fully updated. Use the below commands to update the Raspberry Pi to its latest version:
sudo apt-get update
Then use the following commands to install the required dependencies for installing OpenCV on your Raspberry Pi.
sudo apt-get install libhdf5-dev -y
sudo apt-get install libhdf5-serial-dev –y
sudo apt-get install libatlas-base-dev –y
sudo apt-get install libjasper-dev -y
sudo apt-get install libqtgui4 –y
sudo apt-get install libqt4-test –y
After that, use the command given below to install the OpenCV on your Raspberry Pi.
pip3 install opencv-contrib-python==4.1.0.25
Preparing the Driving Code
You can download the code from our Autonomous Car Github repository. There are three files under the folder named “Lane Detection”. In this part, we will be focusing on the “motors.py”, “keyboardmodule.py”, and the “testdrivemodule.py” files. By using these three files we control our car with keyboard inputs.
“motors.py” file
In the motors.py file, you will find all functions to control the motor directions and drive the motors forward or backward. We have imported the RPi.GPIO as GPIO to control the GPIO pins of the Raspberry Pi 4.
import RPi.GPIO as GPIO
from time import sleep
The following functions are used to drive the car into the “forward”, “Backward”, “forward left”, “forward right”, “backward right”, “backward left” direction. The stop function can be used to stop the car.
def frontmiddle():
    GPIO.output(in3, GPIO.LOW)
    GPIO.output(in4, GPIO.LOW)
def frontright():
    p2.ChangeDutyCycle(100)
    GPIO.output(in3, GPIO.LOW)
    GPIO.output(in4, GPIO.HIGH)
def frontleft():
    p2.ChangeDutyCycle(100)
    GPIO.output(in3, GPIO.HIGH)
    GPIO.output(in4, GPIO.LOW)
def forward(speed=50,time=0):
    p1.ChangeDutyCycle(speed)
    GPIO.output(in1, GPIO.HIGH)
    GPIO.output(in2, GPIO.LOW)
    frontmiddle()
    sleep(time)
def backward(speed=50,time=0):
    p1.ChangeDutyCycle(speed)
    GPIO.output(in1, GPIO.LOW)
    GPIO.output(in2, GPIO.HIGH)
    frontmiddle()
    sleep(time)
def stop(time=0):
    frontmiddle()
    GPIO.output(in1, GPIO.LOW)
    GPIO.output(in2, GPIO.LOW)
    sleep(time)
def fright(speed=50,time=0):
    forward(speed)
    frontright()
    sleep(time)
def fleft(speed=50,time=0):
    forward(speed)
    frontleft()
    sleep(time)
def bright(speed=50,time=0):
    backward(speed)
    frontright()
    sleep(time)
def bleft(speed=50,time=0):
    backward(speed)
    frontleft()
    sleep(time)
“keyboardmodule.py” file:
The keyboardmodule.py consists of the getKey() function to get the pressed key of the keyboard. I used the pygame library to get the pressed key of the keyboard on run time.
def getKey(keyName):
    ans= False
    running = True
    for event in pygame.event.get():  # error is here
        if event.type == pygame.QUIT:
            running = False
            pygame.quit()
    if running:
        pygame.display.flip()
    keyInput = pygame.key.get_pressed()
    myKey = getattr(pygame,'K_{}'.format(keyName))
    if keyInput[myKey]:
        ans = True
    pygame.display.update()
    return ans
“tesdrivemodule.py” file:
We need to import the motors.py and keyboardmodule.py in the testdrivemodule.py file. The km.init() is used to initialize the keyboardmodule.py. Under the following, while loop you can find the “km.getKey()” which is used to get the following ‘w’, ‘s’, ‘q’, ‘e’, ’a’ and ’d’ input keys when we will pressed those keys. And we used the following mot.forward(), mot.backward(), mot.fleft(), mot.fright(), mot.bright() and mot.bleft() for the “forward”, “backward”, “forwardleft”, “forwardright”, “bakcwardright”, “backwardleft” respectively.
import motors as mot
import keyboardmodule as km
km.init()
while True:
    if km.getKey('w'):
        print('forward')
        mot.forward(100)
    elif km.getKey('s'):
        print('backward')
        mot.backward(100)
    elif km.getKey('q'):
        print('fleft')
        mot.fleft(100)
    elif km.getKey('e'):
        print('fright')
        mot.fright(100)
    elif km.getKey('a'):
        print('bleft')
        mot.bright(100)
    elif km.getKey('d'):
        print('bright')
        mot.bleft(100)
    else:
        mot.stop(0)
Autonomous Lane Detection Car Testing
You need to upload the code to your Raspberry Pi 4. I have used the mobaxterm software to open the Raspberry Pi terminal. Then you need to run the “testdrivemodule.py” by using the following command in the terminal. Make sure that you have the “motors.py” and the “keyboardmodule.py” in the same folder.
python3 testdrivemodule.py
You can refer to the following video for more details. In the video, you can see that the car can be controlled with the keyboard keys. In the next part, we will take the video feed from the camera and prepare our Lane Detection algorithm for the video.
Complete Project Code
motors.py
#MOTOR CLASS
import RPi.GPIO as GPIO
from time import sleep
in1 = 4
in2 = 17
in3 = 18
in4 = 27
en = 22
en2 = 23
temp1 = 1
GPIO.setmode(GPIO.BCM)
GPIO.setup(in1, GPIO.OUT)
GPIO.setup(in2, GPIO.OUT)
GPIO.setup(in3, GPIO.OUT)
GPIO.setup(in4, GPIO.OUT)
GPIO.setup(en, GPIO.OUT)
GPIO.setup(en2, GPIO.OUT)
GPIO.output(in1, GPIO.LOW)
GPIO.output(in2, GPIO.LOW)
GPIO.output(in3, GPIO.LOW)
GPIO.output(in4, GPIO.LOW)
p1 = GPIO.PWM(en, 1000)
p1.start(50)
p2 = GPIO.PWM(en2, 4000)
p2.start(50)
print("r-run s-stop f-forward b-backward l-low m-medium h-high dm-frontmiddle dr-frontright dl-frontleft e-exit")
def frontmiddle():
    GPIO.output(in3, GPIO.LOW)
    GPIO.output(in4, GPIO.LOW)
def frontright():
    p2.ChangeDutyCycle(100)
    GPIO.output(in3, GPIO.LOW)
    GPIO.output(in4, GPIO.HIGH)
def frontleft():
    p2.ChangeDutyCycle(100)
    GPIO.output(in3, GPIO.HIGH)
    GPIO.output(in4, GPIO.LOW)
def forward(speed=50,time=0):
    p1.ChangeDutyCycle(speed)
    GPIO.output(in1, GPIO.HIGH)
    GPIO.output(in2, GPIO.LOW)
    frontmiddle()
    sleep(time)
def backward(speed=50,time=0):
    p1.ChangeDutyCycle(speed)
    GPIO.output(in1, GPIO.LOW)
    GPIO.output(in2, GPIO.HIGH)
    frontmiddle()
    sleep(time)
def stop(time=0):
    frontmiddle()
    GPIO.output(in1, GPIO.LOW)
    GPIO.output(in2, GPIO.LOW)
    sleep(time)
def fright(speed=50,time=0):
    forward(speed)
    frontright()
    sleep(time)
def fleft(speed=50,time=0):
    forward(speed)
    frontleft()
    sleep(time)
def bright(speed=50,time=0):
    backward(speed)
    frontright()
    sleep(time)
def bleft(speed=50,time=0):
    backward(speed)
    frontleft()
    sleep(time)keyboardmodule.py
import pygame
def init():
    pygame.init()
    win = pygame.display.set_mode((100,100))

def getKey(keyName):
    ans= False
    running = True
    for event in pygame.event.get():  # error is here
        if event.type == pygame.QUIT:
            running = False
            pygame.quit()
    if running:
        pygame.display.flip()
    keyInput = pygame.key.get_pressed()
    myKey = getattr(pygame,'K_{}'.format(keyName))
    if keyInput[myKey]:
        ans = True
    pygame.display.update()
    return ans
def main():
    if getKey('LEFT'):
        print('LEFT')
    if getKey('RIGHT'):
        print('RIGHT')
    if getKey('q'):
        pygame.quit()
if __name__ == '__main__':
    init()
    while True:
        main()tesdrivemodule.py
import motors as mot
import keyboardmodule as km
km.init()
while True:
    if km.getKey('w'):
        print('forward')
        mot.forward(100)
    elif km.getKey('s'):
        print('backward')
        mot.backward(100)
    elif km.getKey('q'):
        print('fleft')
        mot.fleft(100)
    elif km.getKey('e'):
        print('fright')
        mot.fright(100)
    elif km.getKey('a'):
        print('bleft')
        mot.bright(100)
    elif km.getKey('d'):
        print('bright')
        mot.bleft(100)
    else:
        mot.stop(0)

can you share the 3D model file for the camera stand