
Impact Statement
Traditionally a blind person uses a stick. While he is on road going from one point to another point, Determining any drain that are open or close on road. A stick cannot determine 3D object on road. Such as pedestrian detour sign, Traffic sign, Construction work sign, His gps location, the gps location of destination, the path that he needs to follow in order to reach his destination. Our product will provide him information about 3 object's on road. Such as human, cycle, car, traffic light, bike, scooter, street signs, hazard sign, pedestrian detour sign etc. Not only that the product will also provide information abovt what is the location of that object in his visual space. Such as weather the object is in left or right. It will determine weather the object is moving or not if moving which direction is it moving. Such as from right to left or from left to right. This information is provided to him in speech format. So that he can make appropriate decision while he is on road. Practical artificial intelligence projects with source code to help you understand real AI workflows.
Components Required
1)SIPEED MAIXDUINO KIT FOR RISC-V
2)camera
3)LCD
4) speaker or wired headphone
To see the full demonstration video, click on the YouTube Video below
The product has three sections
Object detection and recognition
Object processing and generating information
Converting information into text to speech.
Object detection
For object detection we are going to use Yolov5 Tiny object detection model. Before creating object detection model we need dataset for creating object detection model. Roboflow has a lot of predefined dataset which we can use for creating object detection model. We are going to use two or more dataset for creating our object detection model. What are the things that we want to detect. Following are the list of object that we want to detect
Humans
Vehicals
Animals
Traffic light
Pedestrian detour
Hazard signs
Traffic signs
Roboflow
Note:- roboflow has limitation that we cannot build dataset for more than 10,000 images weather single or merging the project.
Steps for building tiny yolo object detection model:-
Step 1:-
open google colab by clicking on the link given bellow.
https://colab.research.google.com/
Step 2:-
click on blue colour 'Sign in' button on the top right corner of the page. As shown bellow.
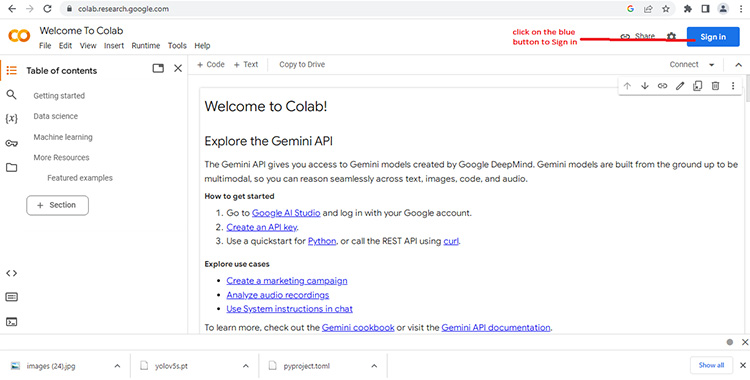
Step 3:-
After clicking on 'Sign In' button a new page will open with you google account as shown bellow.
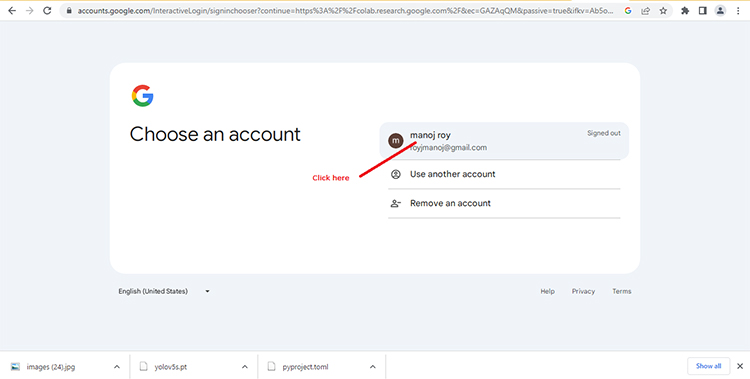
click on the button shown above to log into your account.
Step 4:-
After clicking on it. The google account will ask password as shown in image bellow.
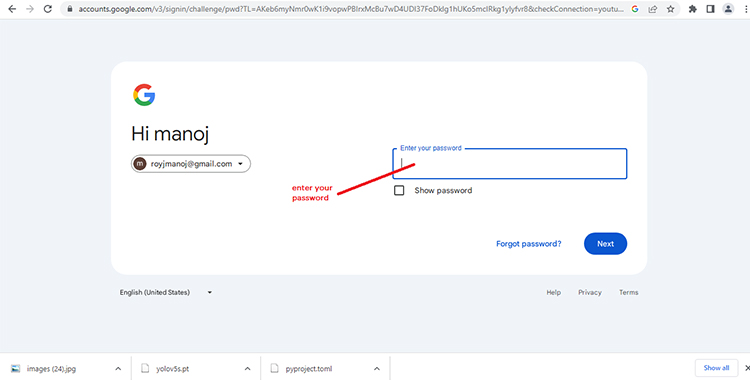
Enter your password to login to your account.
Step 5:-
A notebook window will appear as shown bellow.
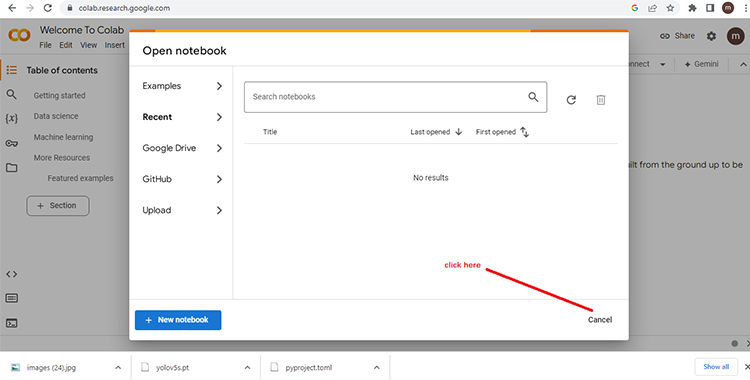
Click on cancel to get into the main window.
Step 6:-
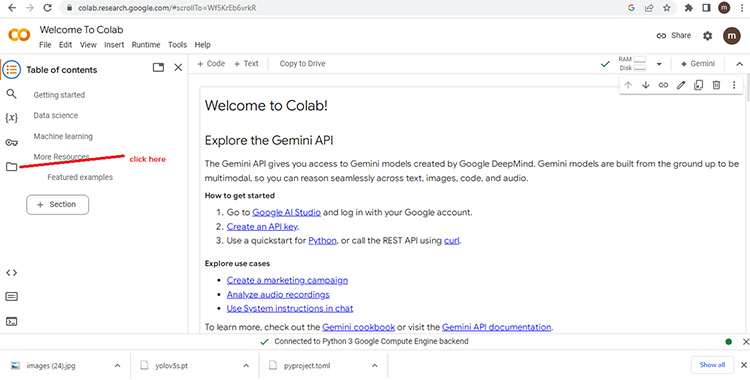
You will get a main screen. Click on folder as shown bellow.
Step 7:-
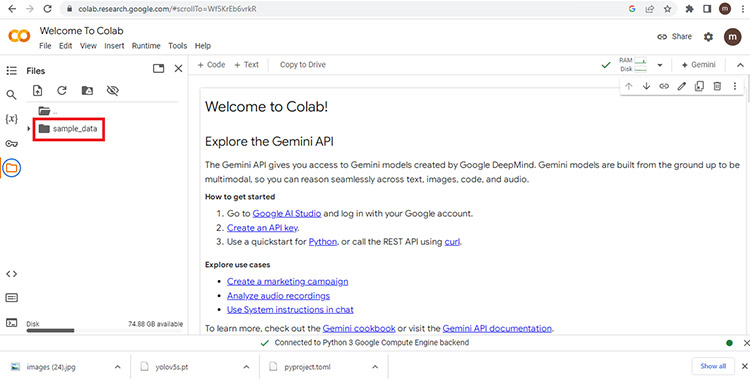
On the left hand side you will see a sample folder as shown bellow.
Step 7.1:-
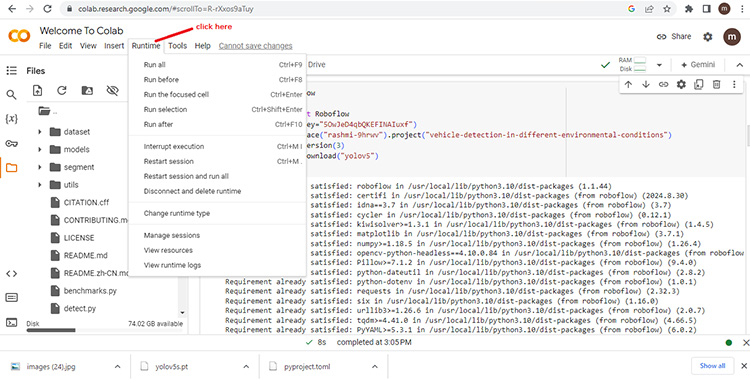
You need to change the runtime environment to GPU. To do so. Click on 'Runtime' tab as shown bellow.
Step 7.2:-
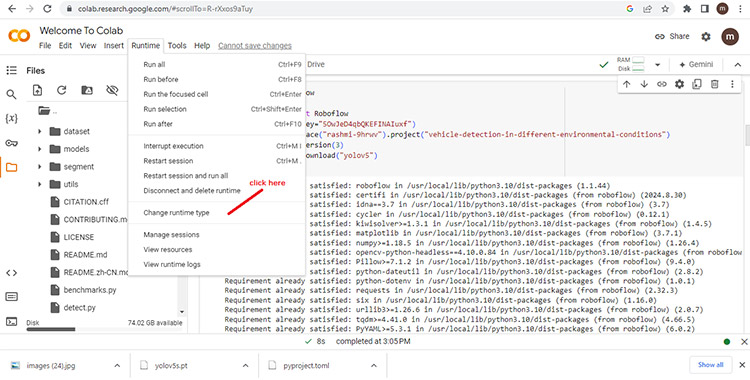
Click on 'Change runtime type' as shown bellow.
Step 7.3:-
A change runtime window will open as shown bellow.
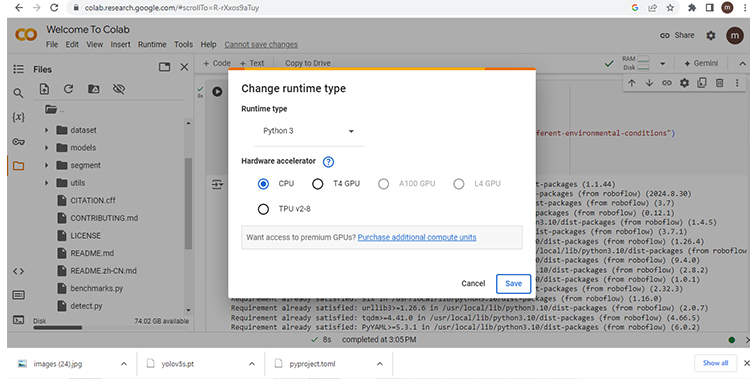
On it select T4 GPU and than click Save.
Step 8:-
The environment is a python environment running on linux os. Know you need to clone yolov5 repository from github in this enviornment. To do so click on '+code' button as shown bellow.
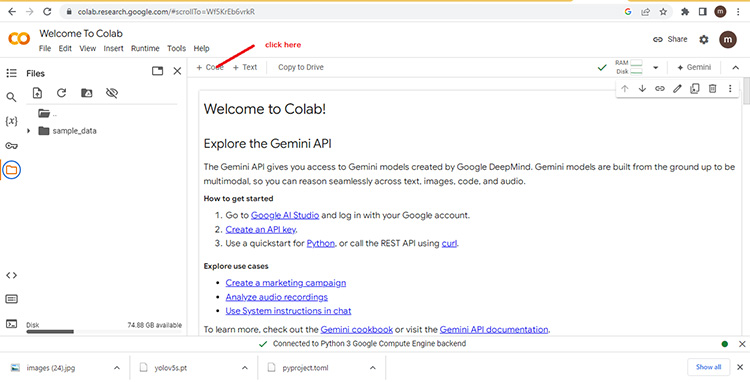
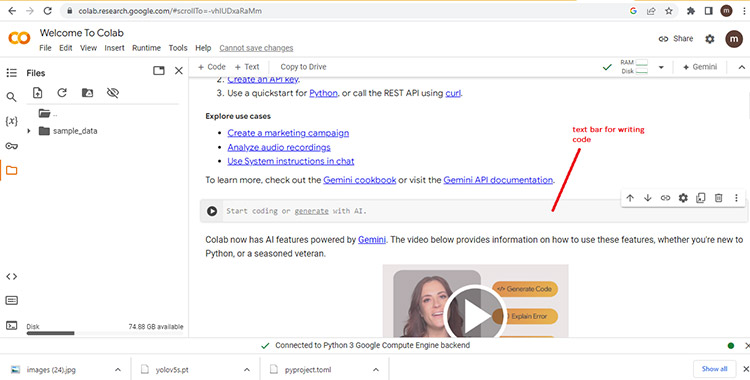
Step 9:-
After clicking on it you will get the following text bar as shown bellow. In this text bar you can execute your code.
Step 10:-
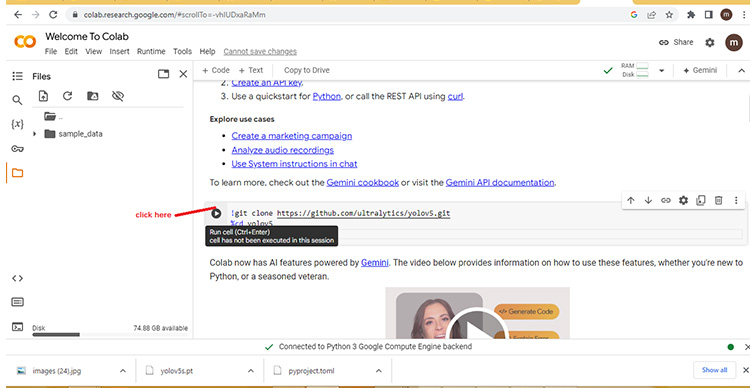
Write the following code on the text bar to clone yolov5 GitHub repo.
!git clone https://github.com/ultralytics/yolov5.git
%cd yolov5
and than click on play button as shown bellow
Step 11:-
Click on refresh button as shown bellow.
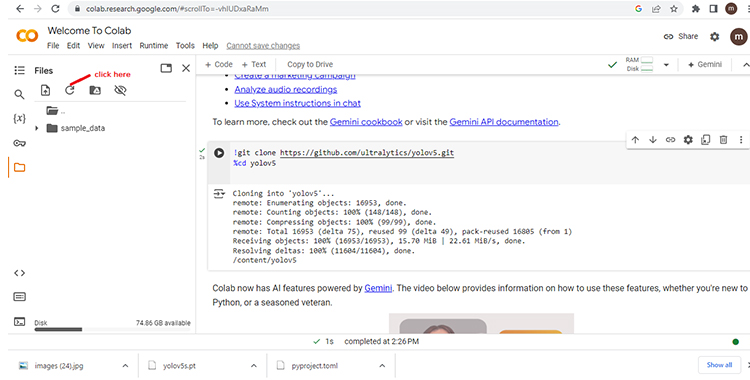
Step 12:-
You will see a yolov5 folder as shown bellow.
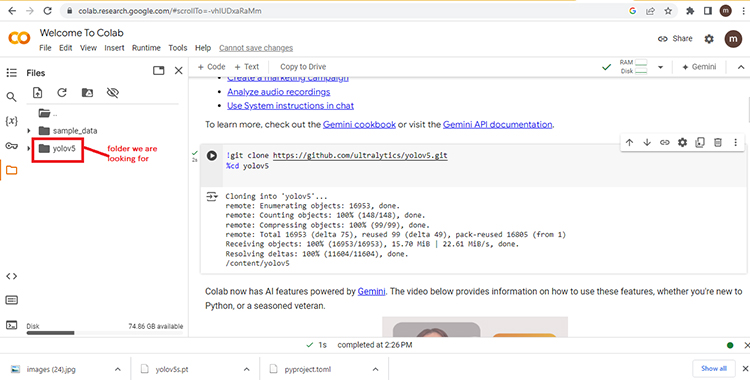
Step 13:-
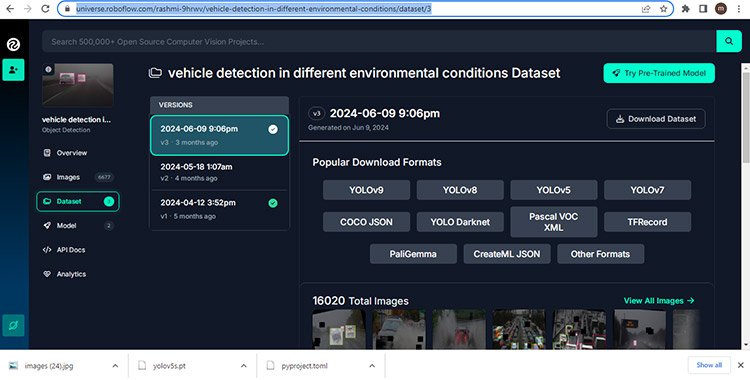
Know open the following link on a different tab
https://universe.roboflow.com/rashmi-9hrwv/vehicle-detection-in-different-environmental-conditions/dataset/3
as shown bellow.
Step 14:-
Now click on 'Download Dataset' link as shown bellow.
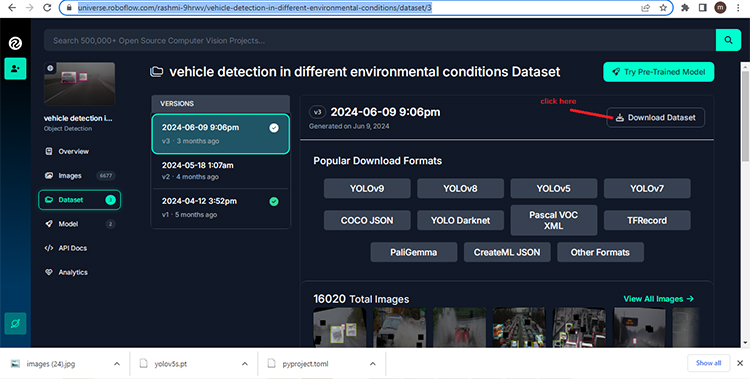
Step 15:-
It will as you to login as shown bellow.

Step 16:-
Sign in with your google account.
Step 17:-
A download window will appear as shown bellow.

On it choose format as "YOLO v5 PyTorch" as shown in the image.
Step 18:-
Select 'show download code' as shown bellow.
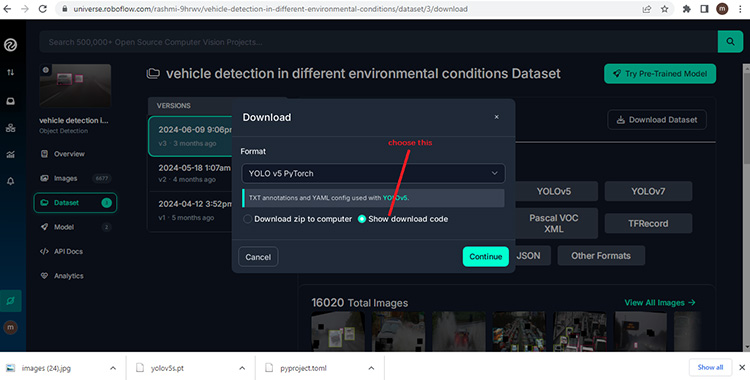
Click on 'Continue' button.
Step 19:-
A window will appear that displays the code as shown bellow.
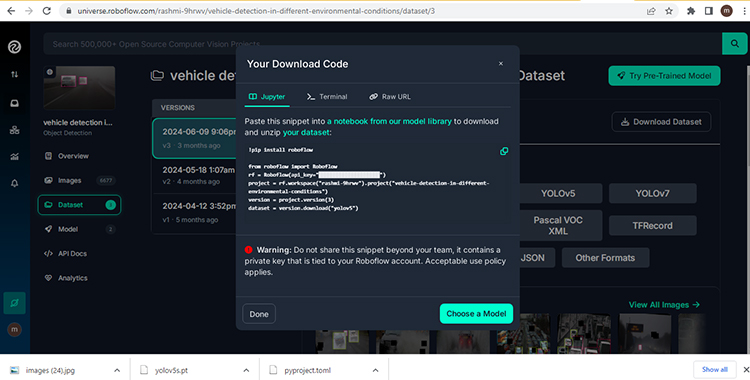
Step 20:-
Click on copy as shown bellow.
After clicking on it the code is coppied into your clipboard which can be past anywhere. click on done button.

Step 21:-
Go to the 'google colab' window again and past the code on the text bar as shown bellow.
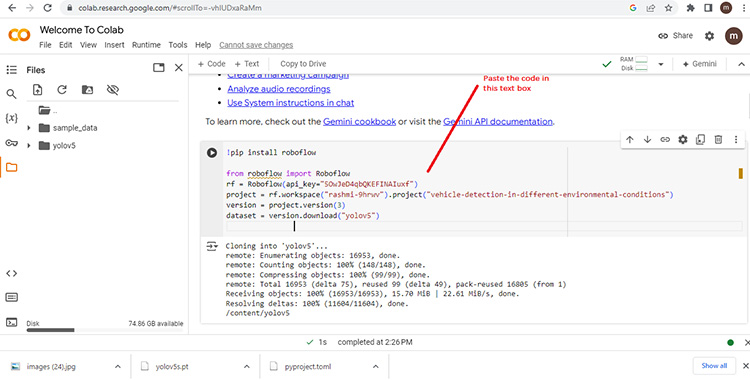
Step 22:-
Click on play button to execute the code.
Step 23:-
Click on the yolov5 folder as shown below.
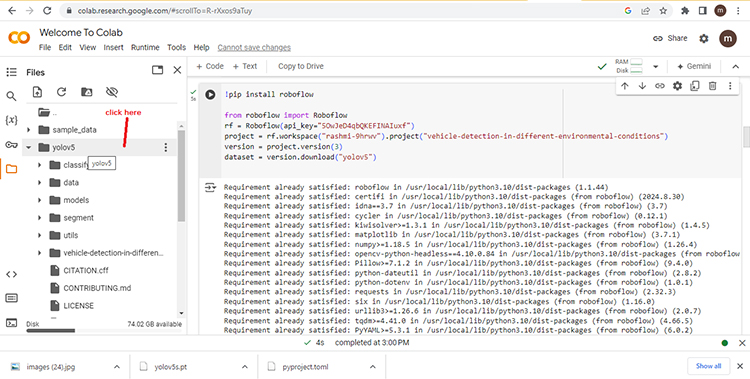
Step 24:-
Go to 'vehical-detection-in-different' folder and rename it to 'dataset' by right clicking on that folder as shown below.
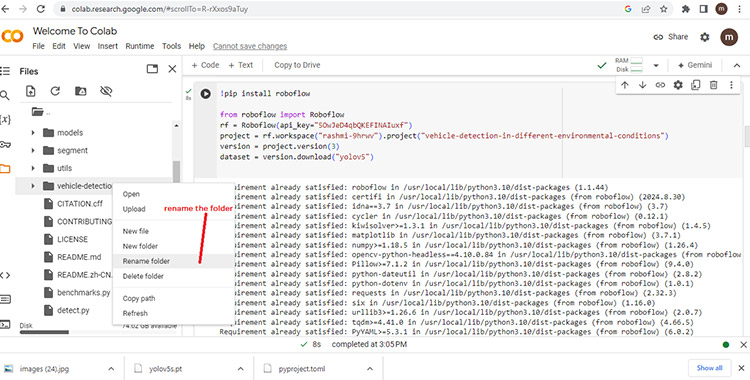
Step 25:-
After renaming it. open folder dataset by double clicking on it as shown bellow.
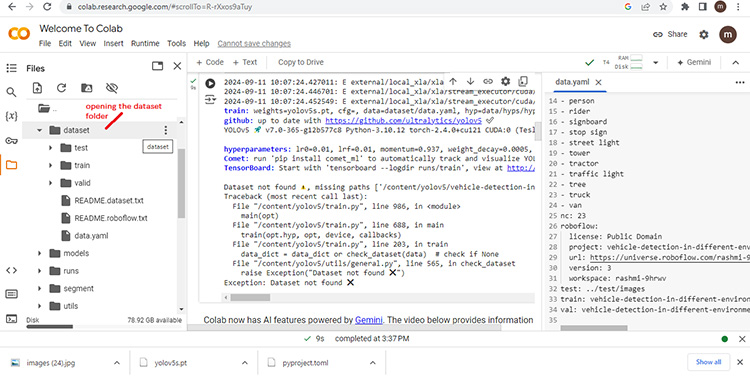
Step 26:-
Inside that folder click on 'data.yaml' for editing it as shown below
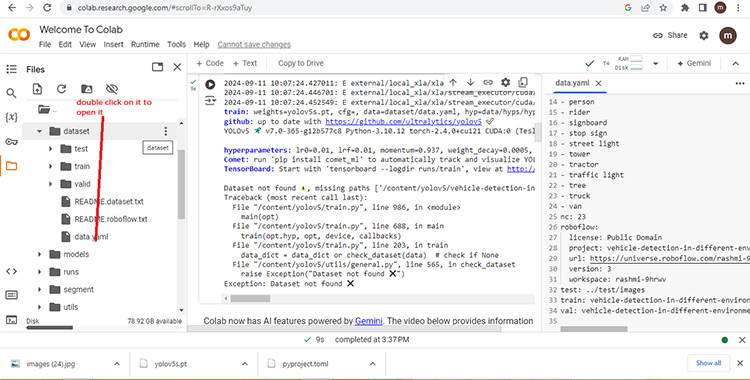
Step 27:-
Data.yaml file will open at the right side of the window as shown below.
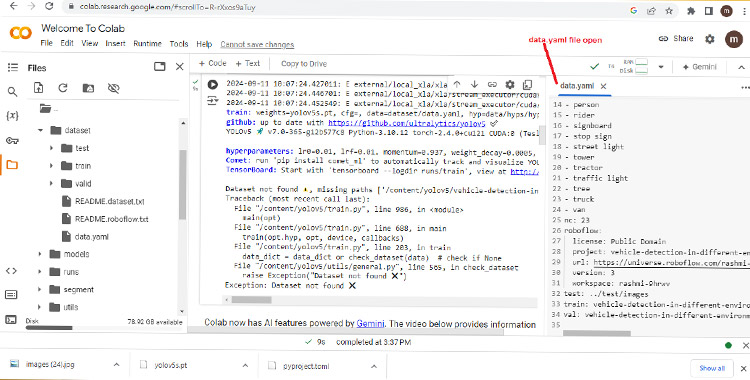
Change the following text on that file
train: vehicle-detection-in-different-environmental-conditions-3/train/images
to
test: ../test/images
train: dataset/train/images
val: dataset/valid/images
As shown below

Step 28:-
Type the following text on the text box
"!python train.py --img-size 640 --batch-size 16 --epochs 50 --data dataset/data.yaml --weights yolov5s.pt --cache"
and than click on play as shown bellow
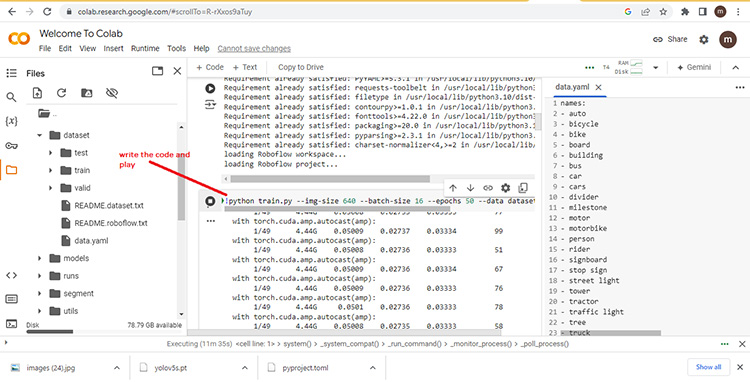
After the command is executed a file name yolov5s.pt is created in your yolov5 folder. It is a neural network model for object detection.
Step 29:-
A file name 'yolov5s.pt ' will be created in yolov5 folder. Download the file in your local drive.
SIPEED MAXDUINO Development Board
Steps for installing USB driver for the for SIPEED MAXDUINO:-
Step 1:-
Download the Driver file from the link given bellow in your local drive.
https://dl.sipeed.com/fileList/MAIX/tools/driver/driver21228_Setup.zip
Step 2:-
Unzip the driver file in you local drive. A folder name "driver21228_Setup" will be created. Open the "driver21228_Setup" by double clicking on it.
Step 3:-
A file name "CDM21228_Setup" will be present in that folder. Double click on it to start the installation operation of the driver.
Step 4:-
A user control panel will ask your permission for installation of the driver. All the appropriate permission for installation of driver. The driver is the "FTDM CDM Driver"
Step 5:-
Click on "Extract" to extract the driver. The setup for the driver will start.
Step for connecting the SIPEED MAXDUINO BOARD:-
Step 1:-
Connect the SIPEED MAXDUINO BOARD to you computer via USB type C cable.
Step 2:-
Open 'device manager' from the control panel.
Step 3:-
Click on Ports (COM and LPT) to see the COM port your SIPEED MAXDUINO BOARD is connected to.
Steps for Installing MaxiPy firmware :-
Step 1:-
Downloading the micropython firmware for SIPEED MAXDUINO BOARD. Bellow is the link for downloading the firmware.
https://dl.sipeed.com/fileList/MAIX/MaixPy/release/master/maixpy_v0.6.3_2_gd8901fd22/maixpy_v0.6.3_2_gd8901fd22.bin
Step 2:-
Download the firmware flashing utility 'kflash_gui' from the link given bellow.
https://github.com/sipeed/kflash_gui/releases
Step 3:-
Follow the link given bellow to download the 'kflash_gui' for windows.
https://objects.githubusercontent.com/github-production-release-asset-2e65be/185712270/ec0e814d-10f2-4337-808a-75be088fdc03?X-Amz-Algorithm=AWS4-HMAC-SHA256&X-Amz-Credential=releaseassetproduction%2F20240928%2Fus-east-1%2Fs3%2Faws4_request&X-Amz-Date=20240928T142445Z&X-Amz-Expires=300&X-Amz-Signature=e0a899108d9f76c82002d20cd964f72b62374ee73254ade600fc22841e7c8f3e&X-Amz-SignedHeaders=host&response-content-disposition=attachment%3B%20filename%3Dkflash_gui_v1.8.1_windows.7z&response-content-type=application%2Foctet-stream
Step 4:-
A setup file name 'kflash_gui_v1.8.1_windows.7z' will be downloaded in your local drive. Extract the file to create a folder name 'kflash_gui_v1.8.1_windows'.
Step 5:-
Open the folder name 'kflash_gui_v1.8.1_windows' an executable file name 'kflash_gui' will be in it. Double click on it to start the setup.
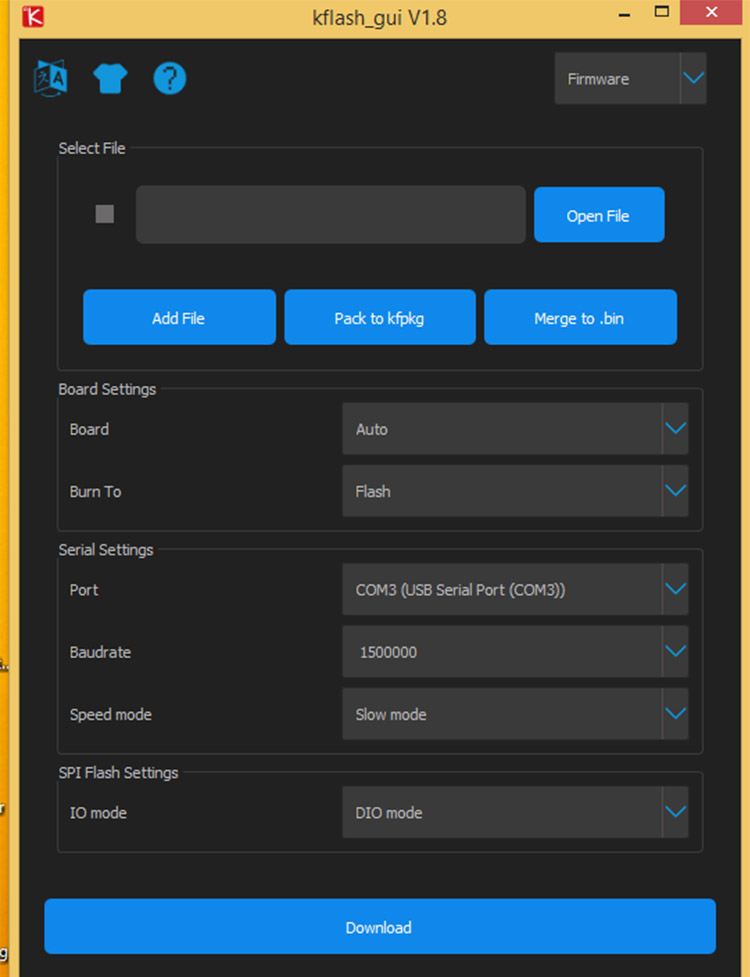
Step 6:-
'Kflash_gui' will open. As shown bellow
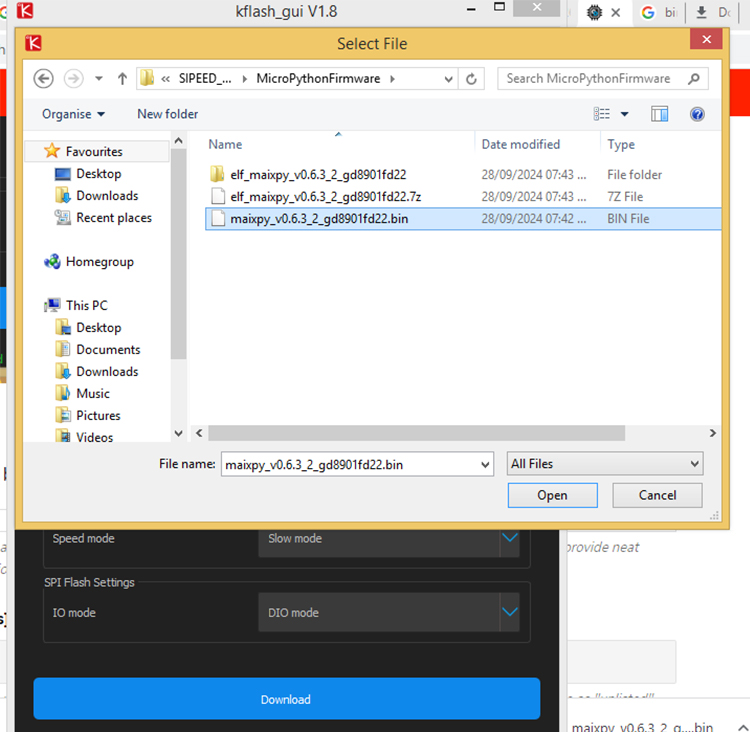
Step 7:-
Click on 'Open File' button to open the firmware file as shown bellow.
Step 8:-
All the configuration will automatically will be set for the 'SIPEED MAXDUINO DEVELOPMENT BOARD'. click on 'Download' button to flash the firmware on the board.
Step 9:-
After the firmware is downloaded on the 'SIPEED MAXDUINO DEVELOPMENT BOARD'. Download success message box will appear as shown bellow.
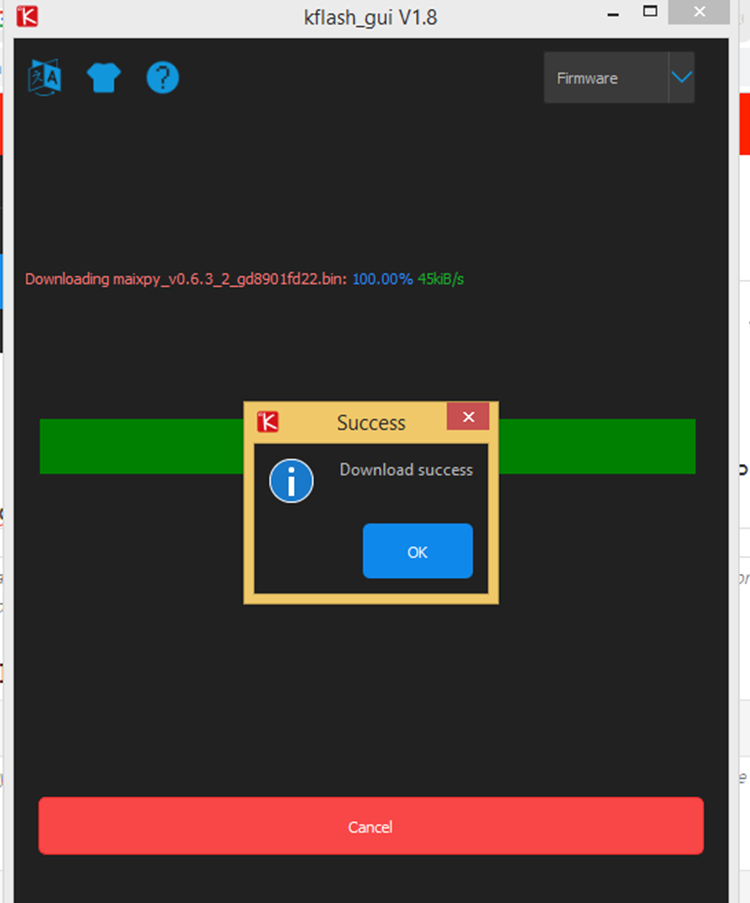
Click on to complete the process.
Steps for Installing MaxiPy IDE:-
Step 1:-
Open the link bellow to search for "MaxiPy IDE" for download for your operating system.
Step 2:-
Click on "maxpy-ide-windows-0.2.5.exe" for download as shown bellow.
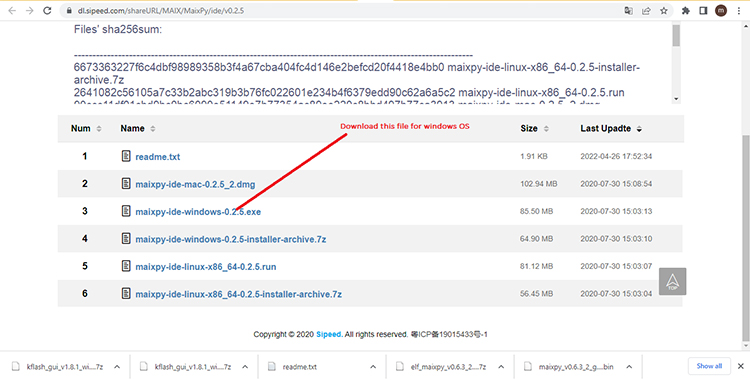
They will ask to fill the captca after clicking on the link.
Step 3:-
Fill the captca and click "download" to download the file as shown bellow.
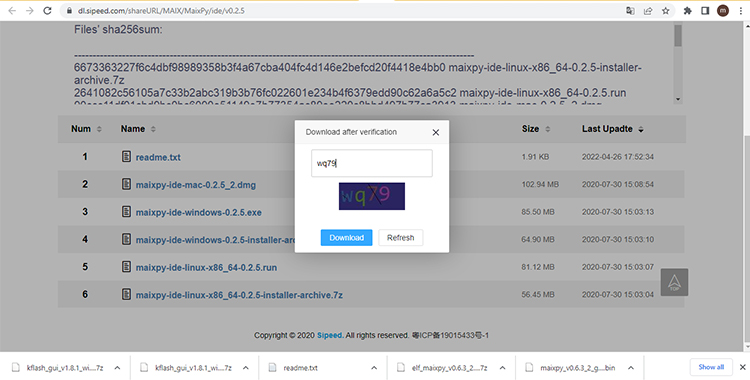
Step 4:-
A file name "maixpy-ide-windows-0.2.5.exe" will be downloaded in your local drive. Double click on the application file to start installation of MaxPy IDE.
Step 5:-
User Account control will ask for permission to install the software. Allow it to install the software.
Steps for writing your first python program in MaxPy IDE:-
Step 1:-
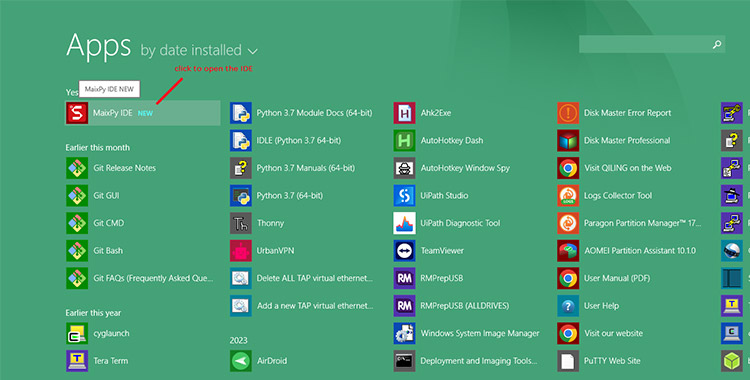
Open your MaixPy IDE by clicking on MaixPy IDE icon as shown bellow
Step 2:-
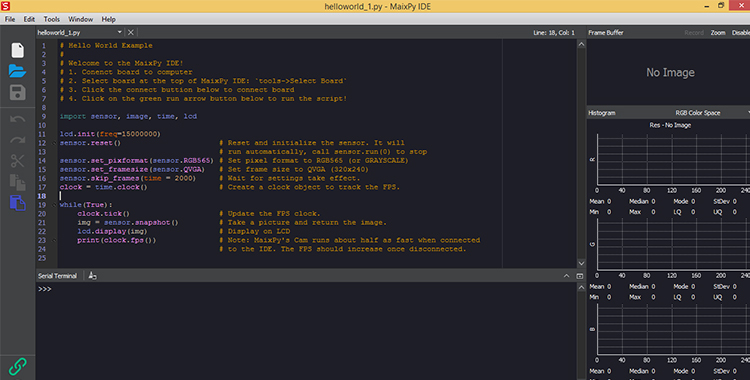
MaxiPy IDE will open as shown below with the default Python program as shown below.
Step 3:-
Click on the link to connect to you "SIPEED MAXDUINO DEVELOPMENT BOARD" as shown bellow
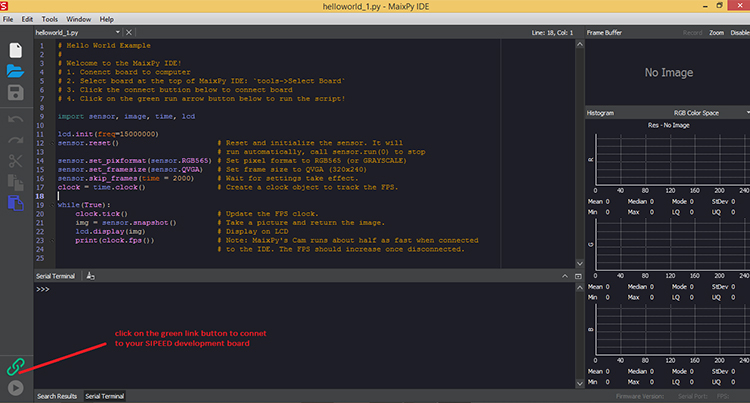
Step 4:-
A default code is loaded in the MaixPy IDE. It is a camera initialization and video streaming code. Click on Play button to load the code on the development board as shown bellow.
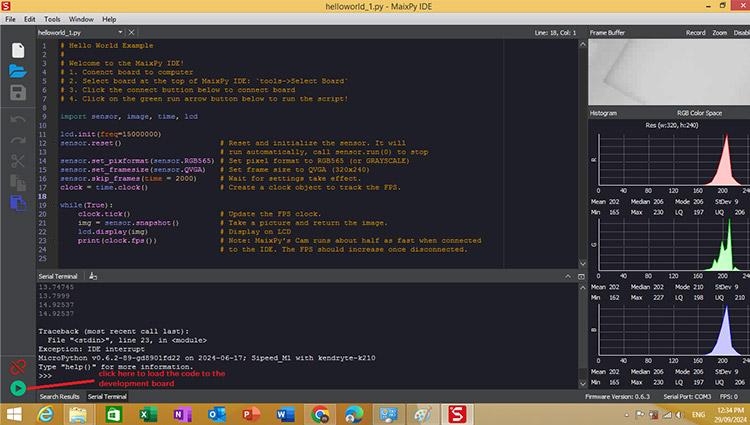
Camera will start working and display it on the Frame Buffer window
Converting your pytorch model to ONNX model for nncase compiler:-
Most of the time python we use in our computer is not updated so it create a lot of problem. For this reason, we are going to use google colab for compiling most of our program.
Step 1:-
open google colab as shown bellow.

Step 2:-
Click on folder to open the folder as shown bellow
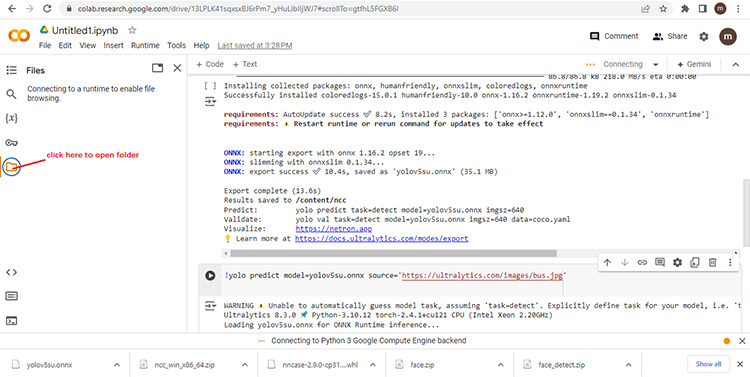
Step 3:-
Folder will open and the content of the folder can be seen. Right click and create a folder converter as shown bellow
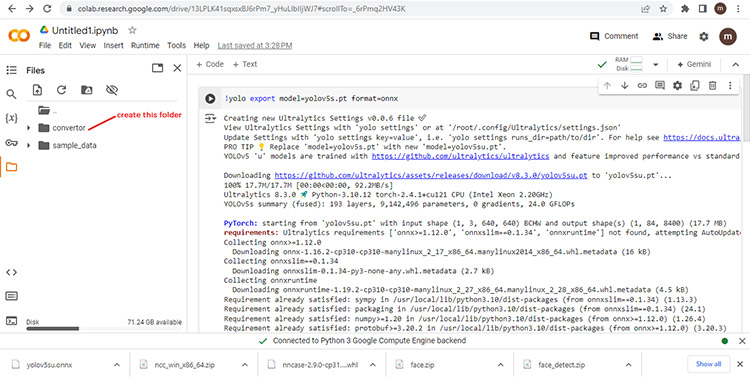
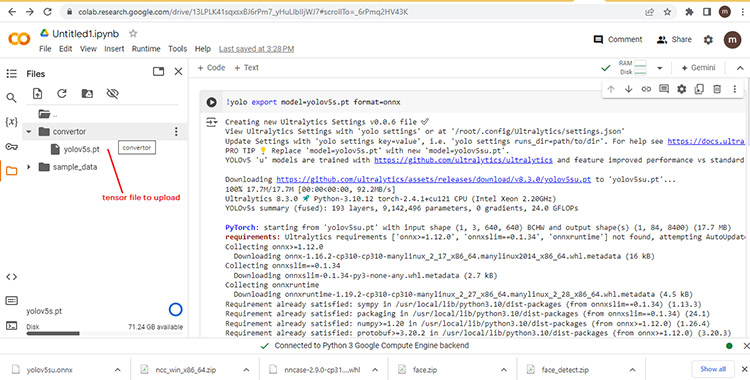
Step 4:-
Upload the tensor flow ai model file named *.pt in the convertor folder. In my case it it 'yolov5s.pt' as shown bellow.
Step 5:-
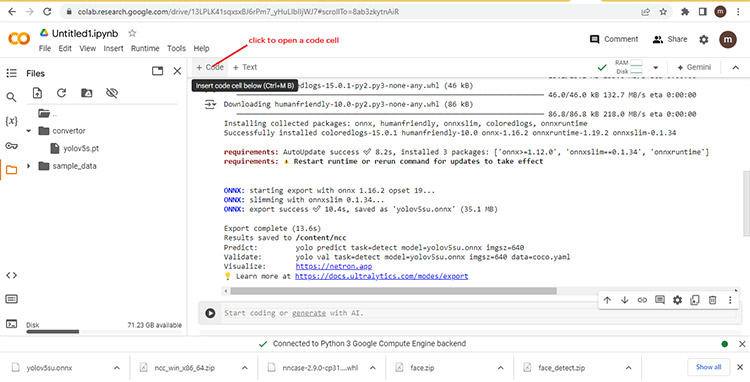
Click on +code button to open the code line as shown bellow.
Step 6:-
Type the following command in code cell.
!ls
above command will show your present working directory.
%cd convertor
Change the present working directory to convertor folder where you have you Ai machine learning model file. In my case it's yolov5s.pt
!ls
Check weather you are in convertor folder or not and can the yolov5s.pt file be seen or not
Step 7:-
Installing the ultralytics package. To install the ultralytics package type the following command.
!pip install ultralytics
Step 8:-
Converting pytensor file to onnx. Type the following command.
!yolo export model=yolov5s.pt format=onnx
Type the following command to check the *.onnx file created
!ls
you can see the file name 'yolov5su.onnx'
Step 9:-
Testing you machine learning model. Write the following command.
!yolo predict model=yolov5su.onnx source='https://ultralytics.com/images/bus.jpg'
You will see what are the things that are detected in that image. Over here it is 4 person, 1 bus
Step 10:-
Download the file name 'yolov5su.onnx' to your local drive from future need.
Converting *.onnx model to *.kmodel for k210 system:-
Step 1:-
Converting *.onnx model to *.kmodel for k210 system:-
Step 1:-
You first need to install and configure your google colab to nnc. nnc is a neural network compiler for converting your *.onnx model to *.kmodel for k210. To do so write the following command in the code cell and execute it.
! git clone https://github.com/kendryte/nncase.git! cd nncase && git lfs pull
It will download nncase.git in the local drive of google colab.
Step 2:-
Installing libs and setting python env. To do so execute the following command in code cell.
!pip install --upgrade pip!pip install nncase --timeout=1000!pip install nncase-kpu --timeout=1000!pip install onnx onnxsim scikit-learn# # nncase-2.x need dotnet-7# # Ubuntu use apt to install dotnet-7.0 (The docker has installed dotnet7.0)!sudo apt-get install -y dotnet-sdk-7.0
Step 3:-
Auto set enviornment for ncc. To do it execute the following code. The code is a python code for setting enviornment.
import osimport sysimport subprocessresult = subprocess.run(["pip", "show", "nncase"], capture_output=True)split_flag = "n"if sys.platform == "win32":split_flag = "rn"location_s = [i for i in result.stdout.decode().split(split_flag) if i.startswith("Location:")]location = location_s[0].split(": ")[1]if "PATH" in os.environ:os.environ["PATH"] += os.pathsep + locationelse:os.environ["PATH"] = location
Step 4:-
Set compile options and PTQ options (quantize model)
import osimport numpy as npimport onnximport onnxsimfrom sklearn.metrics.pairwise import cosine_similarityimport nncasedef get_cosine(vec1, vec2):"""result compare"""return cosine_similarity(vec1.reshape(1, -1), vec2.reshape(1, -1))def read_model_file(model_file):"""read model"""with open(model_file, 'rb') as f:model_content = f.read()return model_contentdef parse_model_input_output(model_file):"""parse onnx model"""onnx_model = onnx.load(model_file)input_all = [node.name for node in onnx_model.graph.input]input_initializer = [node.name for node in onnx_model.graph.initializer]input_names = list(set(input_all) - set(input_initializer))input_tensors = [node for node in onnx_model.graph.input if node.name in input_names]# inputinputs = []for _, e in enumerate(input_tensors):onnx_type = e.type.tensor_typeinput_dict = {}input_dict['name'] = e.nameinput_dict['dtype'] = onnx.mapping.TENSOR_TYPE_TO_NP_TYPE[onnx_type.elem_type]input_dict['shape'] = [i.dim_value for i in onnx_type.shape.dim]inputs.append(input_dict)return onnx_model, inputsdef model_simplify(model_file):"""simplify onnx model"""if model_file.split('.')[-1] == "onnx":onnx_model, inputs = parse_model_input_output(model_file)onnx_model = onnx.shape_inference.infer_shapes(onnx_model)input_shapes = {}for input in inputs:input_shapes[input['name']] = input['shape']onnx_model, check = onnxsim.simplify(onnx_model, input_shapes=input_shapes)assert check, "Simplified ONNX model could not be validated"model_file = os.path.join(os.path.dirname(model_file), 'simplified.onnx')onnx.save_model(onnx_model, model_file)print("[ onnx done ]")elif model_file.split('.')[-1] == "tflite":print("[ tflite skip ]")else:raise Exception(f"Unsupport type {model_file.split('.')[-1]}")return model_filedef run_kmodel(kmodel_path, input_data):print("n---------start run kmodel---------")print("Load kmodel...")model_sim = nncase.Simulator()with open(kmodel_path, 'rb') as f:model_sim.load_model(f.read())print("Set input data...")for i, p_d in enumerate(input_data):model_sim.set_input_tensor(i, nncase.RuntimeTensor.from_numpy(p_d))print("Run...")model_sim.run()print("Get output result...")all_result = []for i in range(model_sim.outputs_size):result = model_sim.get_output_tensor(i).to_numpy()all_result.append(result)print("----------------end-----------------")return all_result
Step 5:-
Compile and PQT version 2 compilation
import nncaseimport numpy as npimport sysdef compile_kmodel(model_path, dump_path, calib_data):"""Set compile options and ptq options.Compile kmodel.Dump the compile-time result to 'compile_options.dump_dir'"""print("n---------- compile ----------")print("Simplify...")model_file = model_simplify(model_path)print("Set options...")# import_optionsimport_options = nncase.ImportOptions()############################################# The code below, you need to modify to fit your model.# You can find more details about these options in docs/USAGE_v2.md.############################################# compile_optionscompile_options = nncase.CompileOptions()compile_options.target = "k230" #"cpu"compile_options.dump_ir = False # if False, will not dump the compile-time result.compile_options.dump_asm = Truecompile_options.dump_dir = dump_pathcompile_options.input_file = ""# preprocess argscompile_options.preprocess = Falseif compile_options.preprocess:compile_options.input_type = "uint8" # "uint8" "float32"compile_options.input_shape = [1,224,320,3]compile_options.input_range = [0,1]compile_options.input_layout = "NHWC" # "NHWC"compile_options.swapRB = Falsecompile_options.mean = [0,0,0]compile_options.std = [1,1,1]compile_options.letterbox_value = 0compile_options.output_layout = "NHWC" # "NHWC"# quantize optionsptq_options = nncase.PTQTensorOptions()ptq_options.quant_type = "uint8" # datatype : "float32", "int8", "int16"ptq_options.w_quant_type = "uint8" # datatype : "float32", "int8", "int16"ptq_options.calibrate_method = "NoClip" # "Kld"ptq_options.finetune_weights_method = "NoFineTuneWeights"ptq_options.dump_quant_error = Falseptq_options.dump_quant_error_symmetric_for_signed = False# mix quantize options# more details in docs/MixQuant.mdptq_options.quant_scheme = ""ptq_options.export_quant_scheme = Falseptq_options.export_weight_range_by_channel = False############################################ptq_options.samples_count = len(calib_data[0])ptq_options.set_tensor_data(calib_data)print("Compiling...")compiler = nncase.Compiler(compile_options)# importmodel_content = read_model_file(model_file)if model_path.split(".")[-1] == "onnx":compiler.import_onnx(model_content, import_options)elif model_path.split(".")[-1] == "tflite":compiler.import_tflite(model_content, import_options)compiler.use_ptq(ptq_options)# compilecompiler.compile()kmodel = compiler.gencode_tobytes()kmodel_path = os.path.join(dump_path, "test.kmodel")with open(kmodel_path, 'wb') as f:f.write(kmodel)print("----------------end-----------------")return kmodel_pathStep 6:-Type!lsto check the present directory. You should be in content directory showing the following folders in itnncasesample_data
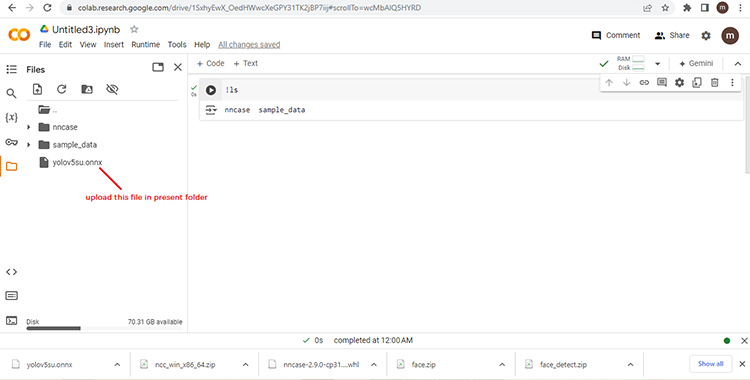
Step 7:-
Upload the onnx model in content directory. In my case it is 'yolov5su.onnx' content director as shown bellow.
Step 8:-
Compile model with single input.
The project failed due to Python3.7.0 *.C and *.cpp files has lots of error in the file provided by python and even tensorflow 1.15.0 files has lots of error in the *.c and *.cpp files while compiling it. We falied in conversion of yolov2 tiny weights to Tensorflow tflite weights which further needed to be converted into KModel.
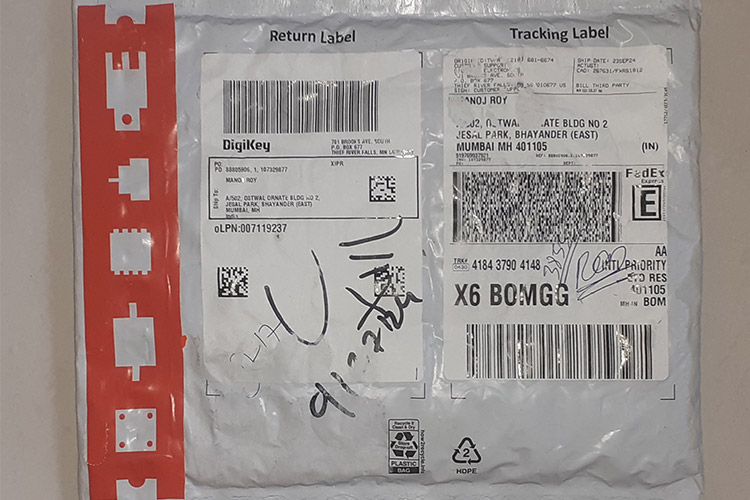
DigiKey Package
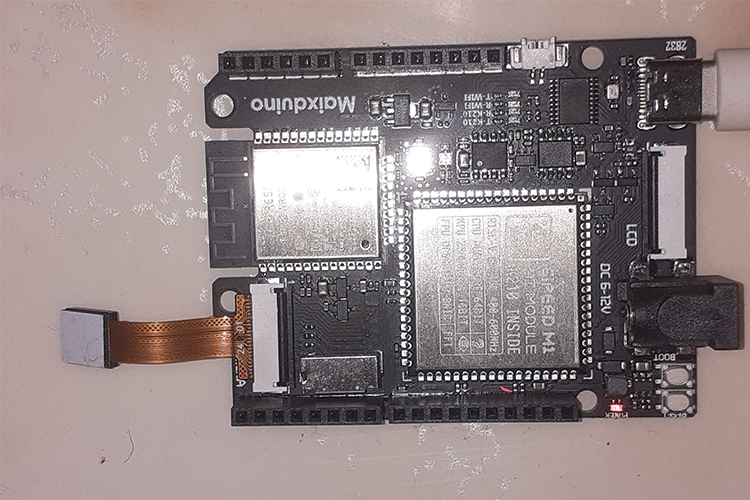
MaxiPy development board
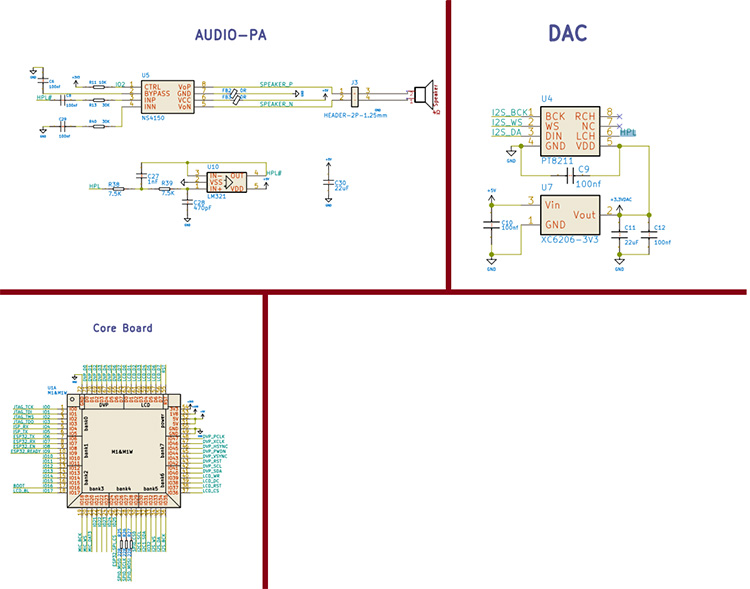
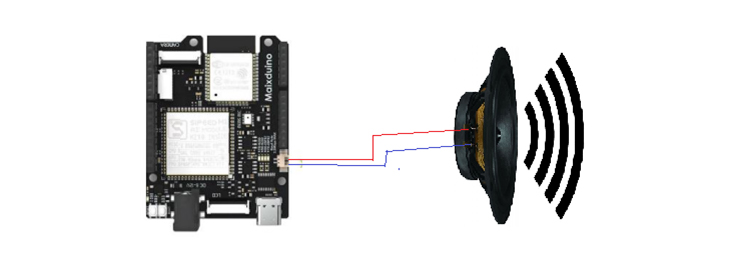
Circuit Diagram
What we have tried:-
We have tried all the readymade module available in github for conversion of yolov2 tiny weights to Tensorflow tflite or to onnx file. But failed drasticaly in doing so. After that we tried to compile python 3.7 from source code in linux which worked but all the *.c and *.cpp files has header file problem and sytanx error in it. Not only that the tensorflow 1.15.0 *.c and *.cpp files has the same problem since it is needed for model conversion.


