

In many IoT applications, there are situations where the sensor data needs to monitor continuously, and the simplest way to do that is by enabling an ESP8266 webserver which serves an HTML webpage; but the problem with this methodology is that the web browser needs to be refreshed at a certain time interval to get an updated sensor data. This is not only inefficient but takes a lot of clock cycles where other tasks can be performed. The solution to this problem is known as “Asynchronous JavaScript and XML” or AJAX for short. Using AJAX, we can monitor real-time data without refreshing the whole webpage, this not only saves time, but it also saves precious clock cycles. Follow along and in this article, you will learn how to implement AJAX based webserver on ESP8266. Instead of using an ESP8366 if you are using an ESP32 the procedure almost remains the same, you can check out the trial on ESP32 webserver to know more.
What Is AJAX?
As we have discussed earlier, AJAX stands for “Asynchronous JavaScript and XML” which can be used to update a portion of the web page without reloading the entail page. It does that by requesting and receiving data from the server spontaneously. AJAX’s function is to update web content asynchronously. This means a user’s web browser doesn’t need to refresh an entire web page when only a part of the content on the page needs to be updated.
An everyday example of AJAX will be Google’s suggestion feature, as we type in the Google search bar, Google starts suggesting related search strings. During this process, the webpage doesn’t reload, but the information that needs to be changed is updated in the background using AJAX.
How AJAX Works?
AJAX just uses a combination of-
- XML (Extensible Markup Language)
- JavaScript and HTML
- XML (Extensible Markup Language):
XML is a markup language. XML is mostly used for receiving server data with a specific format. Although it can receive data in the form of plain text. When a user visits a web page and an event occurs, in our case, it’s a “Button press”, the JavaScript creates an XMLHttpRequest object, which then transfers information in an XML format between a web browser and a web server. The XMLHttpRequest object sends a request for updated page data to the web server, the server process the request, a response is created at server-side and sent back to the browser, which then uses JavaScript to process the response and display it on the webpage.
- JavaScript and HTML:
JavaScript does the updating process in AJAX. The request for updated content is formatted in XML to make it understandable, and JavaScript refreshes the content for the user viewing the updated page.
AJAX Working:
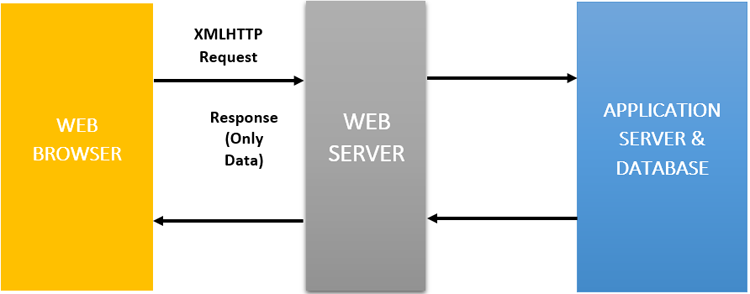
As shown in the above diagram, for an AJAX request, the browser sends an XMLHttpRequest to the server using javascript. This object includes data that tells the server what is being requested. The server responds with only the data that was requested from the client-side. Then the browser receives the data, updates only the portion of the page that needs to be updated instead of reloading the entire webpage.
Components Required to build the AJAX and ESP8266 Based Web Server
As we are building the project to demonstrate the capability of esp8266 to handle AJAX, the component requirement is very minuscule, you can find most of those in your local hobby store.
- NodeMCU X 1
- LM35 Temperature sensor X 1
- LED X 1
- Breadboard X 1
- Jumpers X 4
- Programming Cable X 1
Ajax and ESP8266 Web Server - Circuit Diagram
The circuit diagram for the AJAX-based webserver is shown below.

As the circuit is very simple, there is nothing much to explain about it. We have connected a LED with 150 Ohms current limiting resistor to the Pin D0 of the ESP8266, as you will see, we can toggle it using the webserver. Next, we have our LM35 temperature sensor through which we will be reading the temperature value and update that to the webpage. The temperature sensor is powered from the 3.3V rail, and as the LM35 is an analog sensor, we have used the A0 pin of the ESP8266 board to measure the data. if you have come across the LM35 temperature sensor for the first time, or if you want to learn more about this very cool little sensor, you can check our previous post on Digital Thermometer Using NodeMCU and LM35 where we discussed the working of this sensor in detail.
AJAX Based Webserver Code for ESP8266
Before we proceed any further, let’s dive straight into the program to understand how our NodeMCU web server will work. But before that, please make sure that you have the Arduino IDE setup for ESP8266, If you don’t have the setup, you can follow the next part, else you can just skip this part. If you are interested in learning more about webserver, and IoT based projects, you can check out our previous post where we have discussed more on the topic.
Setup NodeMCU to Upload the Code:
If you are uploading the code to nodeMCU for the first time, then you have to include the board first, using the following steps.
To upload code to NodeMCU, follow the steps below:
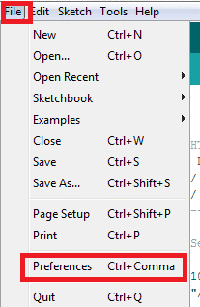
1. Open Arduino IDE, then go to File–>Preferences–>Settings.
2. Type https://arduino.esp8266.com/stable/package_esp8266com_index.json in the ‘Additional Board Manager URL’ field and click ‘Ok’.

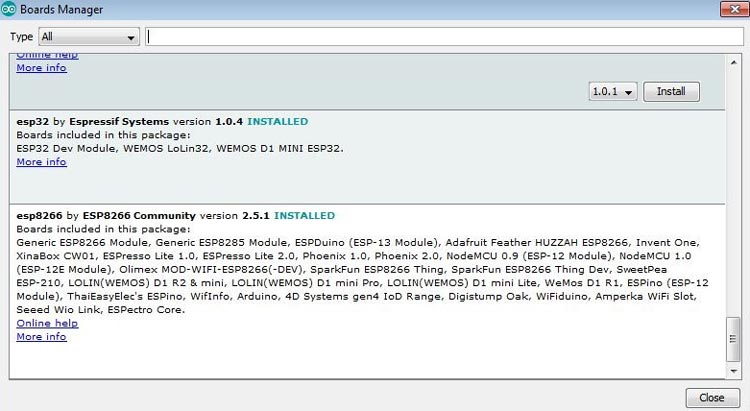
3. Now go to Tools > Board > Boards Manager, in the Boards Manager window. Type ESP8266 in the search box, select the latest version of the board, and click on install.
4. After installation is complete, go to Tools ->Board -> and select NodeMCU 1.0(ESP-12E Module). Now you can program NodeMCU with Arduino IDE.
After completion of the above setup for programming NodeMCU, the complete code needs to be uploaded to NodeMCU. First, all the required library files are to be included in the code.
Creating Header File for HTML Page:
First, the HTML page which is written to displaying the sensor value and LED control buttons needs to be converted into a Header file(.h file), which we will include in our main code. This is purely for the sake of convenience. The HTML code for the entire webpage is shown below:
const char webpage[] PROGMEM = R"=====(
<!DOCTYPE html>
<html>
<style type="text/css">
.button {
  background-color: #4CAF50; /* Green */
  border: none;
  color: white;
  padding: 15px 32px;
  text-align: center;
  text-decoration: none;
  display: inline-block;
  font-size: 16px;
}
</style>
<body style="background-color: #f9e79f ">
<center>
<div>
<h1>AJAX BASED ESP8266 WEBSERVER</h1>
  <button class="button" onclick="send(1)">LED ON</button>
  <button class="button" onclick="send(0)">LED OFF</button><BR>
</div>
 <br>
<div><h2>
  Temp(C): <span id="adc_val">0</span><br><br>
  LED State: <span id="state">NA</span>
</h2>
</div>
<script>
function send(led_sts)
{
  var xhttp = new XMLHttpRequest();
  xhttp.onreadystatechange = function() {
    if (this.readyState == 4 && this.status == 200) {
      document.getElementById("state").innerHTML = this.responseText;
    }
  };
  xhttp.open("GET", "led_set?state="+led_sts, true);
  xhttp.send();
}
setInterval(function()
{
  getData();
}, 2000);
function getData() {
  var xhttp = new XMLHttpRequest();
  xhttp.onreadystatechange = function() {
    if (this.readyState == 4 && this.status == 200) {
      document.getElementById("adc_val").innerHTML =
      this.responseText;
    }
  };
  xhttp.open("GET", "adcread", true);
  xhttp.send();
}
</script>
</center>
</body>
</html>
)=====";
First, create a new file with notepad and save it as a .h extension, which is a representation of a C header file. Name the header file as “index.h” and copy the above codes and paste into the created header file.
The above section of the code is responsible for setting up all the visual and aesthetic parts of the webpage.
Note: Don’t forget to put the above header file in the same folder of NodeMCU code, as this needs to be included in the programming later.
Uploading Code to the NodeMCU Module:
We start by including all the required header files, hear we have included the “ESP8266WiFi.h”, “ WiFiClient.h”, and “ESP8266WebServer.h” header files.
#include <ESP8266WiFi.h>
#include <WiFiClient.h>
#include <ESP8266WebServer.h>
Then, we include the header file that we previously wrote. Don’t forget to save the file inside the ESP8266 Code folder. And it’s defined as,
#include "index.h"
Now, declare the network credentials- i.e. SSID and password. It is required to connect the NodeMCU to the internet.
const char* ssid = "admin";
const char* password = "12345678";
Then we define the ESP8266WebServer object with the name server and default port number 80.
ESP8266WebServer server(80);
The function handleRoot is defined to handle the HTML webpage and send the entire webpage to the client-side when it is requested.
void handleRoot()
{
 String s = webpage;
 server.send(200, "text/html", s);
}
The function sensor_data is defined to read the Temperature sensor data and send it to the webpage after necessary conversions.
void sensor_data()
{
 int a = analogRead(A0);
 int temp= a/4.35;
 String sensor_value = String(temp);
 server.send(200, "text/plane", sensor_value);
}
Inside the led_control function, the information coming from the webpage is received and compared to control the LED state as shown below.
void led_control()
{
 String state = "OFF";
 String act_state = server.arg("state");
 if(act_state == "1")
 {
  digitalWrite(LED,HIGH); //LED ON
  state = "ON";
 }
 else
 {
  digitalWrite(LED,LOW); //LED OFF
  state = "OFF";
 }
 server.send(200, "text/plane", state);
}
Then, to connect NodeMCU to the internet, we call the WiFi.begin() function and pass network SSID and password as its arguments. Check for the successful network connection using WiFi.status() and after a successful connection, print a message on the Serial monitor with the IP address of the connected device.
WiFi.begin(ssid, password);
while (WiFi.status() != WL_CONNECTED)
  {
    Serial.print("Connecting...");
  }
  Serial.println("");
  Serial.print("Connected to ");
  Serial.println(ssid);
  Serial.print("IP address: ");
  Serial.println(WiFi.localIP());
Then, to call the defined functions such as “handleRoot”, “led_control” and “sensor_data” when a client requests URL with index "/", “/led_set” and “/adcread”, the following code blocks are defined.
  server.on("/", handleRoot);
  server.on("/led_set", led_control);
  server.on("/adcread", sensor_data);
  server.begin();
Testing of AJAX and ESP8266 Based Web Server
Once the code is uploaded, It's time to test the project. First of all, make sure your hotspot is turned on. Then check the connections before switching ON the circuit. Then, switch ON the power to the circuit. In our case, we are using a USB to power the project, but an external 5v DC supply can also be given to NodeMCU.
After switching ON the power, it’s time to get the IP address for nodeMCU. This can be found using the serial monitor of Arduino IDE. Open the serial monitor and press the Reset button of NodeMCU once, the IP address of NodeMCU should be printed on the serial monitor. Note down the IP address and paste it on the URL bar of any web browser.
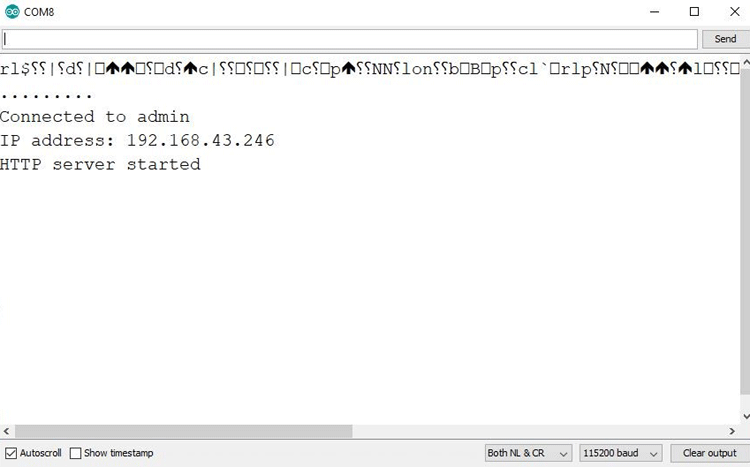
Note, your device must be connected to the same network, which the Nodemcu is connected. After entering the IP to your address bar, you should be getting the webpage of the project in the browser. If you are getting it, then now you can monitor here the sensor values and you can also control the state of the LED from the browser.
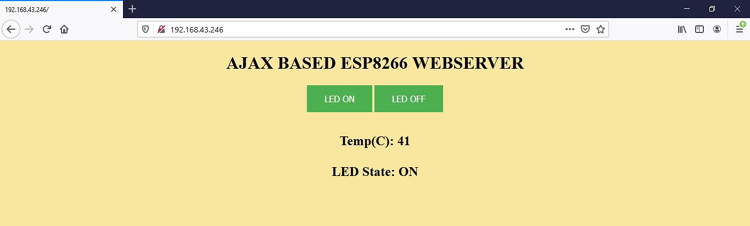
With the webpage up and running marks the end of our project, I hope you liked this project and learned something new, if you have any questions regarding this article, do not hesitate to ask in the comment section below.
Complete Project Code
/*Arduino  code for ESP8266 AJAX Webserver
www.circuitdigest.com
*/
#include <ESP8266WiFi.h>

#include <WiFiClient.h>

#include <ESP8266WebServer.h>

#include "index.h"

#define LED D0

const char* ssid = "admin";

const char* password = "12345678";

ESP8266WebServer server(80);
void handleRoot()

{

 String s = webpage;

 server.send(200, "text/html", s);

}
void sensor_data()

{

 int a = analogRead(A0);

 int temp= a/4.35;

 String sensor_value = String(temp);

 server.send(200, "text/plane", sensor_value);

}
void led_control()

{

 String state = "OFF";

 String act_state = server.arg("state");

 if(act_state == "1")

 {

  digitalWrite(LED,HIGH); //LED ON

  state = "ON";

 }

 else

 {

  digitalWrite(LED,LOW); //LED OFF

  state = "OFF";

 }


 server.send(200, "text/plane", state);

}
void setup(void)

{

  Serial.begin(115200);

  WiFi.begin(ssid, password);

  Serial.println("");

  pinMode(LED,OUTPUT);


  while (WiFi.status() != WL_CONNECTED)

  {

    Serial.print("Connecting...");

  }

  Serial.println("");

  Serial.print("Connected to ");

  Serial.println(ssid);

  Serial.print("IP address: ");

  Serial.println(WiFi.localIP());


  server.on("/", handleRoot);

  server.on("/led_set", led_control);

  server.on("/adcread", sensor_data);

  server.begin();

}
void loop(void)

{

  server.handleClient();

}
Comments
why do you want to use button ? if you have two LEDs then you can define at in LED control function or you can make seprate function for second LED.
Please, give example for AsyncWebServer library. I use this lib for RCBoat, but ESP8266WebServer and ESPAsyncWebServer are incompatible.
Thanks for the great example
Thanks for the example.
It also works for the WT32-ETH01 with Visual Studio Code and PlatformIO.
I'm not familiar with HTML coding, so it took some time to add buttons and additional readings.
Just used this Site to explain something to a friend :)
But is there a specific reason, why you put a function into that setInterval which calls getData(), instead of just doing setInterval(getData,2000);?

How to send led state if we have 2 led's then we have 4 buttons??
Please give me the solution.