

Coil Gun, as many people think (including me) is not just a fun toy with a tube and few coils around it which can shoot projectiles to a certain distance. Scientists at Sandia National Laboratories believe that a coilgun can be engineered to accelerate particles at a greater speed that is high enough to escape earth’s gravity. Yes, you heard that right! Coil gun could possibly be used to launch satellites in future. Perhaps there are people who have tried it and also who are currently working on it. Apart from space applications the military also seems to be interested in another form of Coil Gun called as the Rail Gun or Railway Gun which could fire projectiles.
All this got me interested in building my own of version Coil Gun. Also, it is so satisfying to play with and watch the metal projectiles being popped out the coil at a click of a button. Before, we begin I would like to make it clear that this project is purely for educational purpose, so if you are looking to build this gun for escaping that bully in your high school then probably you should visit a psychologist. The project also involves flying metal pieces and high voltages so be careful while working with. That being said let’s get started.
Materials Required
- Copper wire (enamelled)
- IR sensor (Speed measuring type)
- IRFZ44N MOSFET
- BC557 PNP Transistor
- 10k and 1K Resistor
- 7805 Regulator
- 0.1uF
- Push Button
- Breadboard
- Power source (RPS)
- 9V Battery
How does a Coil Gun Work?
The basic principle behind a Coil Gun is that a current carrying conductor will induce a magnetic field around it, which was stated by Faraday. To improve the strength of this magnetic field the current carrying conductor is wound in form of a coil. Now, when this coil is powered it produces a magnetic field around it which is strong enough to attract metal (or other Ferro magnetic) pieces a.k.a projectiles into it.
Such an arrangement will only attract the projectile into it from one end and when it reaches the other end it will again be attracted inside the coil and thus the projectile will remain inside the coil itself after few oscillations. This is because during the process the projectile gets magnetized and acts as a magnet, so as long as the magnetic field is present the projectile (magnet) will tend to stay within the coil only. But a coil gun should launch projectile out of it, so we should use a sensor to check if the projectile has reached the other end of the coil and when the coil should be turned off, this way the projectile will travel with the same velocity and escape out of the coil.
It might sound simple, but the complexity can be increased by using more than one coil. By using multiple coils the speed of the projectile can be increased while it passes through coil. Another challenging task is with sourcing enough current for the coil. The coil might consume anywhere between 5A to 10A at 24V based on the number of turns and thickness of coil. So to source for such high current most people use a big capacitor to deal with it. But in our tutorial to keep things simple we will build a single stage coil gun and power it with an RPS unit.
Circuit Diagram
The complete circuit diagram for this Single Stage Coil Gun is shown in the image below.

As you can see the circuit is pretty simple. The main component in the circuit is the Coil itself; we will see how we build it in next heading. The coil is powered form a 24V supply voltage form our RPS, the supply is controlled (switched) through a N-Channel MSFET IRF544Z. The Gate pin of the transistor is pulled down through a 10k resistor (R1) and the diode D1 is used to bypass the reverse current when the coil discharges.
The MOSFET is N-channel and hence it remains turned off until a gate threshold voltage in this case 5V is supplied to the gate pin. This is done with a push button though a PNP transistor (BC557), when the button is pressed the 5V is supplied to the Gate pin of MOSFET and the coil is turned on. This will attract the projectile and push it through other end. As soon as the projectile reaches the other end, the IR sensor will sense it and send a 5V signal to the base pin of PNP transistor through the 1K current limiting resistor. This will open the transistor and hence the 5V to MOSFET will be disconnected and the Coil will also be turned off. Hence the projectile will escape from the coil and will be launched out. The 5V to power the IR sensor and trigger the transistor and MOSFET is regulated by a 7805 Voltage regulator IC from a 9V battery.
Winding the Coil
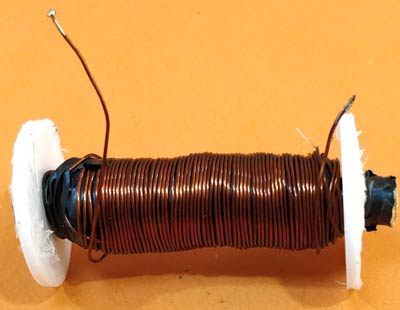
As told earlier the most important component in this circuit is the coil. Before you start winding the coil you should decide what will be your projectile size, in my case I am using a screw driver bits as projectiles. But you can select anything that has Ferro magnetic properties. After selecting the projectile, we have to select a hole pipe like structure which is just enough to slid the projectile though it without much friction. I tried using an empty refill pen and it worked great for me. You can select one based on the size of your projectile. Then length of the cylindrical base can be upto 5cm. Finally also purchase enamelled copper wire of medium thickness, mine is 0.8mm thick.
After gathering all your required materials, play your favorite playlist and start winding the coil on top of your cylindrical base. Make sure the winding don’t lap one on other and does not loosen out easily. After fining the first layer of winding you can use an insulation tape (electrical tape) to secure it in place and then start winging the second layer on top of it similarly. Note that you should always wind the coil in only one direction, if you have started from left to right after reaching the end for first layer start again from left for winding the second layer. You can repeat this step until you reach 5-7 layers. I made around 6 layers with each layer having approximately 60 turns. My coil arrangement looks something like this shown in the picture below. I have used two 3D printed disks (white colour) just to secure the coil in place they are optional.
Working with coils is always challenging and one have to wind it correctly to work properly, like in Tesla Coil Project, many people wont get the correct output because of improper coil winding.
Working of Mini Coil Gun
After building the coil you can proceed with the connecting it to the rest of the coil gun circuit. Keep in mind that the coil might consume as high a 5A and hence the coil part cannot be build on a breadboard because breadboards are normally rated only for 500mA. So you can either build the complete circuit on a perf board by soldering the components or follow a crude way of soldering the high power lines directly though a breadboard as I have done as show in the picture below.
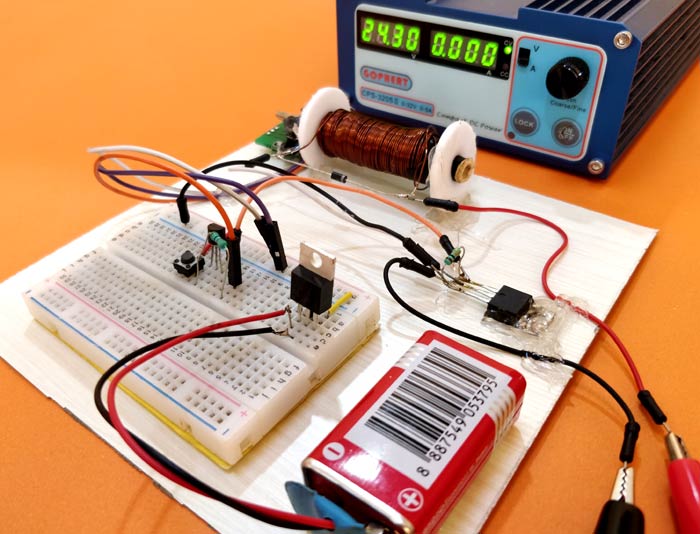
As you can see the Coil is energised by the Regulated Power Supply clips (alligator clips) through a mosfet whose pins are directly soldered to wires. The gate pin of the mosfet only requires 5V and hence it is taken to the breadboard where the remaining circuit including the voltage regulator, transistor and switch is built. The breadboard is powered by the 9V battery though the battery clips.
To test the coil gun project simply put the metal piece inside the coil and press the button on the breadboard. This should launch the projectile outside the coil. Also make sure not to press the button continuously since that will energise the coil again after the projectile has been launched and might damage the coil permanently. The complete working of the project can be found in the video.
Hope you build the project and got it working. If you have any queries you can leave them in the comment section below or post them on our forums for other technical questions.
