
 using Tesseract on Raspberry Pi")
The ability of machines to use a camera to look at the real world and interpret data from it would have a greater influence on its applications. Be it a simple food delivery Robot like the Starship Robots or an advanced self driving car like Tesla, they are rely on information obtained from their highly sophisticated cameras to take decisions. In this tutorial we will learn how details are identified from images by reading the characters present on it. This is called Optical Character Recognition (OCR).
This opens door for many applications like to automatically read the information from a business card, recognize a shop from its name board or recognize sign boards on road and much more. Some of us might have already experienced these features through Google Lens, so today we will build something similar using an Optical Character Recognition (OCR) Tool from Google Tesseract-OCR Engine along with python and OpenCV to identity characters from pictures with a Raspberry Pi.
Raspberry pi, being a portable and less power consuming device, is used in many real-time image processing applications like Face detection, object tracking, Home security system, Surveillance camera etc.
Pre-requisites
As told earlier we will be using the OpenCV Library to detect and recognize faces. So make sure to install OpenCV Library on Raspberry Pi before proceeding with this tutorial. Also Power your Pi with a 2A adapter and connect it to a display monitor for easier debugging.
This tutorial will not explain how exactly OpenCV works, if you are interested in learning Image processing then check out this OpenCV basics and advanced Image processing tutorials. You can also learn about contours, Blob Detection etc in this Image Segmentation tutorial using OpenCV.
Installing Tesseract on Raspberry Pi
sudo dpkg - -configure –a
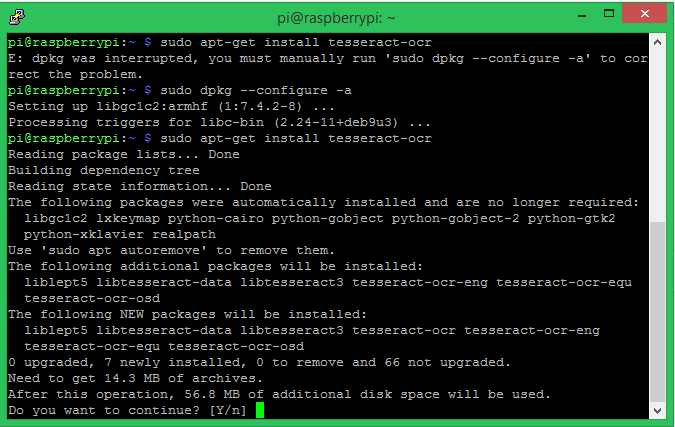
Then we can proceed with installing the Tesseract OCR (Optical Character Recognition) using the apt-get option. The command for the same is given below.
sudo apt-get install tesseract-ocr
Your terminal window will look something like below, it will take around 5-10 minutes for the installation to complete.
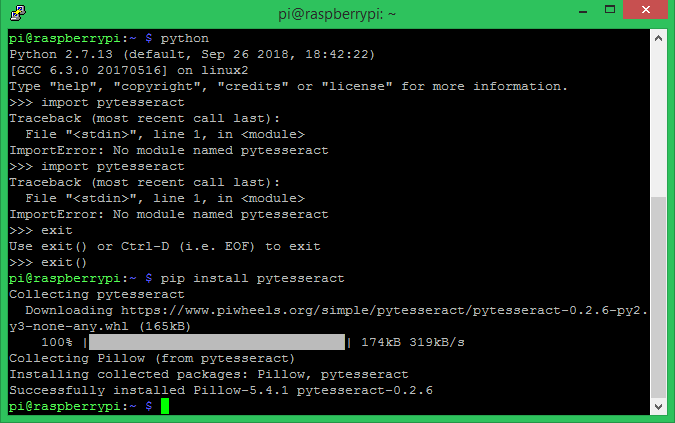
Now that we have the Tesseract OCR installed we have to install the PyTesseract package using the pip install package. Pytesseract is a python wrapper around the tesseract OCR engine, which helps us to use tesseract with python. Follow the below command to install pytesseract on python.
Pip install pytesseract
Make sure pillow is already installed before you proceed to this step. People who have followed the Raspberry Pi face recognition tutorial would have already installed it. Other can use that tutorial and install it now. Once the pytesseract installation is complete you window will look something like this
The Tesseract Optical character recognition project was originally started by Hewlett Packard in 1980 and then was adopted by Google which maintains the project till date. Over the years the Tesseract has evolved, but still it works well only in controlled environments. If the image has too much background noise or is out of focus tesseract does not seem to work well there.
To overcome this, the latest version of tesseract, the Tesseract 4.0 uses a Deep Learning model to recognize characters and even handwritings. Tesseract 4.0 uses Long Short-Term Memory (LSTM) and Recurrent Neural Network (RNN) to improve the accuracy of its OCR engine. Unfortunately through at this time of this tutorial Tesseract 4.0 is only available for Windows and Ubuntu, but is still in beta stage for the Raspberry Pi. So we decided to try Tesseract 4.0 on windows and Tesseract 3.04 on Raspberry Pi.
Simple Character Recognition Program on Pi
Since we have already installed the Tesseract OCR and Pytesseract packages in our PI. We can quickly write a small program to check how the character recognition is working with a test image. The test image I used, the program and the result can be found in the below image.

As you can see the program is pretty simple and we did not even use any OpenCV packages. The above program is given below
from PIL import Image
img =Image.open (‘1.png’)
text = pytesseract.image_to_string(img, config=’’)
print (text)
In the above program we are trying to read text from an image called ‘1.png’ which is located inside the same directory of the program. The Pillow package is used to open this image and save it under the variable name img. Then we use the image_to_sting method from the pytesseract package to detect any text from the image and save it as a string in the variable text. Finally we print the value of text to check the results.
As you can see the original image actually contains the text “Explain that Stuff! 01234567890” which is a perfect test image since we have alphabets, symbols and numbers in the image. But the output that we get from pi is “Explain that stuff! Sdfiosiefoewufv” this means that out program fails to recognize any numbers from the image. To overcome this problem people normally use OpenCV to remove noise from the program and then configure the Tesseract OCR engine based on the image to get better results. But remember that you cannot expect 100% reliable output from Tesseract OCR Python.
Configuring the Tesseract OCR for improved results
Along with the default English language, Tesseract supports many other languages including Hindi, Turkish, French etc. We will only be using English here, but you can download the trained data from official github page and add it up to your package to recognize other languages. It is also possible to recognize two or more different language from the same image. The language is set by flag –l, to set it to a language use the code along with flag, for example for English it will be –l eng, where eng is the code for English.
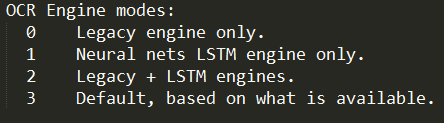
The next flag is the OCR Engine Mode, it has four different modes. Each mode uses a different algorithm to recognize the characters from the Image. By default it uses the algorithm that got installed with the package. But we can change it to use LSTM or Neural nets. The four different Engine modes is shown below. The flag is indicated by --oem, so to set it to mode 1, simply use -- oem 1.
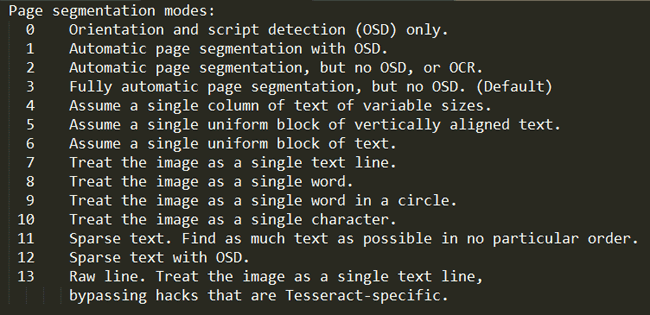
The Final and the most important flag is the page segmentation mode flag. These are very useful when your image has so much background details along with the characters or the characters are written in different orientation or size. There are totally 14 different page segmentation mode, all of them are listed below. The flag is indicated by –psm, so to set the mode of 11. It will be –psm 11.
Using oem and psm in Tesseract Raspberry Pi for better results
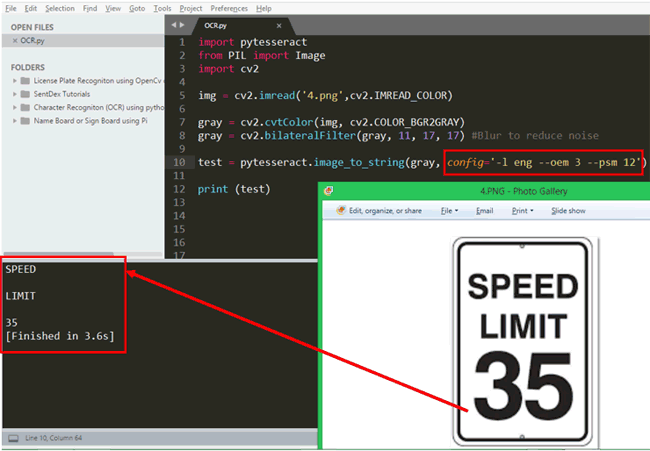
Let us check how effective these configuration modes are. In the below image I have tried to recognize the characters in a speed limit board which says “SPEED LIMIT 35”. As you can see the number 35 is in large size compared to the other alphabets which confuses the Tesseract and thus we get output only as “SPEED LIMIT” and the number is missing.

To overcome this problem, we can set the config flags. In the above program the config flag is empty config=’’ , now let us set it using the details provided above. All the text in the image is English so language flag is –l eng, the OCR engine can be left as default which is mode 3 so –oem 3. Now finally on the psm mode, we need to find more characters from the image so we use the mode 11 here, which becomes –psm 11. The final config line will look like
test = pytesseract.image_to_string(gray, config='-l eng --oem 3 --psm 12')
And the result for the same can be found below. As you can see now the Tesseract is able to find the all the characters from the image including the numbers.

Improving accuracy with confidence level
Another interesting feature that is available in Tesseract is the image_to_data method. This method can give us details like position of the character in the image, the confidence level of detection, line and page number. Let’s try using this on a sample image

In this particular example, we get a lot of noise information along with the original information. The image is the name board of a hospital called “Fortis Hospital”. But along with the name the image also has other background details like logo building etc. So the Tesseract try converting everything into text and gives us a lot of noise like “$C” “|” “S_______S==+” etc.
Now in these cases the image_to_data method comes in handy. As you can see here, the above optical character recognition algorithm returns the confidence level of each character that it has recognized and the confidence level of Fortis is 64 and for HOSPITAL it is 24. For the other noisy information the confidence value is 10 or below than 10. This way we can filter out the useful information and improve the accuracy using the value of confidence.
OCR on Raspberry PI
Although the results are not very satisfying on Pi when using Tesseract, it can be combined with OpenCV to filter out noise from image and other configuration technique can be used to get decent results if the pictures are good. We have already tried about 7 different images with tesseract on Pi and were bale to obtain close results by tweaking the modes accordingly for each picture. The complete project file can be downloaded as Zip for this location, which has all the test images and the basic code.
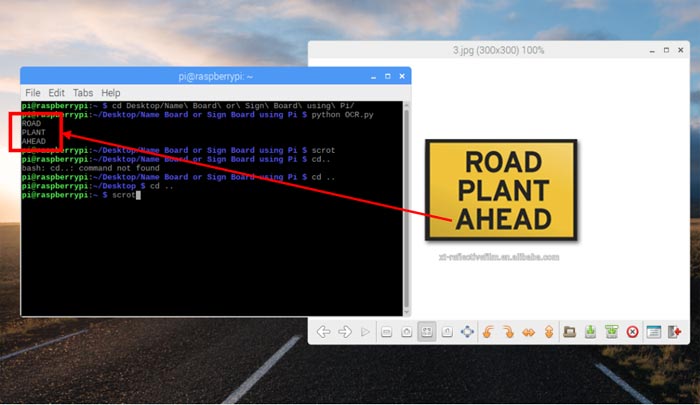
Let’s try one more sample board sign on Raspberry Pi, this time one which is very plain and simple. The code for the same is give below
import pytesseract
from PIL import Image
import cv2

img = cv2.imread('4.png',cv2.IMREAD_COLOR) #Open the image from which charectors has to be recognized
#img = cv2.resize(img, (620,480) ) #resize the image if required

gray = cv2.cvtColor(img, cv2.COLOR_BGR2GRAY) #convert to grey to reduce detials
gray = cv2.bilateralFilter(gray, 11, 17, 17) #Blur to reduce noise

original = pytesseract.image_to_string(gray, config='')
#test = (pytesseract.image_to_data(gray, lang=None, config='', nice=0) ) #get confidence level if required
#print(pytesseract.image_to_boxes(gray))

print (original)
The program opens the file from which we need to recognize the characters from and then converts it to grayscale. This will reduce the details from the image making it easier for Tesseract to recognize characters. Further to reduce the background noise we blur the image using a bilateral filter which is a method from OpenCV. Finally we start recognizing characters from the image and print it on the screen. The final result will be something like this.
Hope you understood the tutorial and enjoyed learning something new. OCR is used in many places like self driving cars, License plate recognition, street board recognition navigation etc and using it on Raspberry Pi opens door to lot more possibilities since it can be portable and compact. If you have any problem or questions in getting this to work feel free to post them in the comment section below or use the forums for other technical questions. Also check our other Image Processing based projects here.
Complete python code for this OCR text recognition is given below, it can be also downloaded from here with all the images to test the program.
Complete Project Code
import pytesseract
from PIL import Image
import cv2


img = cv2.imread('4.png',cv2.IMREAD_COLOR) #Open the image from which charectors has to be recognized
#img = cv2.resize(img, (620,480) ) #resize the image if required

gray = cv2.cvtColor(img, cv2.COLOR_BGR2GRAY) #convert to grey to reduce detials
gray = cv2.bilateralFilter(gray, 11, 17, 17) #Blur to reduce noise

original = pytesseract.image_to_string(gray, config='')
#test = (pytesseract.image_to_data(gray, lang=None, config='', nice=0) ) #get confidence level if required
#print(pytesseract.image_to_boxes(gray))

print (original)

'''required = 'abcdefghijklmnopqrstuvwxyzABCDEFGHIJKLMNOPQRSTUVWXYZ'
Final = ''

for c in original:
    for ch in required:
        if c==ch:
         Final = Final + c
         break

print (test)

for a in test:
if a == "\n":
print("found")'''
Comments
fffffff
erwerwer

Hey, I read your article and I'm interested to try the OCR textdetection on my Raspberry.
You wrote "Complete python code for this OCR text recognition is given below, it can be also downloaded from here with all the images to test the program."
Where can I find the download link ?