
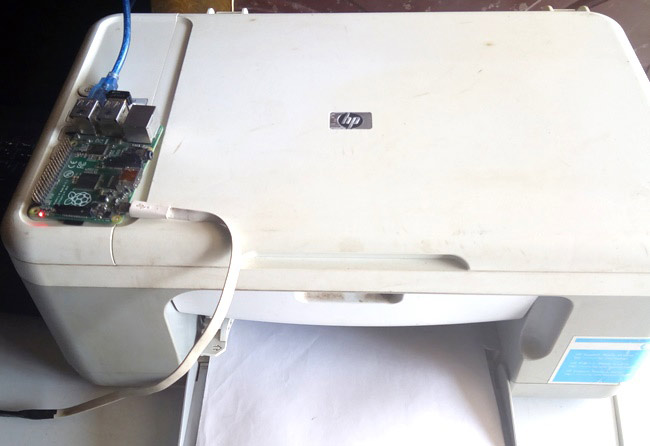
To make your printer accessible from multiple devices or computers, either you need a Wi-Fi printer or need a costly setup to build a Network Printer. So in this season of festivities, what would be a perfect gift than a Network Printer (did I just give someone an Idea?) but instead of spending hundreds of dollars for this new acquisition, what if you could do the same by adding a $35 Raspberry Pi 3 to that old printer laying around on your desk? Yes I thought it’d be awesome too!
Introduction to Print Server and CUPS:
Print Server can connect multiple computers to a single or multiple printers wired or wirelessly. With the help of the Print server, you can access your printer with multiple devices and can send the print command from any of the connected devices to the printer to print any document.
For this Raspberry Pi Print Server tutorial, we will be creating a Network Printer with the aid of the Raspberry Pi 3 and the almighty CUPS which makes it all possible.
CUPS (Common Unix Printing System) is a printing system for UNIX like operating systems based computers. It gives computers on which it is running the ability to act as a print server. A computer running CUPS is able to accept jobs from client devices, process them and pass it on to the appropriate printer to print.
All most all printers are supported by CUPS especially HP printers since HP operates its own open source project. Other printer models that are not directly supported by CUPS may have generic drivers that are compatible which provides basic printing functions. A list of printers supported by CUPS can be found at this attached links.
Required Components
For this tutorial, we will need the following components, some of which you may certainly have laying around and won’t need to buy.
- Raspberry Pi 3
- SD Card (8gb at least)
- USB printer
- Ethernet Cable
- Power Supply for the Pi
To proceed, we will be using the Raspbian stretch OS for this tutorial and since its setup is same as that of the Jessie, I will assume you are familiar with setting up the Raspberry Pi with the Raspbian stretch OS. I also want to assume you know how to ssh into the Raspberry Pi using a terminal software like putty. If you have issues with any of the things mentioned, there are tons of Raspberry Pi Tutorials on this website that can help, and you can also drop your questions in the comment box and I will do my best to respond.
With your Pi at the ready, Let's make a Raspberry Pi Print Server!
Setting up Network Printer on Raspberry Pi:
This section will carry us through a series of steps that will culminate in the installation of CUPS on your Raspberry Pi.
Step 1: Upgrade the Pi
Kind of a ritual, first thing for all of my projects is updating the Raspberry Pi, by doing this you ensure your pi has all the latest updates to the OS you are working with.
To do this we use;
sudo apt-get update
sudo apt-get upgrade
With this done, reboot the pi using;
sudo reboot
Wait for the reboot process and login again
Step 2: Install Print Server Software CUPS
With the update done the next line of action is to install our print server software CUPS.
To do this run;
sudo apt-get install cups
This will take some time but will install CUPS and other dependencies like Samba, perl and several other software or libraries.
Step 3: Configure CUPS
With Installation done, its time to check out the configuration file of CUPS. Several settings that generally affect how cups works, like the port on which cups communicate which is by default 631, port can be changed here.
The config file can be accessed using;
sudo nano /etc/cups/cupsd.conf
Change/add the following lines to the configuration file.
# Only listen for connections from the local machine.

#Listen localhost:631

#CHANGED TO LISTEN TO LOCAL LAN

Port 631

# Restrict access to the server...
<Location />
  Order allow,deny
  Allow @Local
</Location>


# Restrict access to the admin pages...
<Location /admin>
  Order allow,deny
  Allow @Local
</Location>


# Restrict access to configuration files...
<Location /admin/conf>
  AuthType Default
  Require user @SYSTEM
  Order allow,deny
  Allow @Local
</Location>
Save the file using ctrl+X followed by y and then enter.
After saving, restart CUPS to effect the changes to the configuration file using;
sudo service cups restart
Step 4: User Access Settings
Next we add the Pi user to the Ipadmin group. This gives the Raspberry Pi the ability to perform administrative functions of CUPS without necessarily being a super user.
sudo usermod -a -G Ipadmin pi
Step 5: Network Accessibility
Next we need to ensure that CUPS can be connected to on the home network and its also accessible across the entire network.
To get it to allow all connections on the network, run;
sudo cupsctl –remote-any
After this we then restart cups to effect changes using;
sudo /etc/init.d/cups restart
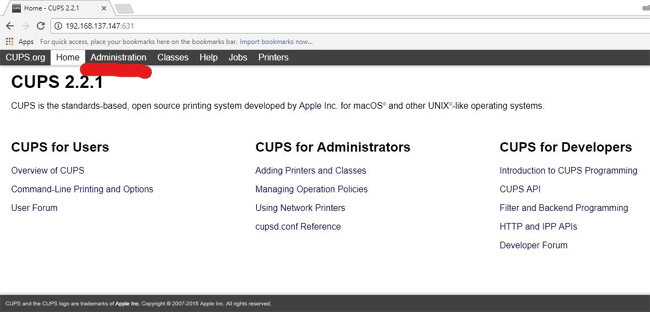
With this done we can proceed to test if it works effectively by checking out the CUPS homepage.
Open a web browser and type in your Pi’s IP address, indicating the cups port.
e.g 192.168.137.147:631
631 is the cups port.
You should see the cups homepage like the image below.
Please note that your browser may warn you about the security certificate of the website but just click on ignore and proceed. Is that right?, I know, I had doubts too while trying, but haven’t had any security breach since then so…

With this done we are ready to move to the next step.
Step 6: Setting Up Samba on Raspberry pi
Samba is an interoperability tool that allows for easy communication between windows and linux or unix programs and it will be used to allow our windows based system to communicate with CUPS running on the Raspberry Pi to print.
While cups is being installed, it installs other dependencies like samba, but just in case it wasn’t installed, you can install it by following the procedure below.
Run:
sudo apt-get install samba
Wait for the installation to run its course then proceed to configure samba.
Step 7: Configure Samba
Configure samba by opening the configuration file using;
sudo nano /etc/samba/samba.conf
In the conf file, scroll to the print section and change the; guest ok = no to guest ok = yes
guest ok = yes
Also under the printer driver section, change the; read only = yes to read only = no
read only = no
With this all done save the file using ctrl+X followed by y and enter.
After saving the file restart samba to effect the changes using;
sudo /etc/init.d/samba restart
With samba installed, our Raspberry Pi is finally ready to be attached to a printer so we take the final step which is adding a printer to cups.
Adding a Printer to CUPS
Adding a printer to cups is officially one of the easiest thing to do, go to the CUPS homepage once more by entering your PI’s IP address into a web browser followed by “:631” which is port address on which CUPS is communicating, your Pi’s IP address can be gotten easily by running the command;
hostname –I
Now on the home page, click on the administration tab.
This will take you to the administration page where you will see add new printer. Follow the prompts, select your printer server and continue.
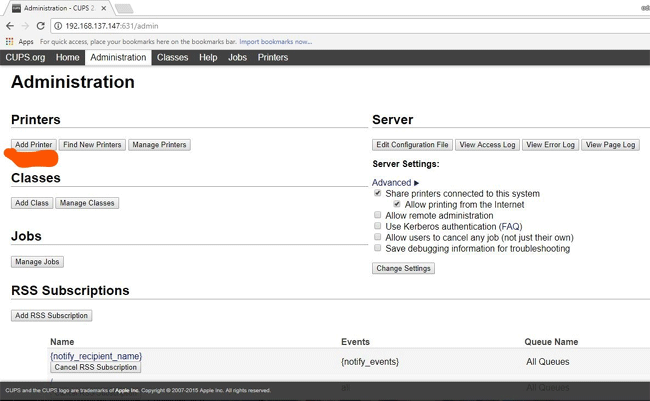
On the final stage before clicking on continue, ensure you checked the “share this printer” check box.
With this you are all done, move the printer to the preferred location, fire up your Raspberry Pi and print away.
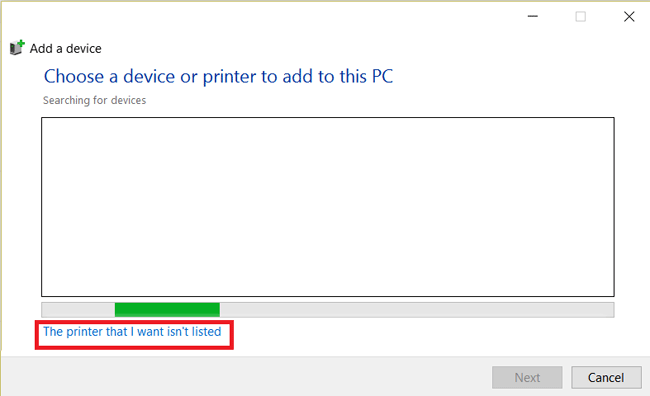
Oh before I forget (rushing to get some chicken, it’s Christmas), to add the new created network printer on your Windows PC, go to devices and printers, select “Add a printer”
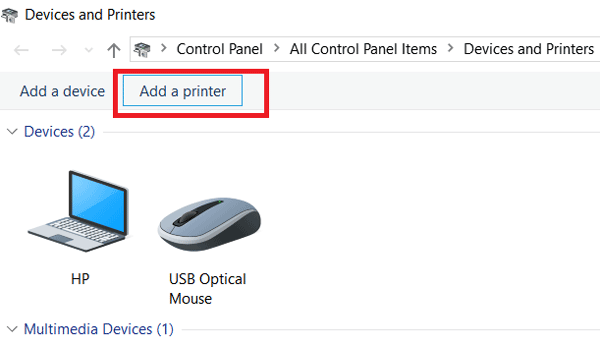
Click on Next, Then select the printer I want isn’t listed on the next page
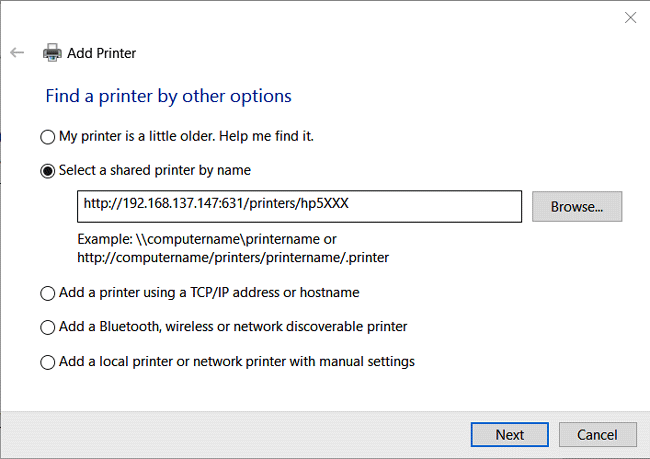
Then enter the IP address of your PI followed by the printer name on the next page using the below format:
http:// + Raspberry Pi IP + :631 + /printers/ + your printer’s name “Queue Name” in CUPS
e.g http://192.168.137.147:631/printers/hp5XXX
With this done, you should now be able to print via a Raspberry Pi network printer.
That’s it for this tutorial guys, feel free to drop whatever questions you might have in the comment section.
Comments
How to print
Can you tell the step by step to print a document? Thx
question
everything works fine, but when i add the printer in windows , i want to establish different configuration per pc, and (ex. one pc print in letter size by default and other A4) . and when i change the settings doesn`t change. i trien in smb conf or cups conf and nothing. saludos se habla español. i hope you could understand me
Does this still work? When I
Does this still work? When I run the command to install cups, all of the elements come back as unresolved and fetch errors occur for each.
I have installed HP Deskjet
I have installed HP Deskjet 1212 printer on my raspi zero. It is working fine and am able to print pdfs perfectly. However, after enabling overlayFS (making the SD card readonly) printing doesn't work. Again when I disable overlayFS (make the SD read/write) it works fine as earlier. All functions of raspi work fine when overlayFS is enabled except for printing. Enabling overlayFS is crucial for the deployment of my application. What I see in /var/log/cups/error_log is a 'filter-failed' error. I'm sure it's not the real problem as filter is working fine when overlayFS is disabled. Any help would be appreciated.

There is a bug with the cups webfront end that causes a timeout when searching for the print driver list. It gives an “Unable to get list of printer drivers: Success” error message.
I encountered this when trying to configure my old rpi model b as a print server. I’m not sure if newer pi’s would be affected as they would be a bit faster.
However the workaround is to run this from the commandline:
sudo /usr/lib/cups/daemon/cups-driverd list 1 0 requested-attributes=’ppd-make’
Once the command completes – go through the process in the cups webfrontend again and it should work this time.