
In this tutorial, we are going to implement an Emotion Recognition System or a Facial Expression Recognition System on a Raspberry Pi 4. We are going to apply a pre-trained model to recognize the facial expression of a person from a real-time video stream. The “FER2013” dataset is used to train the model with the help of a VGG-like Convolutional Neural Network (CNN).
A Facial Expression Recognition System can be used in a number of applications. It can be used to study or analyze the sentiments of humans. Many companies are implanting a Facial Expression Recognition System to study the depression level of their workers. Some gaming companies are applying a Facial recognition system to record the satisfaction level of the gamers during playing. We are going to implement a simple and handy system on the Raspberry Pi to recognize the expressions of a person.
Steps to Perform Facial Expression Recognition on Raspberry Pi
To implement Expression Recognition on Raspberry Pi, we have to follow the three steps mentioned below.
Step-1: Detect the faces in the input video stream.
Step-2: Find the Region of Interest (ROI) of the faces.
Step-3: Apply the Facial Expression Recognition model to predict the expression of the person.
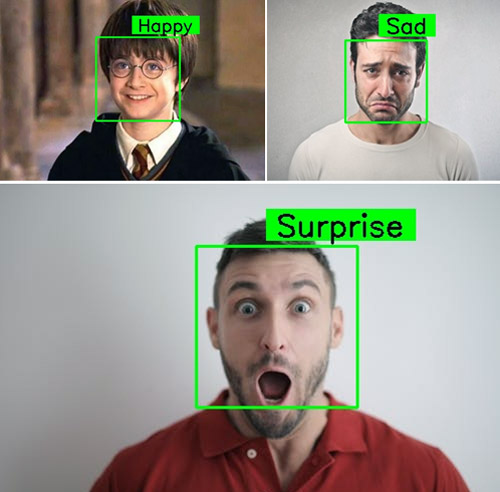
We are using Six Classes here that is 'Angry', 'Fear', 'Happy', 'Neutral', 'Sad', 'Surprise'. So, the predicted images will be among these classes. We have previously used Raspberry Pi for a few other image processing projects like facial landmark detection and Face recognition application, you can also check them out if you are interested.
Components Required for Facial Expression Recognition
This project does not involve much hardware, all you need is:
- Raspberry Pi
- Pi Camera Module
Here, we only need an RPi4 And Pi camera module with OpenCV installed on your Raspberry Pi. OpenCV is used here for digital image processing. The most common applications of Digital Image Processing are object detection, Face Recognition, and people counter.
Installing OpenCV on Raspberry Pi 4
Before installing the OpenCV and other dependencies, Raspberry Pi needs to be fully updated. Use the below commands to update the Raspberry Pi to its latest version:
sudo apt-get update
Then use the following commands to install the required dependencies for installing OpenCV on your Raspberry Pi.
sudo apt-get install libhdf5-dev -y
sudo apt-get install libhdf5-serial-dev –y
sudo apt-get install libatlas-base-dev –y
sudo apt-get install libjasper-dev -y
sudo apt-get install libqtgui4 –y
sudo apt-get install libqt4-test –y
After that, use the command given below to install the OpenCV on your Raspberry Pi.
pip3 install opencv-contrib-python==4.1.0.25
Installing Tensorflow and Keras on Raspberry Pi 4
Before installing Tensorflow and Keras, install the following mentioned libraries that are needed.
sudo apt-get install python3-numpy
sudo apt-get install libblas-dev
sudo apt-get install liblapack-dev
sudo apt-get install python3-dev
sudo apt-get install libatlas-base-dev
sudo apt-get install gfortran
sudo apt-get install python3-setuptools
sudo apt-get install python3-scipy
sudo apt-get update
sudo apt-get install python3-h5py
The Tensorflow and the Keras library can be installed by using pip (If you have python3 as the default python environment on your raspberry pi then use pip3 command) command in the terminal.
pip3 install tensorflow
pip3 install keras
Programming Raspberry Pi for Facial Expression Recognition
Complete Facial Expression Recognition on the Raspberry Pi project directory can be downloaded from the below link.
Raspberry Pi Facial Expression Recognition Project Directory Download
Here, we are explaining the important sections of the code for a better explanation. The downloaded project folder contains a subfolder (Haarcascades), a Python file (emotion1.py), and the model(ferjj.h5).
Start the code by importing the important packages mentioned below.
Note: We are using TensorFlow API to import the Keras Library.
from tensorflow.keras import Sequential
from tensorflow.keras.models import load_model
import cv2
import numpy as np
from tensorflow.keras.preprocessing.image import img_to_array
Next, is to load the pre-trained model ( provided in the project folder) by using load_model() function which is imported from the Keras library. In the next line, create a dictionary and assign the labels to the 6 classes that we have.
# We have 6 labels for the model
class_labels = {0: 'Angry', 1: 'Fear', 2: 'Happy', 3: 'Neutral', 4: 'Sad', 5: 'Surprise'}
classes = list(class_labels.values())
# print(class_labels)
Now, the path of the Haarcascade Classifier is being provided by using the CascadeClassifier() function from the OpenCV library.
face_classifier = cv2.CascadeClassifier('./Haarcascades/haarcascade_frontalface_default.xml')
The text_on_detected_boxes() function can be used to design the output labels of the detected faces. The parameters of the text_on_detected_boxes() already have their default values. You can change these according to your need.
# This function is for designing the overlay text on the predicted image boxes.
def text_on_detected_boxes(text,text_x,text_y,image,font_scale = 1,
                           font = cv2.FONT_HERSHEY_SIMPLEX,
                           FONT_COLOR = (0, 0, 0),
                           FONT_THICKNESS = 2,
                           rectangle_bgr = (0, 255, 0)):
Testing our Facial Expression Recognition on an Images:
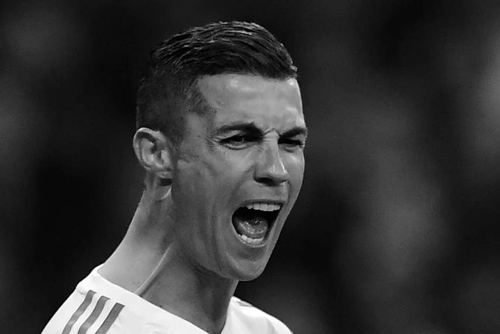
In the face_detector_image(img) function cvtColor() function is used to convert the input image into grayscale. The sample image taken here is converted to greyscale as you can see below.
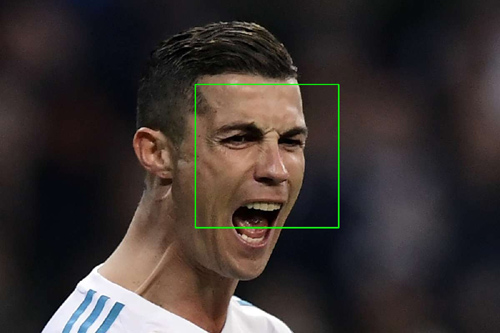
Then the Region Of Interest (ROI) of the faces is extracted from the image. This function is returning three important factors i.e. the ROI of the faces, the coordinates of the faces, and the original image. A rectangle has been drawn on the detected face. The code to convert the image to greyscale and draw a box around our ROI is shown below.
def face_detector_image(img):
    gray = cv2.cvtColor(img.copy(), cv2.COLOR_BGR2GRAY) # Convert the image into GrayScale image
    faces = face_classifier.detectMultiScale(gray, 1.3, 5)
    if faces is ():
        return (0, 0, 0, 0), np.zeros((48, 48), np.uint8), img
    allfaces = []
    rects = []
    for (x, y, w, h) in faces:
        cv2.rectangle(img, (x, y), (x + w, y + h), (0, 255, 0), 2)
        roi_gray = gray[y:y + h, x:x + w]
        roi_gray = cv2.resize(roi_gray, (48, 48), interpolation=cv2.INTER_AREA)
        allfaces.append(roi_gray)
        rects.append((x, w, y, h))
    return rects, allfaces, img
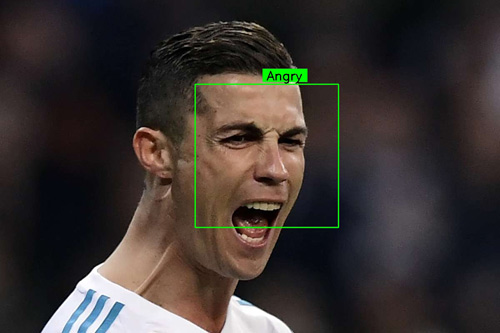
In this section of the program, the model is being applied by providing the ROI values. The first two lines under the function are used to get the input image and passing that into the face_detector_image(img) function, as discussed in the above section.
After the prediction, the output result is displayed with the detected faces. The output result is displayed from the class_labels dictionary that we have created before. We are using text_on_detected_boxes() function to design the labels on the detected faces. The imshow() function is used to display the window.
def emotionImage(imgPath):
    img = cv2.imread(imgPath)
    rects, faces, image = face_detector_image(img)
    i = 0
    for face in faces:
        roi = face.astype("float") / 255.0
        roi = img_to_array(roi)
        roi = np.expand_dims(roi, axis=0)
        # make a prediction on the ROI, then lookup the class
        preds = classifier.predict(roi)[0]
        label = class_labels[preds.argmax()]
        label_position = (rects[i][0] + int((rects[i][1] / 2)), abs(rects[i][2] - 10))
        i = + 1
        # Overlay our detected emotion on the picture
        text_on_detected_boxes(label, label_position[0],label_position[1], image)
    cv2.imshow("Emotion Detector", image)
    cv2.waitKey(0)
    cv2.destroyAllWindows()
Facial Expression Recognition on Video Stream:
The face_detector_video(img) function is used to detect the faces on a Video Stream. We are providing the input frame as an image into this function. This function is returning the coordinate of the detected faces, Region of Interest (ROI) of the faces, and the original frame. The rectangle() function is used to draw a rectangle overlapping on the detected faces.
def face_detector_video(img):
    # Convert image to grayscale
    gray = cv2.cvtColor(img, cv2.COLOR_BGR2GRAY)
    faces = face_classifier.detectMultiScale(gray, 1.3, 5)
    if faces is ():
        return (0, 0, 0, 0), np.zeros((48, 48), np.uint8), img
    for (x, y, w, h) in faces:
        cv2.rectangle(img, (x, y), (x + w, y + h), (0, 255, 0), thickness=2)
        roi_gray = gray[y:y + h, x:x + w]
    roi_gray = cv2.resize(roi_gray, (48, 48), interpolation=cv2.INTER_AREA)
    return (x, w, y, h), roi_gray, img
In this section, we are applying our model to recognize the expression on a video stream and displaying the predicted output on the video stream in real-time.
In the first two lines, we are extracting a frame from the input video stream. Then, feeding the frame into the face_detector_video(frame) function. Now, the predict() function from the classifier is used to predict the expression of the detected faces. Then we are assigning the class_labels for each prediction on the faces. Now, imshow() is used to display the window with the recognized expression on each face.
def emotionVideo(cap):
    while True:
        ret, frame = cap.read()
        rect, face, image = face_detector_video(frame)
        if np.sum([face]) != 0.0:
            roi = face.astype("float") / 255.0
            roi = img_to_array(roi)
            roi = np.expand_dims(roi, axis=0)
            # make a prediction on the ROI, then lookup the class
            preds = classifier.predict(roi)[0]
            label = class_labels[preds.argmax()]
            label_position = (rect[0] + rect[1]//50, rect[2] + rect[3]//50)
            text_on_detected_boxes(label, label_position[0], label_position[1], image) # You can use this function for your another opencv projects.
            fps = cap.get(cv2.CAP_PROP_FPS)
            cv2.putText(image, str(fps),(5, 40), cv2.FONT_HERSHEY_SIMPLEX, 1, (0, 255, 0), 2)
        else:
            cv2.putText(image, "No Face Found", (5, 40), cv2.FONT_HERSHEY_SIMPLEX, 1, (255, 0, 0), 2)
        cv2.imshow('All', image)
        if cv2.waitKey(1) & 0xFF == ord('q'):
            break
    cap.release()
    cv2.destroyAllWindows()
This is the main function of the code. The emotionVideo() function and the emotionImage() function can be used in the main function. If you want to use Facial Expression Recognition on an image, then just comment on the first two lines of the main function and uncomment the rest two lines. But make sure that you are providing the path of the input image in the IMAGE_PATH variable.
if __name__ == '__main__':
    camera = cv2.VideoCapture(0) # If you are using an USB Camera then Change use 1 instead of 0.
    emotionVideo(camera)
    # IMAGE_PATH = "provide the image path"
    # emotionImage(IMAGE_PATH) # If you are using this on an image please provide the path

Testing our Facial Expression Recognition System on Raspberry Pi
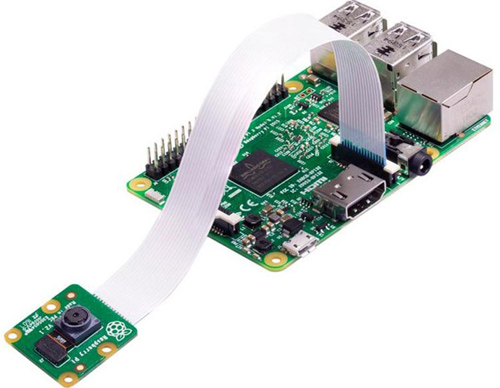
Before launching the Python script, connect the Raspberry Pi Camera module with Pi as shown below:
Now, check whether the Pi camera is working or not. After reviewing the camera, launch the Python script, and you will find a window popping up with your video feed in it. Once the Pi detects the Expression, it will display it on the video feed in Green colored box.
This is how you can implement a Facial Expression Recognition System using OpenCV and Python. If you have any questions, use our forum to post your questions.
Complete Project Code
from tensorflow.keras import Sequential

from tensorflow.keras.models import load_model

import cv2

import numpy as np

from tensorflow.keras.preprocessing.image import img_to_array

 # Load the model

model = Sequential()

classifier = load_model('ferjj.h5') # This model has a set of 6 classes

# We have 6 labels for the model

class_labels = {0: 'Angry', 1: 'Fear', 2: 'Happy', 3: 'Neutral', 4: 'Sad', 5: 'Surprise'}

classes = list(class_labels.values())

# print(class_labels)

face_classifier = cv2.CascadeClassifier('./Haarcascades/haarcascade_frontalface_default.xml')

# This function is for designing the overlay text on the predicted image boxes.

def text_on_detected_boxes(text,text_x,text_y,image,font_scale = 1,

                           font = cv2.FONT_HERSHEY_SIMPLEX,

                           FONT_COLOR = (0, 0, 0),

                           FONT_THICKNESS = 2,

                           rectangle_bgr = (0, 255, 0)):

    # get the width and height of the text box

    (text_width, text_height) = cv2.getTextSize(text, font, fontScale=font_scale, thickness=2)[0]

    # Set the Coordinates of the boxes

    box_coords = ((text_x-10, text_y+4), (text_x + text_width+10, text_y - text_height-5))

    # Draw the detected boxes and labels

    cv2.rectangle(image, box_coords[0], box_coords[1], rectangle_bgr, cv2.FILLED)

    cv2.putText(image, text, (text_x, text_y), font, fontScale=font_scale, color=FONT_COLOR,thickness=FONT_THICKNESS)

# Detection of the emotions on an image:

def face_detector_image(img):

    gray = cv2.cvtColor(img.copy(), cv2.COLOR_BGR2GRAY) # Convert the image into GrayScale image

    faces = face_classifier.detectMultiScale(gray, 1.3, 5)

    if faces is ():

        return (0, 0, 0, 0), np.zeros((48, 48), np.uint8), img

    allfaces = []

    rects = []

    for (x, y, w, h) in faces:

        cv2.rectangle(img, (x, y), (x + w, y + h), (0, 255, 0), 2)

        roi_gray = gray[y:y + h, x:x + w]

        roi_gray = cv2.resize(roi_gray, (48, 48), interpolation=cv2.INTER_AREA)

        allfaces.append(roi_gray)

        rects.append((x, w, y, h))

    return rects, allfaces, img

def emotionImage(imgPath):

    img = cv2.imread(imgPath)

    rects, faces, image = face_detector_image(img)

    i = 0

    for face in faces:

        roi = face.astype("float") / 255.0

        roi = img_to_array(roi)

        roi = np. expand_dims(roi, axis=0)

        # make a prediction on the ROI, then lookup the class

        preds = classifier.predict(roi)[0]

        label = class_labels[preds.argmax()]

        label_position = (rects[i][0] + int((rects[i][1] / 2)), abs(rects[i][2] - 10))

        i = + 1

        # Overlay our detected emotion on the picture

        text_on_detected_boxes(label, label_position[0],label_position[1], image)

    cv2.imshow("Emotion Detector", image)

    cv2.waitKey(0)

    cv2.destroyAllWindows()

# Detection of the expression on video stream

def face_detector_video(img):

    # Convert image to grayscale

    gray = cv2.cvtColor(img, cv2.COLOR_BGR2GRAY)

    faces = face_classifier.detectMultiScale(gray, 1.3, 5)

    if faces is ():

        return (0, 0, 0, 0), np.zeros((48, 48), np.uint8), img

    for (x, y, w, h) in faces:

        cv2.rectangle(img, (x, y), (x + w, y + h), (0, 255, 0), thickness=2)

        roi_gray = gray[y:y + h, x:x + w]

    roi_gray = cv2.resize(roi_gray, (48, 48), interpolation=cv2.INTER_AREA)

    return (x, w, y, h), roi_gray, img

def emotionVideo(cap):

    while True:

        ret, frame = cap.read()

        rect, face, image = face_detector_video(frame)

        if np.sum([face]) != 0.0:

            roi = face.astype("float") / 255.0

            roi = img_to_array(roi)

            roi = np.expand_dims(roi, axis=0)

            # make a prediction on the ROI, then lookup the class

            preds = classifier.predict(roi)[0]

            label = class_labels[preds.argmax()]

            label_position = (rect[0] + rect[1]//50, rect[2] + rect[3]//50)

            text_on_detected_boxes(label, label_position[0], label_position[1], image) # You can use this function for your another opencv projects.

            fps = cap.get(cv2.CAP_PROP_FPS)

            cv2.putText(image, str(fps),(5, 40), cv2.FONT_HERSHEY_SIMPLEX, 1, (0, 255, 0), 2)

        else:

            cv2.putText(image, "No Face Found", (5, 40), cv2.FONT_HERSHEY_SIMPLEX, 1, (255, 0, 0), 2)

        cv2.imshow('All', image)

        if cv2.waitKey(1) & 0xFF == ord('q'):

            break

    cap.release()

    cv2.destroyAllWindows()

if __name__ == '__main__':

    camera = cv2.VideoCapture(0) # If you are using an USB Camera then Change use 1 instead of 0.

    emotionVideo(camera)

    # IMAGE_PATH = "provide the image path"

    # emotionImage(IMAGE_PATH) # If you are using this on an image please provide the path
Comments
On which kernel version of the Raspberry pi OS you did this work?
Hi Shihab Ahmed, I have used the latest os from the official website of the raspberrypi. And I used the "sudo apt-get update" and "sudo apt-get upgrade" to get the latest and stable kernel version.
Can you share the training model GitHub link?
This model is not working for me on pi 4 with the latest raspberry OS. !pip3 install TensorFlow gives an error. does the latest OS support TensorFlow? What's the solution?

Nice and interesting solution.
Can it make solution for Learners feedback during online classes?