

We are in the Internet of Things (IoT) generation! These days, you can control your home gadgets/devices like air-conditioner, room heater, water heater, etc. remotely from anywhere and the device to do this can easily be built or purchased off the shelf. Over the course, we have also built a few IoT based home automation projects using Arduino, ESP, and Raspberry Pi. But for every Wi-Fi-based IoT-enabled devices, you need an Internet connection or you can say uninterrupted Internet/Wi-Fi connectivity. But using broadband connection has its limitations like sometimes wifi signal drop (especially for 2.4 GHz band, occupied with more interference) from room to room or floor to floor.
It is for this reason that wifi repeater or range extenders are required but commercial wifi repeaters available in the market are very costly which is not a feasible option for all. There arises the need for low-cost solutions (less than one third compared to the price of any commercial wifi repeater) only for range-extending. So, today I have shared a solution that quickly builds weekend projects within half an hour. For this, you don’t need to build any hardware circuit and you need not be an expert in electronics. Follow the simple steps given below to build your low-cost wifi repeater or range extender.
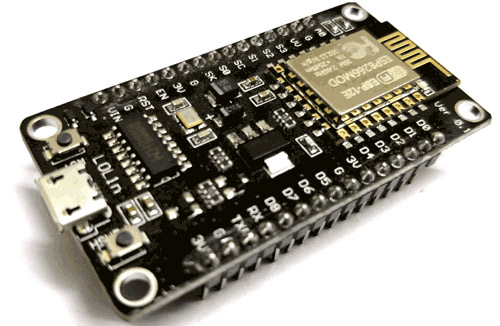
Nodemcu ESP8266
The Nodemcu ESP8266 is the main and only component so, I would like to describe some basic features and specifications too. It is an open-source IoT development platform, a combination of the wifi module and the features of Arduino (Microcontroller). It can also be programmed in Arduino IDE through the micro USB interface (with onboard flash management IC) and it is a programmable wifi transcriber module that’s the best choice for wifi networking, mash networking and has 802.11 international standard 12E wifi chip, onboard 3.3V regulator and onboard Antena. Also, it has several power input options (input using a micro USB port and two types of external power input (5v VCC input and 3.3v VCC input) and can be used as an access point.
Normally these modules can be programmed directly using the Arduino IDE, but for this project, we have to flash the firmware on NodeMCU. Note that after this process, you won't be able to use your NodeMCU with Arduino IDE. You can also refer to this ESP8266 Flashing Article to understand more about this.
Step 1: First of all, connect your ESP8266 with a computer using micro USB type B to USB cable. When connected, a blue light indicator LED will glow.
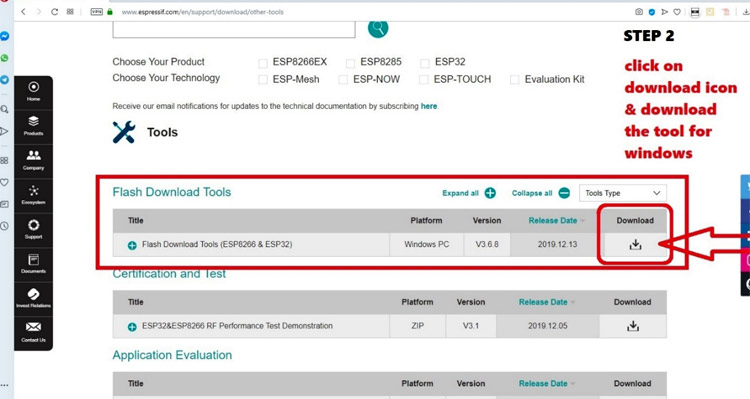
Step 2: Download the ESP8266 Flash Download tool for windows from the official website. Check the image given below to understand how to extract the zip file into the folder using WinRAR. Download the latest version of WinRAR.
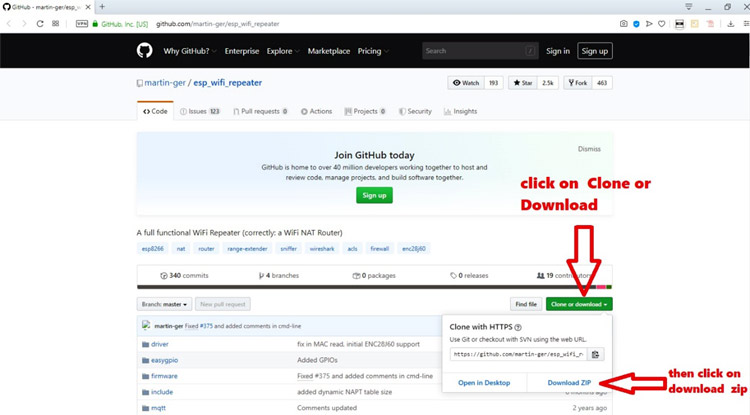
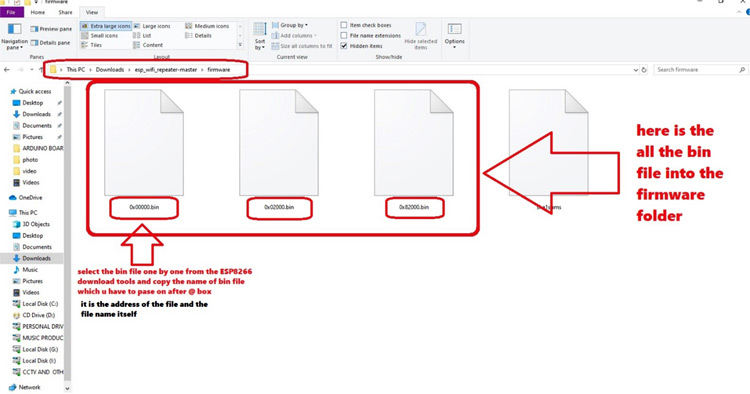
Step 3: Now, you need to download (“esp_wifi_repeater-master”). This is the fully functional Wi-Fi Repeater (with NAT and mesh networking). Download the zip file and extract it into a folder where you can see a firmware folder that has three bin files (which will be used in later stages). Download it from the GitHub page. The link and image are given below.
Now, extract the file into the folder from the zip using WinRAR
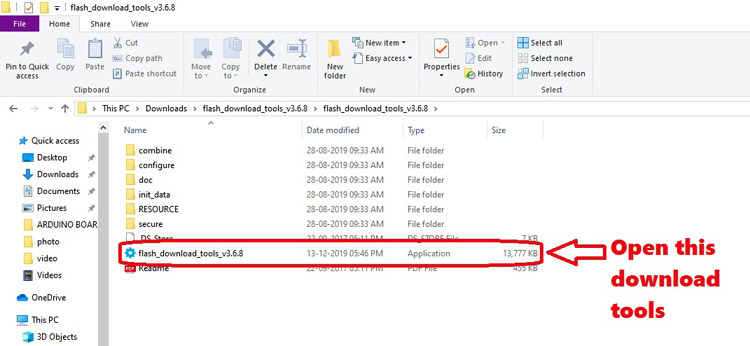
Step 4: Now, right-click on the zip file “flash_download_tools_v3.6.8” and click on ‘extract here’. You will find a folder in your directory with named “flash_download_tools_v3.6.8”. Now, open this folder and open the flash download tools as shown in the image given below.
Step 5: A command window appears and “ESPRESSIF download tools” can be opened from the list. Select the first option and click on “ESP8266 DownloadTools”, as you can see in the image given below.
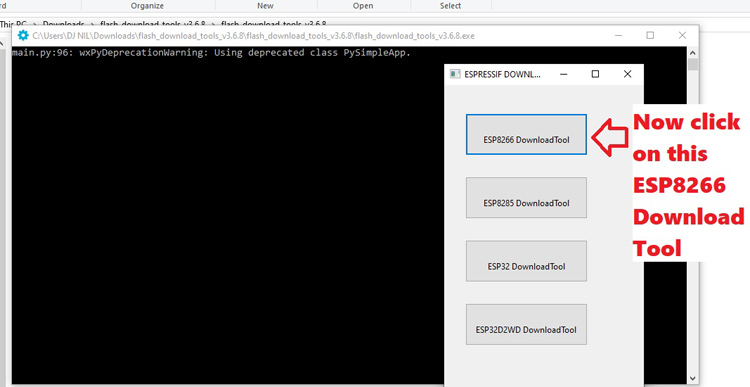
Once you click on it, you will see the main flashing tools/window as shown in the picture given below.

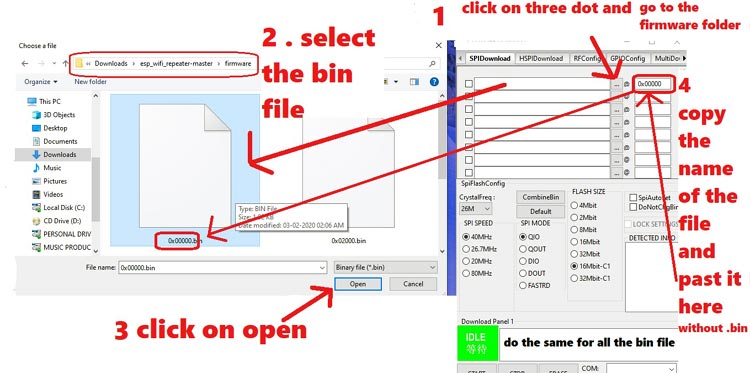
Step 6: As I mentioned in step 3, you will have to download the esp_wifi_repeater-master from the Github and extract the zip file into the folder. Open the folder and you will see a firmware folder which contains 3 bin files. Select and choose all the bin files from the ESP8266 Download tools one by one and put the name of the file itself on the right side box. This is an important step.
Right-click and select ‘Rename’. Then copy the name of the bin file (without.bin) and paste it after the @ box as shown in the image below.
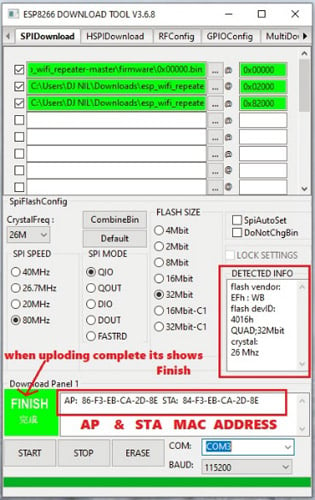
Step 7: This is a very important step. Check out the image below and according to the instructions and screenshots provided, repeat for all the bin file and change some settings of esp8266 flash downloading tools like (SPI SPEED: 80Mhz, SPI MODE: QIO, FLASH SIZE: 32Mbit) and select the Comport, Baud rate: 115200 and finally click the “START” button to start flashing your ESP8266.
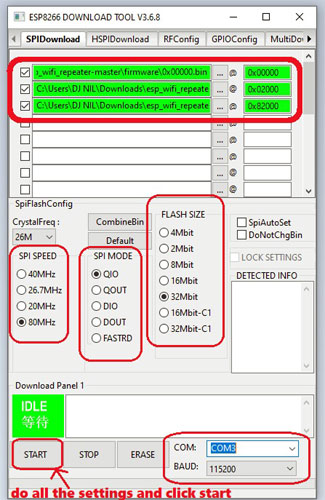
Before flashing, you will see “IDLE” written which means it is an ideal condition and after successfully flashing, you will see “ FINISH” dialogue in the monitor window of ESP8266 download tools. Also, you can view all the flashing related information, and you will get the Access point MAC Address and STA MAC Address, which is a very important network and device identity-related information.
Now, just disconnect your ESP8266 and re-connect it or you can press the reset button on ESP 8266 so that the firmware restart.
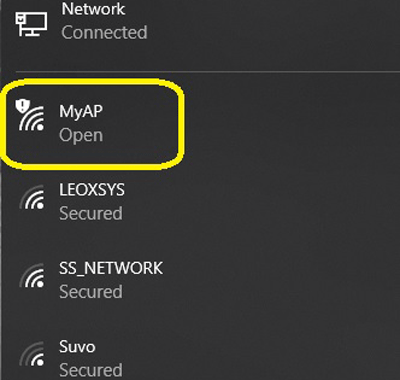
Step 8: Now, you have found a new Accesspoint or wi-fi hotspot name “MyAP” which is the SSID broadcasted by ESP8266 but hold on! It has no Internet connectivity.
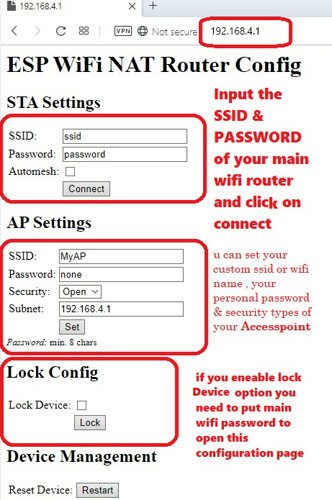
You need to set up and configure with your main home/office Wi-Fi router by opening its configuration page. Connect your mobile/laptop with this (“MyAP”) SSID and dial the IP address (192.168.4.1) from your favorite browser and the configuration page will be opened. Under the STA settings add your main wifi network SSID name and password and click on connect. After that, configuration settings will be saved and under the AP (access point) settings, you can set your SSID name and password. Select the encryption security types like the most popular WPA2. Follow the screenshots given below for better understanding.
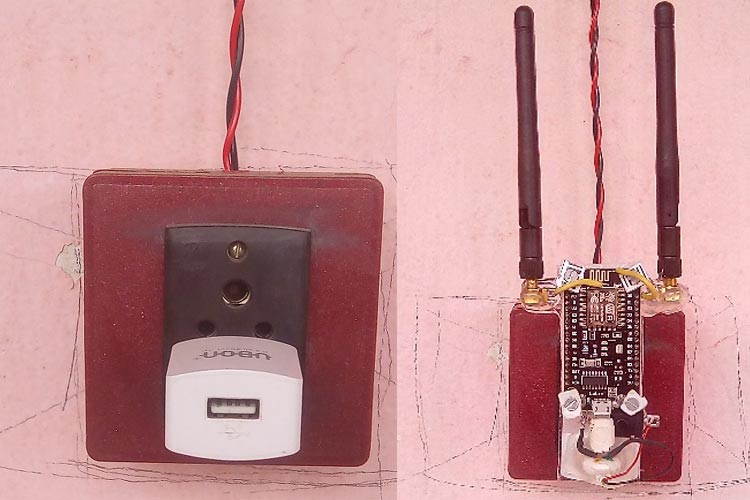
Step 9: After everything was done, I just made a simple fabrication on a piece of plexiglass or in glass fiber and added an on-off switch. Experimentally, I added two pieces of 2 dbi antenna and connected with an onboard antenna for better wifi range coverage, which can also be rotated (although ESP8266 has onboard antenna). I powered it up using a 5v USB mobile charger with a USB cable and connected on ESP8266 MicroUSB port and put it on ac sockets. This is the best reliable power supply for long-term use.
Another advantage is that this Wi-Fi repeater needs 5v power supply which can be powered from a good power bank you can also build your own power bank by following this article. Hence, there are chances that it can be used outdoor along with your mobile phone but commercial Wi-Fi repeater doesn’t have this facility. You can’t use it in the outdoors because the AC electric power supply is always needed.
The complete working of Wi-Fi repeater can be found in the video linked below, we have also made a speed test in this new Wi-Fi repeater and got nearly 4.0Mbps. If you have any questions please leave them in the comment section or use our forums for other technical questions.
Comments
You say to set the memory to 32MB, but I have the 4MB version. Will this still work?
Thanks, Mark.
Hi,
Thanks a lot for your information on repeaters, I have a question about the placement of repeaters.
I want to use the repeater for an "AC controllers" project in a building where there are some rooms at the right end of the floor, without a good wifi connection, how can I find the best place to put the repeater to increase the coverage of rooms?
regards
How to upload this 3 wifi repeater bin files using android ?

sir i followed a youtube vedio to do this task and followed thier step and created a network but it is not giving access to internet now i want to do steps you mentioned but now when i am using your provided flash tool but it is doing nothing some times and sometimes it gives a com errror
moreover my computer says that device not recongnzed
kindly help me