

Adding sounds or music to our project will always make it looks cool and sounds much more attractive. Especially if you are using an Arduino and you have lots of pins free, you can easily add sound effects to your project by just investing in an extra SD card module and a normal speaker. In this article I will show you how easy it is to Play music/add sound effects using your Arduino Board. Thanks to the Arduino community who have developed some libraries to build this in a fast and easy way. We have also used IC LM386 here for amplification and noise cancelation purpose.
In this project, we will play the .wav music files stores in an SD card. We will program the Arduino to read these .wav files and play the audio on a speak through an LM386 Audio amplifier. Now, since this code could only read .wav files, technically this project cannot be called as an Arduino Mp3 Player, but hey you will still be able to hear songs with it. If you are looking for simple alternatives like an Arduio music player without SD card, you should check out the Arduino melody player which we have built earlier.
Hardware Required:
- Arduino UNO
- SD Card Reader module
- SD card
- LM386 Audio Amplifier
- 10uf Capacitor (2 Nos)
- 100uf Capacitor (2 Nos)
- 1K,10K Resistor
- Push buttons (2 Nos)
- Breadboard
- Connecting Wires
Getting ready with your WAV audio files:
For playing sounds from SD Card using Arduino, we need audio files in .wav format because Arduino Board can play an audio file in a specific format that is wav format. To make an arduino mp3 player, there are a lot of mp3 shields are available which you can use with arduino. Or else to play mp3 files in arduino, there are websites which you can be used to convert any audio file on your computer into that specific WAV file.
So to convert any audio file into wav format, follow the below steps:
Step 1: Click on “Online Wav Converter” to enter into the website.
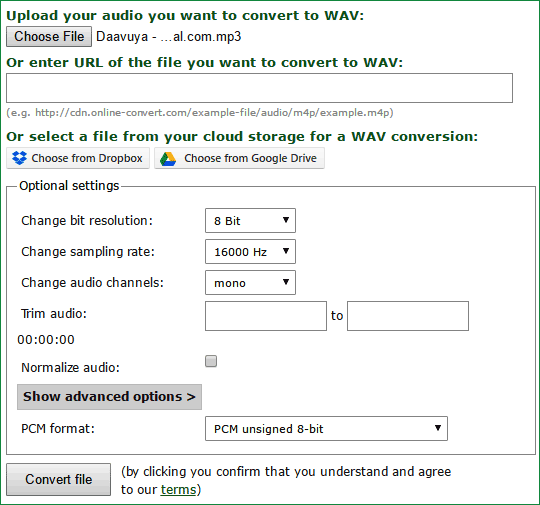
Step 2: Arduino can play a wav file in the following format. You can toy around with the settings later, but these settings were experiment to be the best in quality.
|
Bit Resolution |
8 Bit |
|
Sampling Rate |
16000 Hz |
|
Audio Channel |
Mono |
|
PCM format |
PCM unsigned 8-bit |
Step 3: In the website click on “choose file” and select the file you want to convert. Then feed in the above settings. Once done it should look something like this in the below image
Step 4: Now, click on “Convert File” and your Audio file will be converter to .Wav file format. It will also be downloaded once the conversion is done.
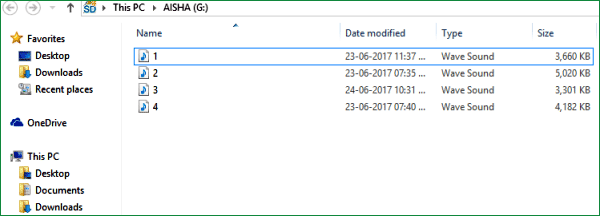
Step 5: Finally format your SD card and save your .wav audio file into it. Make sure you format it before you add this file. Also remember the name of your audio file. Similarly you can select any of your four audios and save them with names 1, 2, 3 and 4(Names should not be changed). I have converted four songs and have saved them as 1.wav, 2.wav, 3.wav and 4.wav like shown below.
Circuit and Hardware:
Circuit Diagram for this Arduino Audio File Player is simple. The complete circuit diagram is shown in the Image below.

As we know our audio files are saved into the SD card, hence we interface a SD card reader module with our Arduino. The Arduino and SD card communicate using the SPI communication protocol. Hence the Module is interfaced with the SPI pins of the Arduino as shown above in the diagram. It is further listed in the table below.
|
Arduino |
SD card module |
|
+5V |
Vcc |
|
Gnd |
Gnd |
|
Pin 12 |
MISO (Master In Slave out) |
|
Pin 11 |
MOSI (Master Out Slave In) |
|
Pin 13 |
SCK (Synchronous Clock) |
|
Pin 4 |
CS (Chip Select) |
Now the Arduino will be able to read the music file from the SD card and play it on the pin number 9. But the audio signals produced by the Arduino on pin 9 will not be audible much. Hence we amplify it by using the LM386 Low voltage Audio amplifier IC.
The amplifier shown above is designed for a Gain of 200 and the Vdd (pin 6) is powered by the 5V pin of the Arduino. If you want to increase/decrease the sound you can increase/decrease the voltage provided to this pin. It can withstand a maximum of 15V. Learn more about this 200 gain amplification configuration for LM386 here.
We also have two push buttons connected to the pin 2 and 3 of the Arduino. These switches are used to play the next track of the song and play/pause the music respectively. I have used these buttons just to demonstrate its abilities; you can play the song whenever required. Check the Demo Video at the end.
You can assemble this circuit completely over a Breadboard as shown in the picture below

Programming your Arduino:
Once we are ready with the Hardware and the SD card, we are just one step away playing those songs. Insert the card into your SD card module and follow the steps below.
Step 1: As said earlier we will be using a library to make this project work. The link for the library is given below. Click on it and select “Clone or download” and choose download as ZIP.
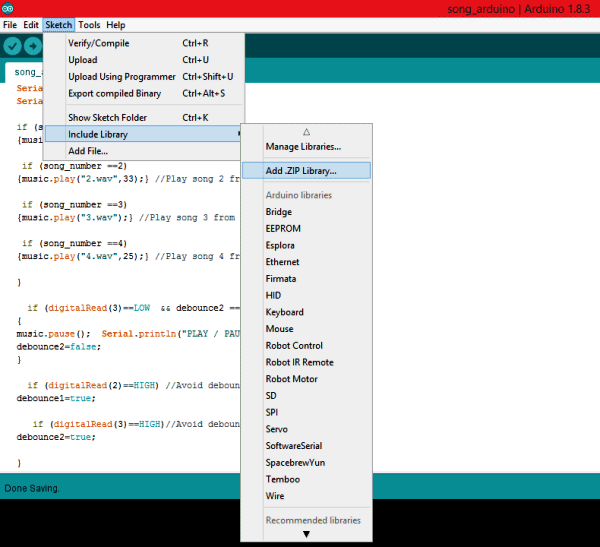
Step 2: Add this Zip file into your Arduino IDE by selecting Sketch->Include Library -> Add .ZIP Library as shown below and select the ZIP file that we just downloaded.
Step 3: The complete program of the arduino music player project is given at the end of this article, simply copy it and paste it in the Arduino Program. Now, click on Upload and get ready to play your audio files.
The program is self explanatory since they have the comment lines. But, I have also explained the ability of the TMRpcm library below.
Playing an audio file:
You can play any audio that is stored in Wav format inside the SD card module by using the line below.
music.play("3.wav");
//object name.play (“FileName.wav”);
You can use this line at places where you want to trigger the Audio
Pause an audio File:
To pause an Audio file, you can simply call the line below.
music.pause();
//objectname.pause();
Forwarding/Rewinding an Audio:
There are not direct ways to forward or rewind an Audio file, but you can use the line below to play a song at a particular time. This can be used to forward/rewind with some additional programming.
music.play("2.wav",33); //Plays the song from 33rd second
//objectname.play(“Filename.wav”,time in second);
Setting the quality of the audio:
The library gives us two qualities to play the music, one is to play as normal mode the other to play with 2X oversampling.
music.quality(0); //Normal Mode
music.quality(1); //2X over sampling mode
Setting the Volume of the audio:
Yes, you can control the volume of the audio through software. You can simply set the volume by using the line below. Higher music volumes tend to affect the quality of the audio, hence use hardware control when possible.
music.setVolume(5);        //Plays the song at volume 5
//objectname.setVolume(Volume level);
Working of this Arduino Music Player:
After programming your Arduino simply press the button connected to pin 2 and your Arduino will play the first song (saved as 1.wav) for you. Now you can press the button again to change your track to the next song that is to play 2.wav. Likewise you can navigate to all four songs.
You can also play/Pause the song by pressing the button connected to pin 3. Press it once to pause the song and press it again to play it from where it stopped. Watch the video below for complete working (or maybe to relax yourself with some songs).

Hope you enjoyed the project. Now it is up to your creativity to use them in your projects. You can make a speaking clock, voice assistant, talking robot, voice alert security system and much more. Let me know how you are planning to use it through the comment section and also if you have any problems in getting this thing work you can reach me through the forums or the comment section below.
Complete Project Code
/*

Arduino Based Music Player
 This example shows how to play three songs from SD card by pressing a push button
 The circuit:

 * Push Button on pin 2 and 3

 * Audio Out - pin 9

 * SD card attached to SPI bus as follows:

 ** MOSI - pin 11

 ** MISO - pin 12

 ** CLK - pin 13

 ** CS - pin 4
 created  25 Jun 2017

 by Aswinth Raj
 This example code was created for CircuitDigest.com
 */


#include "SD.h" //Lib to read SD card

#include "TMRpcm.h" //Lib to play auido

#include "SPI.h" //SPI lib for SD card
#define SD_ChipSelectPin 4 //Chip select is pin number 4

TMRpcm music; //Lib object is named "music"
int song_number=0;

boolean debounce1=true;

boolean debounce2=true;

boolean play_pause;
void setup(){

music.speakerPin = 9; //Auido out on pin 9

Serial.begin(9600); //Serial Com for debugging

if (!SD.begin(SD_ChipSelectPin)) {

Serial.println("SD fail");

return;

}
pinMode(2, INPUT_PULLUP); //Button 1 with internal pull up to chage track

pinMode(3, INPUT_PULLUP); //Button 2 with internal pull up to play/pause

pinMode(3, INPUT_PULLUP); //Button 2 with internal pull up to fast forward
music.setVolume(5);    //   0 to 7. Set volume level

music.quality(1);        //  Set 1 for 2x oversampling Set 0 for normal

//music.volume(0);        //   1(up) or 0(down) to control volume

//music.play("filename",30); plays a file starting at 30 seconds into the track

}
void loop()

{


  if (digitalRead(2)==LOW  && debounce1 == true) //Button 1 Pressed

  {

  song_number++;

  if (song_number==5)

  {song_number=1;}

  debounce1=false;

  Serial.println("KEY PRESSED");

  Serial.print("song_number=");

  Serial.println(song_number);
  if (song_number ==1)

  {music.play("1.wav",10);} //Play song 1 from 10th second
  if (song_number ==2)

  {music.play("2.wav",33);} //Play song 2 from 33rd second
  if (song_number ==3)

  {music.play("3.wav");} //Play song 3 from start
  if (song_number ==4)

  {music.play("4.wav",25);} //Play song 4 from 25th second
  if (digitalRead(3)==LOW  && debounce2 == true) //Button 2 Pressed

  {

  music.pause();  Serial.println("PLAY / PAUSE");

  debounce2=false;

  }
  if (digitalRead(2)==HIGH) //Avoid debounce

  debounce1=true;
  if (digitalRead(3)==HIGH)//Avoid debounce

  debounce2=true;

}
}
Comments
Can I use more than 4 tracks..like for eg. One button play one track and other button play more than 4 tracks. Thanks
Yes you can, all you have to do it program the Arduino accordingly
Hi can I play more than 4 tracks. For example one button play one track and other play more than 4 tracks with a play and stop?. Thanks
Hi, B.Aswinth Raj
I made a same by following your project, but can't get sound, I am not sure what is wrong with my circu, could I send a picture and do me a favor and help have a look? thank you.
Hi, thank you for the great tutorial. My problem is how to play just one song? I didn't include any push bottoms. I just have one line of code -- music.play("1.wav"); in my loop(). But in that case, I could only hear noise. However, when I put music.play("1.wav"); at the end of setup(), it played the music. So how do I fix my code, so I can put music.play("1.wav"); in my loop()?
when i press button 1 the first song plays, but when i press it the second time nothing happens. also with button 2, nothing happens when i press it. i think i connected the button circuit correctly. what should be the problem?
In your video I can't hear the clicking sound every time you push the button. I strictly followed your circuit and the sketch and it works playing the music but every time i press the button to play the music a clicking sound from the switch is heard first. I tried to put a delay every time the switch is read but the clicking sound is still there. Can you help me on this? thanks
Hi guys... let me say I have 50 folders in my SD card and each folder contain 10 songs. What must I do if I want to play song number 5 in folder 21? Thank you guys
Thank you for a wonderful tutorial! While debugging, I seem to have an issue with PIN9 oscillating (very high pitched noise). Unable to make the sketch play from the SD card. Seems I'm receiving the following error:
SD fail
KEY PRESSED
song_number=1
PLAY / PAUSE
I'm sure I'm doing something wrong.
Thank you in advance for any help!
What do you mean by oscillating very high pitched noise?
did you try connecting the speaker directly to pin by-passing the amplifier circuit ?
my speaker is producing noise only and not the music itself
hey,i have everything done,and i can play the audio after push the button connected to pin2,but when i push the button again,it doesn't work,whenever which button
please help
Hey i just bulid the project but it does not work, i have an error...
i will post here the ourput:
/Users/elamo/Documents/Arduino/mp3/mp3.ino: In function 'void loop()':
/Users/elamo/Documents/Arduino/mp3/mp3.ino:66:25: warning: ISO C++ forbids converting a string constant to 'char*' [-Wwrite-strings]
{music.play("1.wav",10);} //Play song 1 from 10th second
^
/Users/elamo/Documents/Arduino/mp3/mp3.ino:69:25: warning: ISO C++ forbids converting a string constant to 'char*' [-Wwrite-strings]
{music.play("2.wav",33);} //Play song 2 from 33rd second
^
/Users/elamo/Documents/Arduino/mp3/mp3.ino:72:22: warning: ISO C++ forbids converting a string constant to 'char*' [-Wwrite-strings]
{music.play("3.wav");} //Play song 3 from start
^
Sketch uses 12494 bytes (38%) of program storage space. Maximum is 32256 bytes.
Global variables use 1116 bytes (54%) of dynamic memory, leaving 932 bytes for local variables. Maximum is 2048 bytes.
Can I use 10uf 50v instead of 10uf 25v? I have two 100uf 25v but I only have 10uf 50v. Will the circuit work if I use 10uf 50v capcitor? Please help!
Hi,
How much difference in the audio quality will come if I use a DAC for speaker output.
Hi, I saw someone having the same trouble as mine, I push play for the first time and it plays the song, it also displays
KEY PRESSED
song_number=1
on the serial monitor but after that whenever I push any of the two buttons nothing happens and nothing is displayed on the serial monitor, I double checked hardware connection and everything seems fine
Hi M. Raj,
Thank you for your effort, you've made a great tutorial.
I have questions regarding the capacitors connected to the amplifier.
Why are they used there? How would the circuit behave without them?
I've never seen this kind of circuitry.
Thank you.
Hi, Raj.
It would be better to fix the source code on the advise of Michael McGuire
Jul 08, 2018.
The current code doesn't works by pushing buttons excepting at the first time.
The music player only works once and also plays only one song none of the functions work. I was able to play the second song once and never again only gthe first song is played
Hello. Can I use this project in addition with HC-SR04 ultrasonic sensor to detect birds and produce audio to deter bird. And I am curious about what is the power of the speaker (wattage, W)?
Hello,
This is a very useful tutorial! I have tried to connect a simpler version (no buttons - just playing a single song). It starts and plays but the quality is really bad it is very noisy. What could be the most plausible reason for this? I have a lot of other things connected to the breadboard and it is quite heavy in terms of number of wires - is it possible that this is the reason?
Thank you
Mostly the fault should be with your amplifier circuit, you can try bypassing the amplifier or use a pre-built one to check how the quality is. Also what speaker are you using ?
Hi Aswinth,
Thank you for your answer. The speaker I am using is HI-FI Replacement Speaker Cone Mid range Frequency 5" 125mm 40W 8 Ohm Speaker 1.
Hi Aswinth,
My speaker is Hi-Fi Replacement Speaker Cone Mid range Frequency 5" 125mm 40W 8 Ohm.
Thank you
Hello Raj,
Thanks very much for this tutorial !
However, following your circuit, I get weird sound: I heard a quiet loud sinusoide at very high frequency. Behind that I can hear the music, but much lower. I checked many time the wiring, it looks good.
I used 2x100uF / 2x10uF / 1kOhm at input of amp and 10kohm at output.
Any idea to make my debugging session advance...?
Hello,
I am getting the following error. I have loaded the library and have it included. Can you tell me what the issue is? Thank you.
C:\Users\jeff\OneDrive\Documents\Arduino\Grand_Entrance\Grand_Entrance.ino: In function 'void loop()':
C:\Users\jeff\OneDrive\Documents\Arduino\Grand_Entrance\Grand_Entrance.ino:70:25: warning: ISO C++ forbids converting a string constant to 'char*' [-Wwrite-strings]
{music.play("1.wav",10);} //Play song 1 from 10th second
^
C:\Users\jeff\OneDrive\Documents\Arduino\Grand_Entrance\Grand_Entrance.ino:73:25: warning: ISO C++ forbids converting a string constant to 'char*' [-Wwrite-strings]
{music.play("2.wav",33);} //Play song 2 from 33rd second
^
C:\Users\jeff\OneDrive\Documents\Arduino\Grand_Entrance\Grand_Entrance.ino:76:22: warning: ISO C++ forbids converting a string constant to 'char*' [-Wwrite-strings]
{music.play("3.wav");} //Play song 3 from start
^
C:\Users\jeff\OneDrive\Documents\Arduino\Grand_Entrance\Grand_Entrance.ino:79:25: warning: ISO C++ forbids converting a string constant to 'char*' [-Wwrite-strings]
{music.play("4.wav",25);} //Play song 4 from 25th second
^
Sketch uses 12842 bytes (39%) of program storage space. Maximum is 32256 bytes.
Global variables use 1084 bytes (52%) of dynamic memory, leaving 964 bytes for local variables. Maximum is 2048 bytes.
Hi, can you tell if it is possible to pass a string to the play function?
If i write
string = "1.wav";
music.play(string);
I get an error message. Is it possible to construct the string so that i can play music in a random order?
I'd love to use this with a LED push button which lights up when the audio is NOT playing, so it promts the user to press next. Is that possible please? Also, can you make it reset to the first track if no button is pressed for x amount of time?
Thanks

hi, I have a built audio amplifer. the Haljia LM386. it has 2 gnd one in and one VDD. which wires to I connect in this connection