

Pulse oximetry is a widely used medical measurement instrument and it is a non-invasive and painless test that measures oxygen saturation level in our blood that can easily detect small changes in oxygen. In the current Covid-19 situation, it has become important to track the oxygen level of multiple patients at the same time remotely without getting into contact with the patient.
So, in this project, we build a pulse oximeter using MAX30100 Pulse oximeter and ESP32 that will track the Blood Oxygen level and send the data via internet by connecting to a Wi-Fi network. This way, we can monitor multiple patients remotely by maintaining social distance with the patients. The obtained data will be shown as a graph which makes it easier for tracking and analyzing the patient’s condition. Previously, we have also built other heart rate monitors using pulse sensors. And if you are interested in other Covid-19 related projects, you can check out the Human body thermometer, Smart IR Thermometer for fever monitoring, and Wall-Mount Temperature scanner that we build earlier.
Other than the Covid-19 application, this project can also be widely used in chronic obstructive pulmonary disease (COPD), asthma, pneumonia, lung cancer, anemia, heart attack or heart failure, or in congenital heart defects.
Do note that, the sensor used in this project is not medically rated, and the project is not tested for fail-proof applications. Always use a medically rated pulse oximeter to determine the pulse and oxygen level of the patient and discuss it with a medical practitioner. The project discussed here is only for educational purposes.
MAX30100 Sensor
MAX30100 sensor is integrated pulse oximetry and heart rate monitor module. It communicates with the I2C data line and provides the SpO2 and Pulse information to the host microcontroller unit. It uses photodetectors, optical elements where red, green IR LED modulates the LED pulses. The LED current is configurable from 0 to 50mA. The below image is showing the MAX30100 sensor.
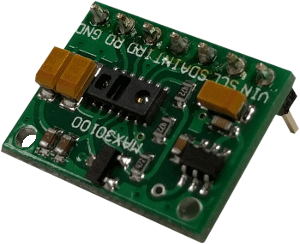
The above sensor module works with 1.8V to the 5.5V range. The pull-up resistors for the I2C pins are included in the module.
Required Components
- A WiFi connection
- ESP32
- MAX30100 Sensor
- Adafruit IO user id and a custom created dashboard (Will make it further)
- 5V adequate power supply unit with the rated current of at least 1A
- USB cable Micro USB to USBA
- A PC with Arduino IDE with ESP32 programming environment.
Interfacing MAX30100 Oximeter with ESP32
The complete circuit diagram for MAX30100 with ESP32 is given below.

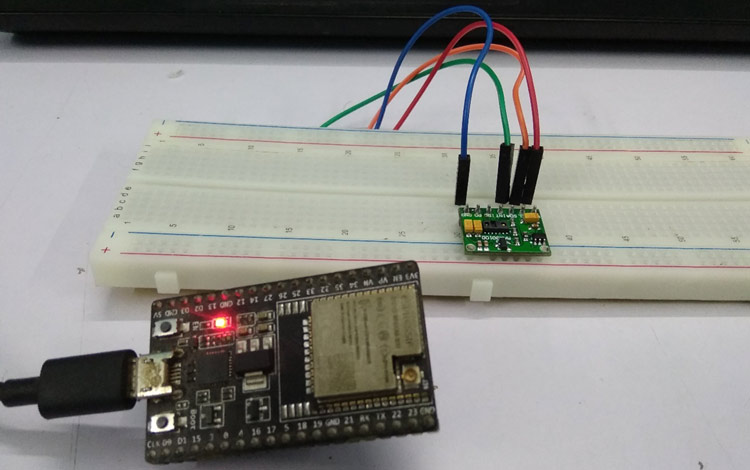
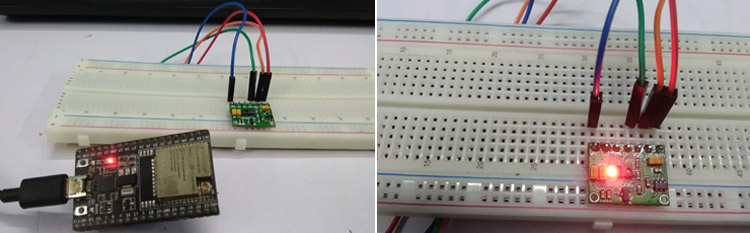
This is a very simple schematic. The pin 21 and 22 of the ESP32 devkit C is connected with pulse oximeter sensor MAX30100 with the SDA and SCL pins. The Oximeter is also powered by the 5V pin on the ESP32 development board. I made my connection using a breadboard and connecting wires and my testing setup looks like this-
Adafruit IO with ESP32 for Heart Rate Monitoring
We have previously built many Adafruit IO projects for different IoT applications. Adafruit IO is an excellent platform where a custom dashboard can be created. To create the custom dashboard for IoT based Pulse-Oximeter sensor, use the below steps-
Step 1: First sign up in the adafruit IO after giving the Fist name, last name, email address, user name, and the password.

Step 2: The blank dashboard window will open after the sign-in process is done. In this segment, we will need to create a dashboard to show the data in various ways. Thus, it is time to create the new dashboard and provide the name of the dashboard and the description.


Step 3: After filling the above form, it is time to create the graph and control section for the sensor.
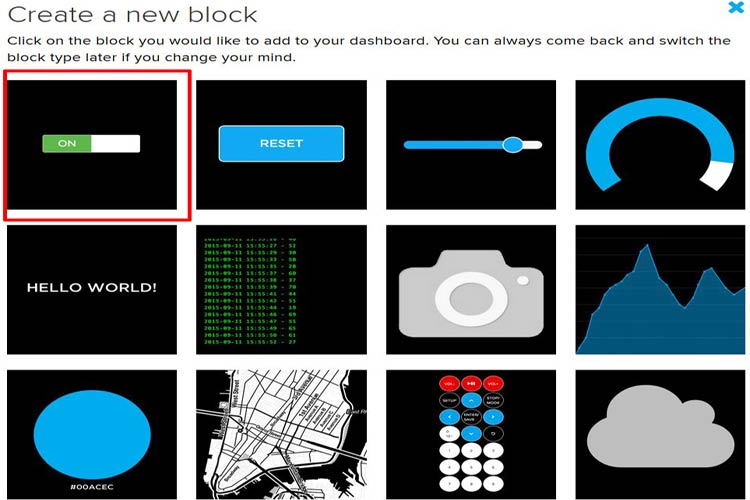
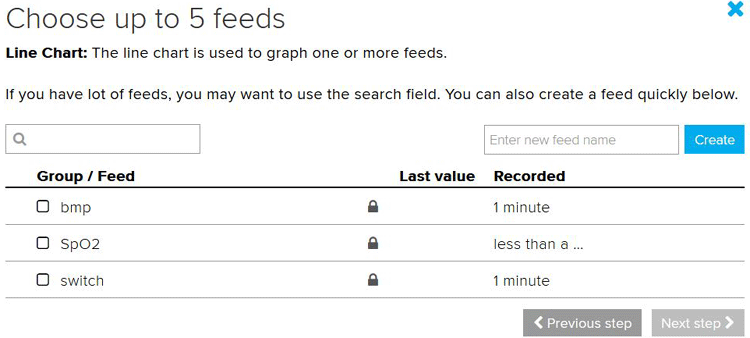
Select the switch block. It will be required for turning ON or OFF the pulse-oximeter sensor.

Step 4: Write down the block name. As we can see in the above image, the toggle function will provide two states, ON and OFF. In the same process, select the graph block.
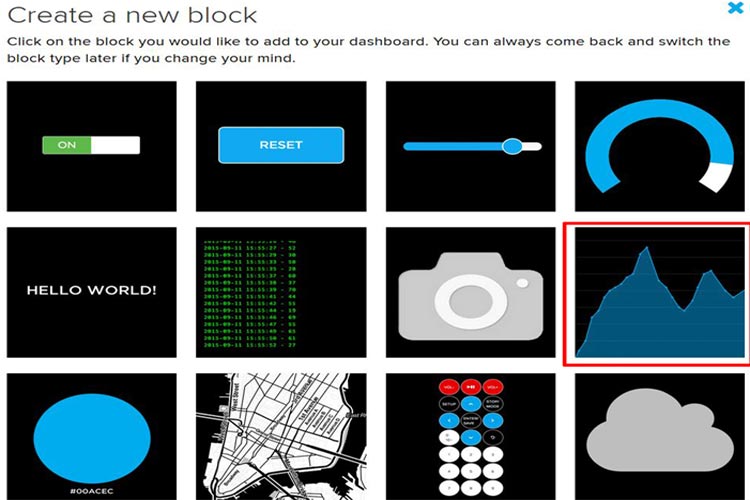
This graph section needs to be selected twice as two graphs will be displayed, Heart bit and SpO2. Both sections are created. As we can see, we have selected all input and output functionality.
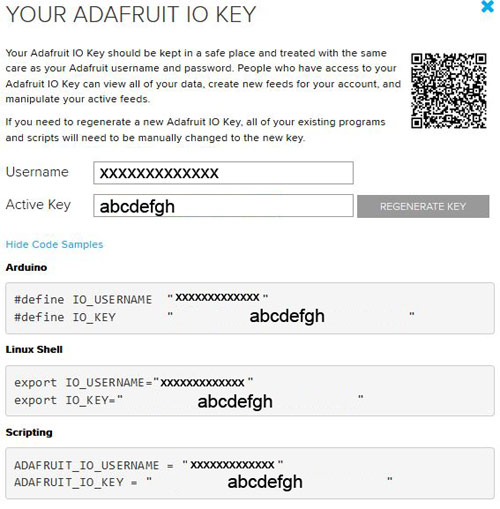
Step 5: The next and final step is to have the adafruit key. As we can see, we get the adafruit key and this needs to be added in the code.
The Adafruit IO is now configured. It is time to prepare the hardware and create the firmware for this project.
Code Explanation
This code uses many libraries and all are important. The libraries are MAX30100 Pulse oximeter sensor library, Wire.h for the I2C, WiFi.h for the WiFi related support in ESP32, Adafruit MQTT, and MQTT Client library. The complete program can be found at the bottom of this page.
Those libraries mentioned above are included at the beginning of the code.
#include <stdint.h>
#include <Wire.h>
#include <WiFi.h>
#include "Adafruit_MQTT.h"
#include "Adafruit_MQTT_Client.h"
#include "MAX30100_PulseOximeter.h"  //used arduino builtin MAX30100 lib (https://github.com/oxullo/Arduino-MAX30100)
The next two definitions are the WLAN SSID and WLAN Password. This has to be exact and it will be used by the ESP32 to connect with the WiFi network.
#define WLAN_SSID  "xxxxxxxxx"
#define WLAN_PASS  "2581xxxxx2"
Next, we defined the Adafruit io definitions.
#define AIO_UPDATE_RATE_SEC 5
#define AIO_SERVER  "io.adafruit.com"
#define AIO_SERVERPORT  1883
#define AIO_USERNAME  "xxxxxxxxxxxxx"
#define AIO_KEY "abcdefgh"
The update rate will update the data on every 5 Seconds, the server will be io.adafruit.com with a server port of 1883. The username and password will be the generated username and password from the adafruit IO dashboard. It will be different for all and need to be generated as described in the adafruit setup section.
The I2C ports are defined afterward as shown in the schematic.
#define I2C_SDA 21
#define I2C_SCL 22
Next, three variables are used to store the last report and the bpm and spo2 value.
uint32_t tsLastReport = 0;
float bpm_dt=0;
float spo2_dt = 0;
The MQTT works with a pub-sub model (publish and subscribe). In this work model, the device that submits the data to the Adafruit server stays in publish mode where the Adafruit IO server subscribes to the same data points. In such an effect, whenever the device publishes any new data, the server, as it is subscribed to the same, receives the data and provides necessary action.
The same thing happens when the server publishes the data, and the device subscribes to it. In our application, the device sends the data of SPO2 and BPM to the server, so it publishes the same and it receives the ON-OFF state from the server, thus subscribing to this one. This thing is configured in the code snippet described below-
WiFiClient client;
Adafruit_MQTT_Client mqtt(&client, AIO_SERVER, AIO_SERVERPORT, AIO_USERNAME, AIO_KEY);
Adafruit_MQTT_Subscribe sw_sub = Adafruit_MQTT_Subscribe(&mqtt, AIO_USERNAME "/feeds/switch");
// Notice MQTT paths for AIO follow the form: <username>/feeds/<feedname>
Adafruit_MQTT_Publish bpm_pub = Adafruit_MQTT_Publish(&mqtt, AIO_USERNAME "/feeds/bpm");
Adafruit_MQTT_Publish spo2_pub = Adafruit_MQTT_Publish(&mqtt, AIO_USERNAME "/feeds/SpO2");
In the setup function, we are starting the I2C, connecting the WiFi with the predefined SSID and Password, and starting the MQTT subscription process for the switch state (The switch button created in the Adafruit IO dashboard).
void setup()
{
            Serial.begin(115200);
            Wire.begin(I2C_SDA, I2C_SCL);
            WiFi.begin(WLAN_SSID, WLAN_PASS);
            while (WiFi.status() != WL_CONNECTED) {
            delay(500);
            Serial.print(".");
            }
            Serial.println();
            Serial.println("WiFi connected");
            Serial.println("IP address: "); Serial.println(WiFi.localIP());
            mqtt.subscribe(&sw_sub);
            Serial.print("Initializing pulse oximeter..");
            // Initialize the PulseOximeter instance
            // Failures are generally due to an improper I2C wiring, missing power supply
            // or wrong target chip
            if (!pox.begin()) {
            Serial.println("FAILED");
            for(;;);
            } else {
            Serial.println("SUCCESS");
            }
            // The default current for the IR LED is 50mA and it could be changed
            //   by uncommenting the following line. Check MAX30100_Registers.h for all the
            //   available options.
            pox.setIRLedCurrent(MAX30100_LED_CURR_7_6MA);
            // Register a callback for the beat detection
            pox.setOnBeatDetectedCallback(onBeatDetected);
            stopReadPOX();
}
After all of this, the max30100 is started with a led current setting. Different current settings are also available in the MAX30100 header files for different configurations. A heartbeat detection call back function is also started. After all of these setups, the oximeter sensor is stopped.
In the loop function, the MQTT connection is started and the subscription model is checked in every 5000 milliseconds. In this situation, if the switch is turned on, it starts to read the oximeter sensor and publish the data of the Heartbeat and the SPO2 value. If the switch is turned off, it suspends all tasks related to the pulse oximeter sensor.
void loop() {
  MQTT_connect();
  Adafruit_MQTT_Subscribe *subscription;
  while ((subscription = mqtt.readSubscription(5000)))
  {
            if (subscription == &sw_sub)
            {
            Serial.print(F("Got: "));
            Serial.println((char *)sw_sub.lastread);
            if (!strcmp((char*) sw_sub.lastread, "ON"))
            {
            Serial.print(("Starting POX... "));
            startReadPOX();
            BaseType_t xReturned;
            if(poxReadTaskHld == NULL){
            xReturned = xTaskCreate(
                        poxReadTask, /* Function that implements the task. */
                        "pox_read", /* Text name for the task. */
                        1024*3,    /* Stack size in words, not bytes. */
                        NULL,  /* Parameter passed into the task. */
                        2,/* Priority at which the task is created. */
                        &poxReadTaskHld ); /* Used to pass out the created task's handle. */
            }
            delay(100);
            if(mqttPubTaskHld == NULL){
            xReturned = xTaskCreate(
                        mqttPubTask, /* Function that implements the task. */
                        "mqttPub",  /* Text name for the task. */
                        1024*3,    /* Stack size in words, not bytes. */
                        NULL, /* Parameter passed into the task. */
                        2,/* Priority at which the task is created. */
                        &mqttPubTaskHld ); /* Used to pass out the created task's handle. */
            }
            }
            else
            {
            Serial.print(("Stoping POX... "));
            // Detele POX read task
            if(poxReadTaskHld != NULL)
            vTaskDelete(poxReadTaskHld);
            poxReadTaskHld = NULL;
            }
            // Delete the MQTT Pub Task
            if(mqttPubTaskHld != NULL){
            vTaskDelete(mqttPubTaskHld);
            mqttPubTaskHld = NULL;
            }
            stopReadPOX();
            }
            }
  }
}

IoT Based Pulse Oximeter Demonstration
The circuit is connected properly in a breadboard and the program given below is uploaded to ESP32. Make sure you change the Wi-Fi and Adafruit credentials accordingly in your code to make it work for you.
After the connection with the WiFi and Adafruit IO server, it started to work as expected.
As we can see that the SPO2 level is showing 96% and the heartbeat is showing 78 to 81 bits per minute. It is also providing the time when the data is captured.
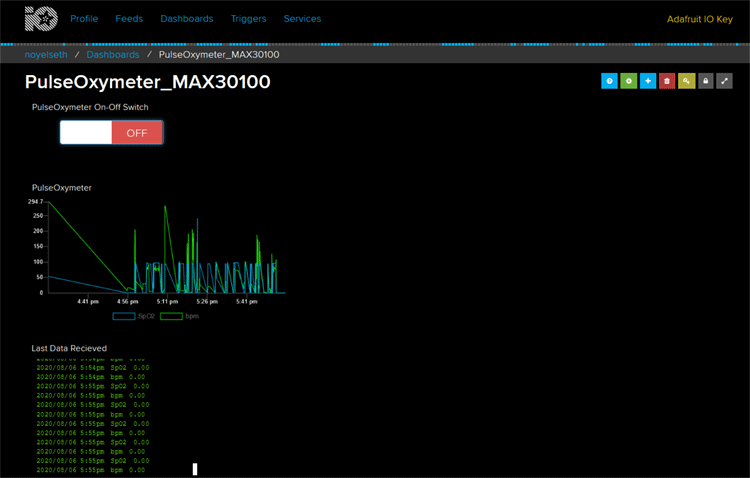
As we can see in the above image, the switch is turned off and the data is 0. The complete working video of the project can also be found at the bottom of this page.
Hope you enjoyed the article and learned something useful, if you have any questions, please leave them in the comment section below or post them on our forums.
Complete Project Code
#include <stdint.h>
#include <Wire.h>
#include <WiFi.h>
#include "Adafruit_MQTT.h"
#include "Adafruit_MQTT_Client.h"
#include "MAX30100_PulseOximeter.h"  //used arduino builtin MAX30100 lib (https://github.com/oxullo/Arduino-MAX30100)
#define WLAN_SSID          "xxxxxxxxx"
#define WLAN_PASS        "2581xxxxx2"
#define AIO_UPDATE_RATE_SEC 5
#define AIO_SERVER        "io.adafruit.com"
#define AIO_SERVERPORT  1883
#define AIO_USERNAME "xxxxxx"
#define AIO_KEY                "abcdefgh"
#define I2C_SDA   21
#define I2C_SCL   22
TaskHandle_t poxReadTaskHld = NULL;
TaskHandle_t mqttPubTaskHld = NULL;
// PulseOximeter is the higher-level interface to the sensor
PulseOximeter pox;
uint32_t tsLastReport = 0;
float bpm_dt=0;
float spo2_dt = 0;
WiFiClient client;
Adafruit_MQTT_Client mqtt(&client, AIO_SERVER, AIO_SERVERPORT, AIO_USERNAME, AIO_KEY);
Adafruit_MQTT_Subscribe sw_sub = Adafruit_MQTT_Subscribe(&mqtt, AIO_USERNAME "/feeds/switch");
// Notice MQTT paths for AIO follow the form: <username>/feeds/<feedname>
Adafruit_MQTT_Publish bpm_pub = Adafruit_MQTT_Publish(&mqtt, AIO_USERNAME "/feeds/bpm");
Adafruit_MQTT_Publish spo2_pub = Adafruit_MQTT_Publish(&mqtt, AIO_USERNAME "/feeds/SpO2");
// Callback (registered below) fired when a pulse is detected
void onBeatDetected()
{
                Serial.println("Beat!")
}
/******************************************* Function for pause MAX30100 Read **************************************************/
void stopReadPOX(){
  pox.shutdown();
}
/******************************************* Function for Start MAX30100 Read **************************************************/
void startReadPOX(){
  pox.resume();
}
/******************************************* MAX30100 Read task **************************************************/
void poxReadTask( void * param )
{
  while(1){
                // Make sure to call update as fast as possible
                pox.update();
                vTaskDelay( 1 / portTICK_PERIOD_MS );
  }
  poxReadTaskHld = NULL;
  vTaskDelete(NULL); // kill itself
}
/******************************************* MQTT publish task **************************************************/
void mqttPubTask( void * param )
{
  uint8_t sec_count=0;
  while(1){
                Serial.print("Heart rate:");
                float bpm_dt = pox.getHeartRate();
                Serial.print(bpm_dt);
                Serial.print("bpm / SpO2:");
                float spo2_dt = pox.getSpO2();
                Serial.print(spo2_dt);
                Serial.println("%");
                if(sec_count >= AIO_UPDATE_RATE_SEC){
                if (! bpm_pub.publish(bpm_dt)) {
                Serial.println(F("Failed to publish bmp.."));
                } else {
                Serial.println(F("bmp publish OK!"));
                }
                if (! spo2_pub.publish(spo2_dt)) {
                Serial.println(F("Failed to publish SpO2.."));
                } else {
                Serial.println(F("SpO2 publish OK!"));
                }
                sec_count=0;
                }
                vTaskDelay( 1000 / portTICK_PERIOD_MS );
                sec_count++;
  }
  mqttPubTaskHld = NULL;
  vTaskDelete(NULL); // kill itself
}
/******************************************** MQTT Connect Function *******************************************************/
// Function to connect and reconnect as necessary to the MQTT server.
void MQTT_connect() {
  int8_t ret;
  if (mqtt.connected()) {
                return;
  }
  Serial.print("Connecting to MQTT... ");
  uint8_t retries = 3;
  while ((ret = mqtt.connect()) != 0) {
                Serial.println(mqtt.connectErrorString(ret));
                Serial.println("Retrying MQTT connection in 5 seconds...");
                mqtt.disconnect();
                delay(5000);
                retries--;
                if (retries == 0) {
                while (1);
                }
  }
  Serial.println("MQTT Connected!");
}
/**************************************************************************************************/
void setup()
{
                Serial.begin(115200);
                Wire.begin(I2C_SDA, I2C_SCL);
                WiFi.begin(WLAN_SSID, WLAN_PASS);
                while (WiFi.status() != WL_CONNECTED) {
                delay(500);
                Serial.print(".");
                }
                Serial.println();
                Serial.println("WiFi connected");
                Serial.println("IP address: "); Serial.println(WiFi.localIP());
                mqtt.subscribe(&sw_sub);
                Serial.print("Initializing pulse oximeter..");
                // Initialize the PulseOximeter instance
                // Failures are generally due to an improper I2C wiring, missing power supply
                // or wrong target chip
                if (!pox.begin()) {
                Serial.println("FAILED");
                for(;;);
                } else {
                Serial.println("SUCCESS");
                }
                // The default current for the IR LED is 50mA and it could be changed
                //   by uncommenting the following line. Check MAX30100_Registers.h for all the
                //   available options.
                pox.setIRLedCurrent(MAX30100_LED_CURR_7_6MA);
                // Register a callback for the beat detection
                pox.setOnBeatDetectedCallback(onBeatDetected);
                stopReadPOX();
}
void loop() {
  MQTT_connect();
  Adafruit_MQTT_Subscribe *subscription;
  while ((subscription = mqtt.readSubscription(5000)))
  {
                if (subscription == &sw_sub)
                {
                Serial.print(F("Got: "));
                Serial.println((char *)sw_sub.lastread);
                if (!strcmp((char*) sw_sub.lastread, "ON"))
                {
                Serial.print(("Starting POX... "));
                startReadPOX();
                BaseType_t xReturned;
                if(poxReadTaskHld == NULL){
                xReturned = xTaskCreate(
                                poxReadTask,      /* Function that implements the task. */
                                "pox_read",           /* Text name for the task. */
                                1024*3,                  /* Stack size in words, not bytes. */
                                NULL,    /* Parameter passed into the task. */
                                2,/* Priority at which the task is created. */
                                &poxReadTaskHld );          /* Used to pass out the created task's handle. */
                }
                delay(100);
                if(mqttPubTaskHld == NULL){
                xReturned = xTaskCreate(
                                mqttPubTask,       /* Function that implements the task. */
                                "mqttPub",             /* Text name for the task. */
                                1024*3,                  /* Stack size in words, not bytes. */
                                NULL,    /* Parameter passed into the task. */
                                2,/* Priority at which the task is created. */
                                &mqttPubTaskHld );            /* Used to pass out the created task's handle. */
                }
                }
                else
                {
                Serial.print(("Stoping POX... "));
                // Detele POX read task
                if(poxReadTaskHld != NULL){
                vTaskDelete(poxReadTaskHld);
                poxReadTaskHld = NULL;
                }
                // Delete the MQTT Pub Task
                if(mqttPubTaskHld != NULL){
                vTaskDelete(mqttPubTaskHld);
                mqttPubTaskHld = NULL;
                }
                stopReadPOX();
                }
                }
  }
}Comments
Hello Sourav Gupta,
I really enjoy your articles & thank you for them.
There is a line of code in the IoT Based Heart Rate Monitor w MAX30100 and ESP32 that I do not understand & cannot find a thing on the internet to explain. It is a for statment: for(;;);
What does this do?
Thanks,
Joe
Getting error into code
Build options changed, rebuilding all
Adafruit_123:16:1: error: 'TaskHandle_t' does not name a type
TaskHandle_t poxReadTaskHld = NULL;
^
Adafruit_123:17:1: error: 'TaskHandle_t' does not name a type
TaskHandle_t mqttPubTaskHld = NULL;
^
C:\Users\ATL-1\Documents\Arduino\Adafruit_123\Adafruit_123.ino: In function 'void onBeatDetected()':
Adafruit_123:33:1: error: expected ';' before '}' token
}
^
C:\Users\ATL-1\Documents\Arduino\Adafruit_123\Adafruit_123.ino: In function 'void poxReadTask(void*)':
Adafruit_123:48:33: error: 'portTICK_PERIOD_MS' was not declared in this scope
vTaskDelay( 1 / portTICK_PERIOD_MS );
^
Adafruit_123:48:52: error: 'vTaskDelay' was not declared in this scope
vTaskDelay( 1 / portTICK_PERIOD_MS );
^
Adafruit_123:50:3: error: 'poxReadTaskHld' was not declared in this scope
poxReadTaskHld = NULL;
^
Adafruit_123:51:19: error: 'vTaskDelete' was not declared in this scope
vTaskDelete(NULL); // kill itself
^
C:\Users\ATL-1\Documents\Arduino\Adafruit_123\Adafruit_123.ino: In function 'void mqttPubTask(void*)':
Adafruit_123:78:36: error: 'portTICK_PERIOD_MS' was not declared in this scope
vTaskDelay( 1000 / portTICK_PERIOD_MS );
^
Adafruit_123:78:55: error: 'vTaskDelay' was not declared in this scope
vTaskDelay( 1000 / portTICK_PERIOD_MS );
^
Adafruit_123:81:3: error: 'mqttPubTaskHld' was not declared in this scope
mqttPubTaskHld = NULL;
^
Adafruit_123:82:19: error: 'vTaskDelete' was not declared in this scope
vTaskDelete(NULL); // kill itself
^
C:\Users\ATL-1\Documents\Arduino\Adafruit_123\Adafruit_123.ino: In function 'void loop()':
Adafruit_123:150:17: error: 'BaseType_t' was not declared in this scope
BaseType_t xReturned;
^
Adafruit_123:150:28: error: expected ';' before 'xReturned'
BaseType_t xReturned;
^
Adafruit_123:151:20: error: 'poxReadTaskHld' was not declared in this scope
if(poxReadTaskHld == NULL){
^
Adafruit_123:152:17: error: 'xReturned' was not declared in this scope
xReturned = xTaskCreate(
^
Adafruit_123:158:49: error: 'xTaskCreate' was not declared in this scope
&poxReadTaskHld ); /* Used to pass out the created task's handle. */
^
Adafruit_123:161:20: error: 'mqttPubTaskHld' was not declared in this scope
if(mqttPubTaskHld == NULL){
^
Adafruit_123:162:17: error: 'xReturned' was not declared in this scope
xReturned = xTaskCreate(
^
Adafruit_123:168:49: error: 'xTaskCreate' was not declared in this scope
&mqttPubTaskHld ); /* Used to pass out the created task's handle. */
^
Adafruit_123:175:20: error: 'poxReadTaskHld' was not declared in this scope
if(poxReadTaskHld != NULL){
^
Adafruit_123:176:43: error: 'vTaskDelete' was not declared in this scope
vTaskDelete(poxReadTaskHld);
^
Adafruit_123:180:20: error: 'mqttPubTaskHld' was not declared in this scope
if(mqttPubTaskHld != NULL){
^
Adafruit_123:181:43: error: 'vTaskDelete' was not declared in this scope
vTaskDelete(mqttPubTaskHld);
^
exit status 1
'TaskHandle_t' does not name a type
Can you plz send me full code correct one
its urgent plzzzz
hello sir,
Kindly can you help me to write the code for the project of remote based patient health monitoring .
Where the compoents will be connnected with esp32
1).AD8232
2).MAX30100
3).DS18B20
4).BME280
5) LCD DISPLAY 128*64 to display all the parameter
6). Thinkspeak(to display the parameter.
7).blutooth app for display the curve of ecg curve in app
Kindly help me-email-anisur123rai@gmail.com

Arduino: 1.8.11 (Linux), Board: "NodeMCU 0.9 (ESP-12 Module), 80 MHz, Flash, Legacy (new can return nullptr), All SSL ciphers (most compatible), 4MB (FS:2MB OTA:~1019KB), v2 Lower Memory, Disabled, None, Only Sketch, 115200"
adafruit_max30100:16:1: error: 'TaskHandle_t' does not name a type
TaskHandle_t poxReadTaskHld = NULL;
^
adafruit_max30100:17:1: error: 'TaskHandle_t' does not name a type
TaskHandle_t mqttPubTaskHld = NULL;
^
/root/Arduino/adafruit_max30100/adafruit_max30100.ino: In function 'void onBeatDetected()':
adafruit_max30100:33:1: error: expected ';' before '}' token
}
^
/root/Arduino/adafruit_max30100/adafruit_max30100.ino: In function 'void poxReadTask(void*)':
adafruit_max30100:48:33: error: 'portTICK_PERIOD_MS' was not declared in this scope
vTaskDelay( 1 / portTICK_PERIOD_MS );
^
adafruit_max30100:48:52: error: 'vTaskDelay' was not declared in this scope
vTaskDelay( 1 / portTICK_PERIOD_MS );
^
adafruit_max30100:50:3: error: 'poxReadTaskHld' was not declared in this scope
poxReadTaskHld = NULL;
^
adafruit_max30100:51:19: error: 'vTaskDelete' was not declared in this scope
vTaskDelete(NULL); // kill itself
^
/root/Arduino/adafruit_max30100/adafruit_max30100.ino: In function 'void mqttPubTask(void*)':
adafruit_max30100:78:36: error: 'portTICK_PERIOD_MS' was not declared in this scope
vTaskDelay( 1000 / portTICK_PERIOD_MS );
^
adafruit_max30100:78:55: error: 'vTaskDelay' was not declared in this scope
vTaskDelay( 1000 / portTICK_PERIOD_MS );
^
adafruit_max30100:81:3: error: 'mqttPubTaskHld' was not declared in this scope
mqttPubTaskHld = NULL;
^
adafruit_max30100:82:19: error: 'vTaskDelete' was not declared in this scope
vTaskDelete(NULL); // kill itself
^
/root/Arduino/adafruit_max30100/adafruit_max30100.ino: In function 'void loop()':
adafruit_max30100:150:17: error: 'BaseType_t' was not declared in this scope
BaseType_t xReturned;
^
adafruit_max30100:150:28: error: expected ';' before 'xReturned'
BaseType_t xReturned;
^
adafruit_max30100:151:20: error: 'poxReadTaskHld' was not declared in this scope
if(poxReadTaskHld == NULL){
^
adafruit_max30100:152:17: error: 'xReturned' was not declared in this scope
xReturned = xTaskCreate(
^
adafruit_max30100:158:49: error: 'xTaskCreate' was not declared in this scope
&poxReadTaskHld ); /* Used to pass out the created task's handle. */
^
adafruit_max30100:161:20: error: 'mqttPubTaskHld' was not declared in this scope
if(mqttPubTaskHld == NULL){
^
adafruit_max30100:162:17: error: 'xReturned' was not declared in this scope
xReturned = xTaskCreate(
^
adafruit_max30100:168:49: error: 'xTaskCreate' was not declared in this scope
&mqttPubTaskHld ); /* Used to pass out the created task's handle. */
^
adafruit_max30100:175:20: error: 'poxReadTaskHld' was not declared in this scope
if(poxReadTaskHld != NULL){
^
adafruit_max30100:176:43: error: 'vTaskDelete' was not declared in this scope
vTaskDelete(poxReadTaskHld);
^
adafruit_max30100:180:20: error: 'mqttPubTaskHld' was not declared in this scope
if(mqttPubTaskHld != NULL){
^
adafruit_max30100:181:43: error: 'vTaskDelete' was not declared in this scope
vTaskDelete(mqttPubTaskHld);
^
Multiple libraries were found for "WiFi.h"
Used: /root/Downloads/arduino/arduino-1.8.11-linux64/arduino-1.8.11/libraries/WiFi
Not used: /root/Arduino/libraries/WiFiNINA
exit status 1
'TaskHandle_t' does not name a type
This report would have more information with
"Show verbose output during compilation"
option enabled in File -> Preferences.