
A "Clap On Clap Off" switch is an interesting concept that could be used in home automation. It works as a switch which makes devices On and Off by making a clap sound. Although its name is “Clap switch”, but it can be turned ON by any sound of about same pitch of Clap sound. The main component of the circuit is the Electric Condenser Mic, which has been used as a sound sensor. Condenser Mic basically converts sound energy into electrical energy, that in turns used to trigger 555 timer IC, through a Transistor. And triggering of 555 ic works as a Clock pulse for D-type flip-flop and would turn ON the LED, which will remain ON until the next clock pulse means until the next Clap/sound. So this is the Clap Switch which will turn ON with first Clap and turn OFF with the second Clap. If we remove the D-type Flip flop from the circuit, the LED will be turned OFF automatically after some time and this time will be 1.1xR1xC1 seconds, which I have explained in my previous circuit of clap switch. For better understanding, I recommend to study the previous circuit before study this one.
Working Explanation
Here we are using Electric Condenser Mic for sensing the sound, transistor to trigger the 555 timer IC, 555 IC to SET & RESET the D-type flip flop and D-type flip flop to remember the logic level (LED ON or OFF) until next Clap/sound.
Components
Condenser Mic
555 Timer IC
Transistor BC547
Resistors (1k, 47k, 100k ohm)
Capacitor (10uF)
IC7474 more precisely DM74S74N (D-type flip flop)
LED and Battery (5-9v)
Circuit Diagram and Explanation

You can see the connections in above "clap on clap off circuit diagram". Initially the transistor is in OFF state because there is not enough (0.7v) base-emitter voltage to turn it ON. And the point A is at high potential, and point A is connected to Trigger pin 2 of 555 IC, as a result Trigger pin 2 is also at high potential. As we know that, to trigger the 555 IC through Trigger PIN 2, the voltage of the PIN 2 must be below Vcc/3. So at this stage no output at OUT PIN 3, means no clock pulse for D-type Flip-flop (IC 7474), thereby no response from D-type Flip-flop, and so LED is OFF.
Now when we produce some sound near condenser mic, this sound will be converted into electrical energy and it will raise the potential at the Base, which will turn the Transistor ON. As soon as the transistor becomes ON, the potential at Point A would become low and it will trigger the 555 IC because of the low voltage (below Vcc/3) at Trigger Pin 2. So the output PIN3 will be high and a positive clock pulse will be applied to D-type Flip-flop, which makes Flip-flop to respond and LED will turn ON. This SET state of flip flop will remain as it is until the next clock pulse (next Clap). Detailed working of D-type Flip-flop has been given below.
Here we are using 555 timer IC in Monostable Mode, whose output (PIN 3 of 555 IC) has been used as a clock pulse for D-type Flip-flop. So the clock pulse will be HIGH for 1.1xR1xC1 seconds and then it would become LOW. You can learn 555 IC operations through some 555 timer circuits HERE.
Working of D-type Flip-flop
Here we are using Positive Edge Triggered D-type flip-flop, which means this flip flop only responds when clock pulse would go from LOW to HIGH. OUTPUT Q will be shown according to state of INPUT D, at the time of the Clock pulse transition (Low to High). Flip flop remembers this OUTPUT state Q (Either HIGH or LOW), until the next positive clock pulse (Low to High). And again shows the OUPUT Q, according to the input state D, at the time of clock pulse transition (LOW to HIGH)
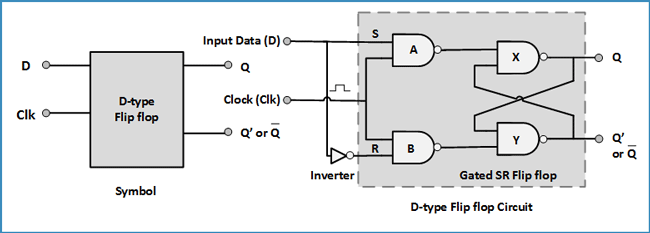
D-type Flip-flop is basically the advanced version of S-R flipflop. In S-R flipflop, the S=0 and R=0 is forbidden, because it is making the flip-flop behaving unexpectedly. This problem is resolved in D-type Flip-flop, by adding a Inverter between both the inputs (see the diagram) and the second input is given by the Clock pulse to both the NAND gates. Inverter is introduced to avoid same logic levels at both the inputs, so that “S=0 and R=0” condition never occurs.
D-type Flip-flop doesn’t change its state while clock pulse is low, because it gives the output logic level “1” at NAND gates A and B, which is the input for NAND gates X and Y. And when both the inputs are 1 for NAND gates X and Y, then output don’t change (remember S-R flip-flop). The conclusion is that it will not change its state while clockpulse is LOW, regardless of INPUT D. It only change when there is transition in Clock pulse from LOW to HIGH. It won’t change during the HIGH and LOW period. We can deduce the truth table for this D-Flip-flop:
|
Clk |
D |
Q |
Q' |
Description |
|
↓ » 0 |
X |
Q |
Q' |
Memory |
|
↑ » 1 |
0 |
0 |
1 |
Reset Q » 0 |
|
↑ » 1 |
1 |
1 |
0 |
Set Q » 1 |
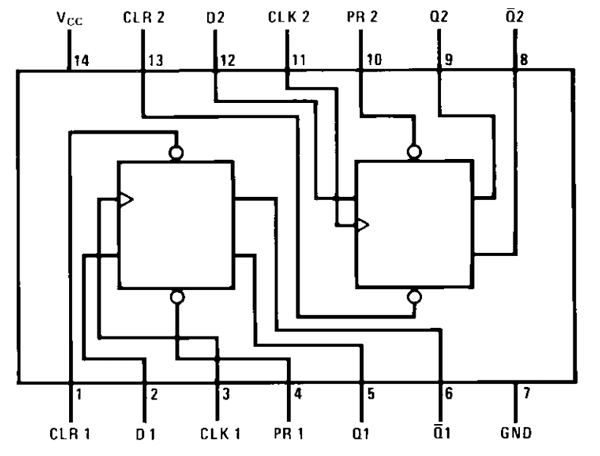
IC 7474
We have used IC DM74S74N of 7474 series. IC DM74S74N is the Dual D-type Flip-flop IC, in which there are two D-type Flip-flops, which can be either used individually or as a master-slave toggle combination. We are using one D-type Flip-flop in our circuit. Pins for first D flip-flop are the left side and for second flip flop are at right side. Also there are PRE and CLR pins for both the D-type Flip-flops which are active-low pins. These pin used to SET or RESET the D-type Flip-flop respectively, regardless of INPUT D and Clock. We have connected both to Vcc to make them inactive.
After understanding the D-type Flip-flop and IC DM74S74N, we can easily understand the use of D-type Flip-flop in our circuit. When we first triggered the 555 IC by first Clap, the LED glows as we get Q=1 and Q’=0. And it will remain ON until the next trigger or next positive clock pulse (LOW to HIGH). We have connected Q’ to to INPUT D, so when LED is glowing, Q’=0 is waiting for Second Clock pulse, so that it can be applied to the INPUT D and makes Q=0 and Q’=1, which in turns TURN OFF the LED. Now Q’=1 is waiting for next clock pulse to make the LED turn ON by applying Q’=1 to INPUT D, and so on this process will continue.
To test this circuit you need to clap loudly as this small condenser mic don’t have long range. Or you can directly hit at the mic lightly (like I have done in the video).

Some Important Points
- If circuit doesn’t works at first, then connect the CLR (PIN1 of IC DM74S74N) to the ground to RESET the flip-flop, then again connect to Vcc as shown in circuit.
- We can modify this circuit using Relay to control the Electronic devices (120/220V AC).
- Control PIN 5 of 555 Timer IC should be connected to Ground through a 0.01uF capacitor.
- We should use a 220 ohm resistor to connect LED.
Comments
I want to work this cicuit
I want to work this cicuit with 5 volt.if so what can i do
Just use a 7805 and power the
Just use a 7805 and power the IC from 5V it will work just fine
Question about mic
What should be the value of pull up resistance of condensor microphone to increase the sensitivity, like it will operate with low sound??
I made this circuit using
I made this circuit using SN74HC74N.But the led is turned on only when I remove the ground.it is not responding to the clap.what is wrong in my circuit?
I think you should have made
I think you should have made a mistake in the connection? Tey using a multimeter to check the voltage levels
When I connect the source, it
When I connect the source, it just turns on automatically
How much time will the LED be
How much time will the LED be in on state, with out giving another clap??
Please reply!!
I have connected all the
I have connected all the components exactly shown in the circuit diagram and photo, but the led is continuously glowing, what should i do now?
DEBUG
You should start debugging. Every experienced engineers sometimes wont get their circuits working the very first time. They have to debug it to make it work the way it is supposed.
So learning to debug a circuit is very important, take you multimeter check for connectivity. Break the circuit into logical parts and check where the problem is
I have done this circuit at a
I have done this circuit at a PCB and it works. ON and OFF. But when I put it in a relay module, it only energize the led indicator but the relay itself doesn't. I am using 12v supply because I thought the voltage is not enough, but turns out it's not the problem. I even checked the relay module by shorting IN and +12 and connecting it to (+) supply, then (-) supply to ground. The relay ticks meaning it's working. I am thinking that maybe the output at pin 5 is not sufficient. Please help me.

can't we use 555 ic as a bistable multivibrator, so we don't need to use 7474 .