
We have previously used RFID in many of our RFID projects and already built a RFID based Attendance System using 8051, here we are going to build RFID Based Attendance System using Raspberry Pi.
In this RFID based Attendance System project, we will explain you that how can we authorize and count attendance automatically by using RFID cards. RFID Technology (Radio Frequency Identification and Detection) is commonly used in schools, colleges, offices and stations for various purposes to automatically keep track of people. Here we will count the attendance of an authorized person by using RFID.
If you are not familiar with Raspberry Pi, we have created a series of tutorials and raspberry pi projects, with interfacing with all the basic components and some simple projects to start with, do check.
Components Used:
- Raspberry Pi (with booted SD card)
- Push button
- Buzzer
- 16x2 LCD
- 10k pot
- 10K Resistor
- LED
- 1k Resistor
- Bread board
- RFID Reader
- Power 5 volt
- RFID tags or Cards
- Ethernet Cable
- Connecting wires
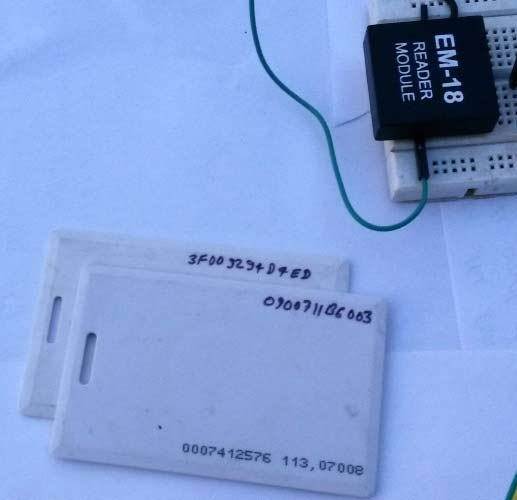
RFID Reader and Tags:
RFID is an electronics device which has two parts - one is RFID Reader and other is RFID tag or Card. When we put RFID tag near to the RFID reader, it reads tag data serially. RFID tag has 12 digit character code in a coil. This RFID is working at baud rate of 9600 bps. RFID uses electromagnet to transfer data from Reader to Tag or Tag to Reader.
Working Explanation:
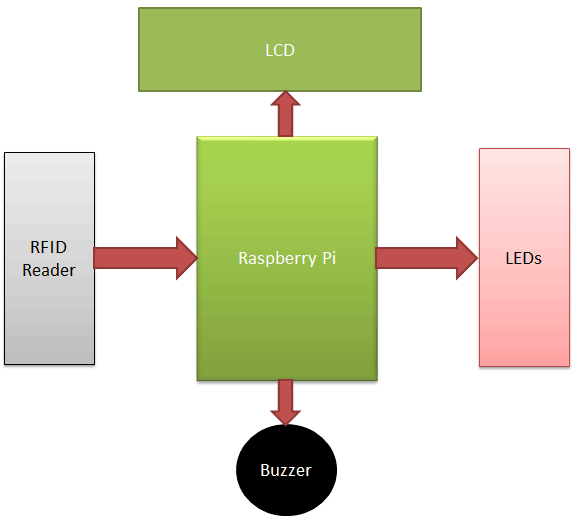
Here Raspberry Pi 3 is controlling the whole the process of this project (User can use any Raspberry Pi Board). RFID Reader reads the RFID card ID, this data is received by Raspberry Pi through UART, then RPi validates the card and shows the results on LCD screen.
When a person put their RFID tag near over the RFID reader to scan, RFID reads tag’s data and sends it to Raspberry Pi. Then Raspberry Pi reads the Unique Identification Number of that RFID tag and then compares this data with predefined data or information. If data is matched with predefined data, then Raspberry Pi increments the attendance of the tag’s person by one and if matched is not matched then microcontroller shows ‘Invalid Card’ message on LCD and buzzer is beeping continuously for some time. And here we also added a push button to see total no. of attendance of all the students. Here we have taken 4 RFID tags in which three are used to record the attendance of three students and one is used as a invalid card.
Circuit Description:
Circuit diagram for this Raspberry Pi Attendance System Project is very simple, which contains Raspberry Pi 3, RFID Reader, RFID Tags, buzzer, LED and LCD. Here Raspberry Pi controls the complete process like Reading Data coming from the Reader, comparing data with predefined data, driving buzzer, driving Status LED and sending status to LCD display. RFID Reader is used to Read RFID Tags. Buzzer is used for indications and driven by inbuilt NPN transistor. LCD is used for displaying status or messages on it.

Connections are simple. LCD is connected with Raspberry Pi in 4-bit mode. LCD’s RS, RW, and EN pin is directly connected at wiringPi GPIO 11, gnd and 10. And data pin are connected at wiringPi GPIO 6, 5, 4 and 1. A 10K pot is used to set contrast or brightness of LCD. Buzzer is connected at wiringPi GPIO pin 7 with respect to ground. Three LEDs are connected for student indication with respective RFID card. And one LED is used to show that system is ready to scan the RFID card. A push button is also connected at wiringPi GPIO pin 12 to display the Attendance Count. RFID reader is connected at UART pin (wiring GPIO pin 16).
Installing wiringPi Library in Raspberry Pi:
Like in Python we import import RPi.GPIO as IO header file to use the GPIO Pins of Raspberry Pi, here in C language we need to use wiringPi Library to use the GPIO Pins in our C Program. We can install it by using below commands one by one, you can run this command from Terminal or from some SSH client like Putty (if you are using Windows). Go through our Getting Started with Raspberry Pi tutorial to learn more about handling the Raspberry Pi.
sudo apt-get install git-core
sudo apt-get update
sudo apt-get upgrade
git clone git://git.drogon.net/wiringPi
cd wiringPi
git pull origin
cd wiringPi
./build
Test the installation of wiringPi library, use below commands:
gpio -v
gpio readall
Programming Explanation:
Now first we have included some libraries and define pins that we need to use in this code.
#include<wiringPi.h>
#include <wiringSerial.h>
#include<stdio.h>
#include <string.h>
#define RS 11
#define EN 10
#define D4 6
#define D5 5
#define D6 4
#define D7 1
#define led1 23
#define led2 24
#define led3 25
#define led5 14
#define buzz 7
After it, define some variables and array for calculation and store values & strings.
int sp ;
int count1=0,count2=0,count3=0;
char ch;
char rfid[13];
int i=0;
char temp[5];
Then Functions have been written to execute the whole process. Some of them are given below:
Given void lcdcmd function is used for sending command to LCD
void lcdcmd(unsigned int ch)
{
    int temp=0x80;
    digitalWrite(D4, temp & ch<<3);
    digitalWrite(D5, temp & ch<<2);
    digitalWrite(D6, temp & ch<<1);
    digitalWrite(D7, temp & ch);
    digitalWrite(RS, LOW);
    digitalWrite(EN, HIGH);
    .... ....
    .... .....
Given void write function is used for sending data to LCD.
void write(unsigned int ch)
  {
    int temp=0x80;
    digitalWrite(D4, temp & ch<<3);
    digitalWrite(D5, temp & ch<<2);
    digitalWrite(D6, temp & ch<<1);
    digitalWrite(D7, temp & ch);
    digitalWrite(RS, HIGH);
    digitalWrite(EN, HIGH);
    .... ....
    .... .....
Given void clear() function is used to clear the LCD, void setCursor is used to set cursor position and void print for sending string to LCD.
  void clear()
  {
     lcdcmd(0x01);
  }
  void setCursor(int x, int y)
  {
    int set=0;
    if(y==0)
    set=128+x;
    if(y==1)
    set=192+x;
    lcdcmd(set);
  }
  void print(char *str)
  {
    while(*str)
    {
     write(*str);
     str++;
    }
  }
void begin function is used to initialize LCD in 4-bit Mode.
  void begin(int x, int y)
  {
    lcdcmd(0x02);
    lcdcmd(0x28);
    lcdcmd(0x06);
    lcdcmd(0x0e);
    lcdcmd(0x01);
  }
void buzzer() and void wait() functions are used for beeping the buzzer and for wait to again placing card. Function void serialbegin is used to initialize the serial communication.
void buzzer()
{
     digitalWrite(buzz, HIGH);
     delay(1000);
     digitalWrite(buzz, LOW);
}
void wait()
{
     digitalWrite(led5, LOW);
     delay(3000);
}

void serialbegin(int baud)
  {
    if ((sp = serialOpen ("/dev/ttyS0",baud)) < 0)
   {
     clear();
     print("Unable to open");
     setCursor(0,1);
     print("serial Port");
   }
  }
In void setup() function we initiaze all the GPIOs, LCD and serial UART.
void setup()
{
   if (wiringPiSetup () == -1)
   {
     clear();
     print("Unable to start");
     setCursor(0,1);
     print("wiringPi");
   }
  pinMode(led1, OUTPUT);
  pinMode(led2, OUTPUT);
  ..... ......
  ...... .......
Given void get_card() Function is used to get data from RFID reader.
In void main() function, we have showed some messages on LCD and compared the tag data with predefined data to validate the card with below code.
... ......
.... .....
if(strncmp(rfid,"0900711B6003",12)==0)
    {
        count1++;
        clear();
        print("Attd. Registered");
        setCursor(0,1);
        print("Studnet 1");
        digitalWrite(led1, HIGH);
        buzzer();
        digitalWrite(led1, LOW);
        wait();
    }
else if(strncmp(rfid,"090070FE6EE9",12)==0)
    {
        count2++;
        clear();
        print("Attd. Registered");
        setCursor(0,1);
        .... .....
        .... .....
Finally void check_button() function is used for showing total attendance on button press.
void check_button()
{
   if(digitalRead(in1)==0)
        {
          digitalWrite(led5, LOW);
           clear();
           setCursor(0,0);
           print("std1  std2  std3");
            .... ....
            .... .....
Check the Full Code for this Raspberry Pi Attendance System below.
Complete Project Code
#include<wiringPi.h>
#include <wiringSerial.h>
#include<stdio.h>
#include <string.h>
#define RS 11
#define EN 10
#define D4 6
#define D5 5
#define D6 4
#define D7 1
#define led1 23
#define led2 24
#define led3 25
#define led5 14
#define buzz 7
#define in1 21
  int sp ;
  int count1=0,count2=0,count3=0;
  char ch;
  char rfid[13];
  int i=0;
  char temp[5];
  void check_button();
  void lcdcmd(unsigned int ch)
  {
    int temp=0x80;
    digitalWrite(D4, temp & ch<<3);
    digitalWrite(D5, temp & ch<<2);
    digitalWrite(D6, temp & ch<<1);
    digitalWrite(D7, temp & ch);
    digitalWrite(RS, LOW);
    digitalWrite(EN, HIGH);
    delay(10);
    digitalWrite(EN, LOW);
    digitalWrite(D4, temp & ch<<7);
    digitalWrite(D5, temp & ch<<6);
    digitalWrite(D6, temp & ch<<5);
    digitalWrite(D7, temp & ch<<4);
    digitalWrite(RS, LOW);
    digitalWrite(EN, HIGH);
    delay(10);
    digitalWrite(EN, LOW);
  }
    void write(unsigned int ch)
  {
    int temp=0x80;
    digitalWrite(D4, temp & ch<<3);
    digitalWrite(D5, temp & ch<<2);
    digitalWrite(D6, temp & ch<<1);
    digitalWrite(D7, temp & ch);
    digitalWrite(RS, HIGH);
    digitalWrite(EN, HIGH);
    delay(10);
    digitalWrite(EN, LOW);
    digitalWrite(D4, temp & ch<<7);
    digitalWrite(D5, temp & ch<<6);
    digitalWrite(D6, temp & ch<<5);
    digitalWrite(D7, temp & ch<<4);
    digitalWrite(RS, HIGH);
    digitalWrite(EN, HIGH);
    delay(10);
    digitalWrite(EN, LOW);
  }
  void clear()
  {
     lcdcmd(0x01);
  }
  void setCursor(int x, int y)
  {
    int set=0;
    if(y==0)
    set=128+x;
    if(y==1)
    set=192+x;
    lcdcmd(set);
  }
  void print(char *str)
  {
    while(*str)
    {
     write(*str);
     str++;
    }
  }
  void begin(int x, int y)
  {
    lcdcmd(0x02);
    lcdcmd(0x28);
    lcdcmd(0x06);
    lcdcmd(0x0e);
    lcdcmd(0x01);
  }
 void buzzer()
{
     digitalWrite(buzz, HIGH);
     delay(1000);
     digitalWrite(buzz, LOW);
}
void wait()
{
     digitalWrite(led5, LOW);
     delay(3000);
}
  void serialbegin(int baud)
  {
    if ((sp = serialOpen ("/dev/ttyS0",baud)) < 0)
   {
     clear();
     print("Unable to open");
     setCursor(0,1);
     print("serial Port");
   }
  }
  void setup()
{
   if (wiringPiSetup () == -1)
   {
     clear();
     print("Unable to start");
     setCursor(0,1);
     print("wiringPi");
   }
  pinMode(led1, OUTPUT);
  pinMode(led2, OUTPUT);
  pinMode(led3, OUTPUT);
  pinMode(led5, OUTPUT);
  pinMode(buzz, OUTPUT);
  pinMode(RS, OUTPUT);
  pinMode(EN, OUTPUT);
  pinMode(D4, OUTPUT);
  pinMode(D5, OUTPUT);
  pinMode(D6, OUTPUT);
  pinMode(D7, OUTPUT);
  pinMode(in1, INPUT);
  digitalWrite(in1, HIGH);
  begin(16,2);
  serialbegin(9600);
}
void get_card()
{
   digitalWrite(led5, HIGH);
   i=0;
   while(i<12)
   {
      check_button();
       while(serialDataAvail (sp))
       {
        ch= serialGetchar(sp);
        rfid[i]=ch;
        fflush (stdout) ;
        i++;
       }
   }
   rfid[i]='\0';
  buzzer();
   return;
}
void main()
{
   setup();
   clear();
   print("Attendance Systm");
   setCursor(0,1);
   print("using RPI ");
   delay(2000);
   clear();
   print("Circuit Digest");
   setCursor(0,1);
   print("Welcomes you");
   delay(2000);
   clear();
   print("System Ready");
   delay(1000);
   clear();
   while(1)
  {
        clear();
        print("Place Your Card:");
        get_card();
        setCursor(0,1);
        print(rfid);
        delay(1000);
        if(strncmp(rfid,"0900711B6003",12)==0)
        {
           count1++;
           clear();
           print("Attd. Registered");
           setCursor(0,1);
           print("Student 1");
           digitalWrite(led1, HIGH);
           buzzer();
           digitalWrite(led1, LOW);
           wait();
        }
        else if(strncmp(rfid,"090070FE6EE9",12)==0)
        {
           count2++;
           clear();
           print("Attd. Registered");
           setCursor(0,1);
           print("Student 2");
           digitalWrite(led2, HIGH);
           buzzer();
           digitalWrite(led2, LOW);
           wait();
        }
          else if(strncmp(rfid,"3F0072C049C4",12)==0)
        {
           count3++;
           clear();
           print("Attd. Registered");
           setCursor(0,1);
           print("Student 3");
           digitalWrite(led3, HIGH);
           buzzer();
           digitalWrite(led3, LOW);
           wait();
        }
        else
        {
        clear();
           print("Invalid Card");
           buzzer();
           buzzer();
           wait();
        }
  }
}
void check_button()
{
   if(digitalRead(in1)==0)
        {
          digitalWrite(led5, LOW);
           clear();
           setCursor(0,0);
           print("std1  std2  std3");
           setCursor(1,1);
           sprintf(temp,"%d",count1);
           print(temp);
           setCursor(7,1);
           sprintf(temp,"%d",count2);
           print(temp);
           setCursor(13,1);
           sprintf(temp,"%d",count3);
           print(temp);
           delay(5000);
           digitalWrite(led5, HIGH);
           clear();
           print("Place Your Card:");
        }
}
Comments
You may try this....
import serial
ser = serial.Serial ("/dev/ttyAMA0") #Open named port in Raspberry Pi 2
# ser=serial.Serial ("/dev/ttyS0") # Open Named port in raspberry Pi 3
ser.baudrate = 9600 #Set baud rate to 9600
data = ser.read(12) #Read 12 characters from serial port to data
ser.write(data) #Send back the received data
ser.close()
I tried it for Raspberry pi 3 but it does not display anything like the cursor is stuck.
First of all you should make sure that your UART is enabled and working.
then try this code.
Please consider using the serial port aliases in Raspbian; /dev/serial0 points to the primary UART on each device - /dev/ttyS0 on Pi3, and /dev/ttyAMA0 on Pi2.
I have enabled uart , but still cursor is struck
sir can u please explain me how to run and compile this c code in raspberry pi .
Check this one where we have explained How to run C program in Raspberry Pi : Electronic Voting Machine using Raspberry Pi
sir i am wondering if i would replaced RFID reader with another one have long distace (10- 15m) ... is there any change in software or hardware ?
You ask yourself if replacing RFID Reader with RFID RC522 is not so
sir, we are doing mini project. can u provide any documentation
Sir,
Could you able to tell me that whether i can use PIC 16F877A for RFID PROJECT.
I want to ask something, I want to put camera in my project for take picture the person who swap the tag..how?
Undefined Referance to digitalwright.
Undefined Referance to delay.
more error..
Help me
inal.c: In function ‘write’:
final.c:47:18: error: ‘HIGH’ undeclared (first use in this function)
digitalWrite(RS, HIGH);
^~~~
final.c:50:18: error: ‘LOW’ undeclared (first use in this function)
digitalWrite(EN, LOW);
^~~
final.c: In function ‘buzzer’:
final.c:79:20: error: ‘HIGH’ undeclared (first use in this function)
digitalWrite(buzz, HIGH);
^~~~
final.c:81:20: error: ‘LOW’ undeclared (first use in this function)
digitalWrite(buzz, LOW);
^~~
final.c: In function ‘wait’:
final.c:84:20: error: ‘LOW’ undeclared (first use in this function)
digitalWrite(led5, LOW);
^~~
final.c: In function ‘setup’:
final.c:96:5: warning: implicit declaration of function ‘wiringPiSetup’ [-Wimplicit-function-declaration]
if (wiringPiSetup () == -1){
^~~~~~~~~~~~~
final.c:101:1: warning: implicit declaration of function ‘pinMode’ [-Wimplicit-function-declaration]
pinMode(led1, OUTPUT);
^~~~~~~
final.c:101:15: error: ‘OUTPUT’ undeclared (first use in this function)
pinMode(led1, OUTPUT);
^~~~~~
final.c:112:14: error: ‘INPUT’ undeclared (first use in this function)
pinMode(in1, INPUT);
^~~~~
final.c:113:19: error: ‘HIGH’ undeclared (first use in this function)
digitalWrite(in1, HIGH);
^~~~
final.c: In function ‘get_card’:
final.c:117:20: error: ‘HIGH’ undeclared (first use in this function)
digitalWrite(led5, HIGH);
^~~~
final.c: In function ‘main’:
final.c:158:20: error: ‘HIGH’ undeclared (first use in this function)
digitalWrite(led1, HIGH);
^~~~
final.c:160:20: error: ‘LOW’ undeclared (first use in this function)
digitalWrite(led1, LOW);
^~~
final.c: In function ‘check_button’:
final.c:189:4: warning: implicit declaration of function ‘digitalRead’ [-Wimplicit-function-declaration]
if(digitalRead(in1)==0)
When asking for help regarding an error, paste the error message from the console. Only then people will be able to help you
Successfully compiled Code..
When i run this Code ..
One Led light blinking..
then Showing Segmentation fault

Can you please tell me that how should I read the the 12 bit string from RFID reason using PYTHON language?