
In this article we are going to make a Invisible Broken Wire Detector which is used to check broken or disconnected wires inside the walls. It detects the broken wire by detecting the presence of AC voltage in the wire. When there will be AC voltage present near it, then it will start beeping and LED will go high while when there will be no AC voltage or if there will be a broken wire, then the buzzer will remain quiet and the LED will go low. This circuit can also serve as EMF detector and can detect the Electric Field generated by Alternating Current (AC).
The devices which run on A.C, like electrical irons, grinders, air conditioners, flood lights, are powered by long 2 or 3 core cables connected to the AC mains. Due to the utilization of these appliances for a long time with the flow of high current or because of mechanical strains, these wires may get broken from somewhere.
It is very difficult to locate the accurate location of the broken wire, because now days electric wires are installed inside the walls by using the PVC pipes. And because of this, people generally prefer to replace the broken instead of repairing it. So, to find the accurate position of the broken wire, this Broken Wire Detector comes very handy which detects the broken wire by detecting the EMF generated by Alternating Current in the wire. It stops to beep where it finds the broken wire and the LED on the circuit will also go down.
Required Components:
- IC CD 4069
- BC 547 transistor
- Buzzer
- 9V battery
- LED’s
- 10M, 4.7k, 470k, 220k, 470 and 1.8k ohm resistors
- 47k variable resistor
- 1N4148 diode
- 470pF, 100nF capacitor
Circuit Diagram and Explanation:

The main part of the project is IC 4096. It is a hex inverter CMOS IC which consist six inverter circuits. It will help us in detecting the electro-magnetic field. It is connected in linear by placing a feedback resistor between the pins 1 and 2. The resistance of the feedback resistor is kept high so that change in the electro-magnetic field does not affect the IC 4096.
When there is no electro-magnetic field, then pin 4 of the IC 4096 remains high and if the electro-magnetic field is present near the detector circuit, then pin 4 becomes low and pin 12 becomes high which triggers the NPN transistor BC547 to light up the RED LED.
At the same time, pin 6 will also go high and the output of pin 6 makes the diode in the reverse biased which will cause the RC oscillator created by the R7 and C2 to operate. The frequency of this oscillator will be around 1 KHz and the output of this oscillator will drive the buzzer.
Working Explanation:
Working of this Broken Wire Detector is very easy and the main part of this circuit, as mentioned preciously, is a hex inverter IC CD4069. This IC consists of 6 inverters which are basically ‘NOT’ gate. The gates N3 and N4 out of those six inverters act as a pulse generator that oscillates within the audio range of around 1 KHz.
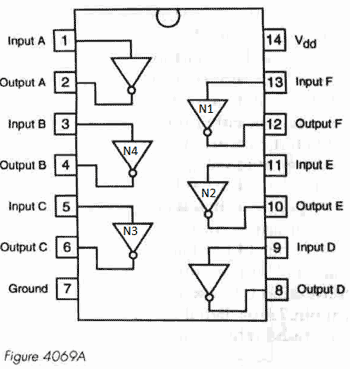
The resistors R4 (470k) and R5 (220k) and the capacitor C1 (100nF) in this circuit are the timing components which decide the frequency. The gates N1 and the N2 detect the presence of the AC voltage around the live wire and weak AC voltage picked from test probe. The oscillator circuit is enabled or disabled by the output pin of the gate N2 which is output pin 10.
When there will be no AC voltage present near the live wire then the output pin 10 will remain low and as a result, the diode D3 conducts in the forward biased mode and holds back the oscillator part from oscillating. Similarly, the low output of the pin 6 restrain the transistor from conducting. As a result, the buzzer will not beep and the LED will remain low.
When the circuit detects the presence of AC voltage near it, then the output pin 10 goes high. This will allow the oscillator to oscillate at around frequency of 1 KHz. When the oscillator will oscillate, then it will make the LED to blink at very high speed and the buzzer will start to beep. While LED and buzzer are actually oscillating but they appears to be continuously on as the speed of blinking is very high.
Comments
not working
Sir...I trying to make this but it is not properly working. Only working when it is bring to nearby a tube light...have any solution sir?

How much range it will cover