
Bistable Multivibrator mode of 555 timer IC is the easiest mode of 555 timer IC, where Monostable multibrator mode has one stable & one unstable state, Astable multvibrator mode has both the unstable states, here in Bistable mode, both the states are stable. Means it remains in the same state (either HIGH or LOW) until an external trigger is applied; otherwise it stays in one of the two states (HIGH or LOW) indefinitely. In biastable mode there is no RC network like the other two modes of 555, hence there are no equations and wave form. Biastable mode simply works as a Flip-flop.
Before going through the detailed explanation of 555 timer bistable multivibrator circuit, you should know about 555 timer IC and its PINs, here is the short description about its PINs.
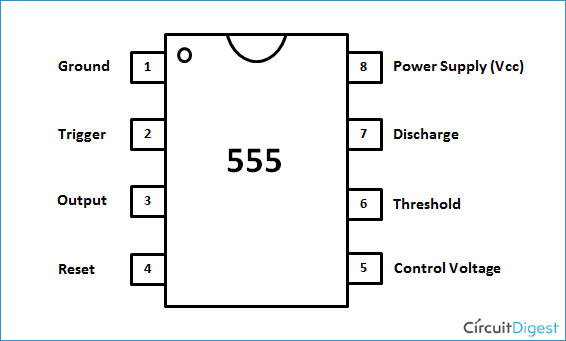
Pin 1. Ground: This pin should be connected to ground.
Pin 2. TRIGGER: Trigger pin is dragged from the negative input of comparator two. The Lower comparator output is connected to SET pin of flip-flop. A negative pulse (< Vcc/3) on this Pin sets the Flip flop and output goes High.
Pin 3. OUTPUT: This pin also has no special function. This is output pin where Load is connected. It can be used as source or sink and drive up to 200mA current.
Pin 4. Reset: There is a flip-flop in the timer chip. Reset pin is directly connected to MR (Master Reset) of the flip-flop. This is a active Low pin and normally connected to VCC for preventing accidental Reset.
Pin 5. Control Pin: The control pin is connected from the negative input pin of comparator one. Output Pulse width can be controlled by applying voltage at this Pin, irrespective of RC network. Normally this pin is pulled down with a capacitor (0.01uF), to avoid unwanted noise interference with the working.
Pin 6. THRESHOLD: Threshold pin voltage determines when to reset the flip-flop in the timer. The threshold pin is drawn from positive input of upper comparator. If the control pin is open, then a voltage equal to or greater than VCC*(2/3) will reset the flip-flop. So the output goes low.
Pin 7. DISCHARGE: This pin is drawn from the open collector of transistor. Since the transistor (on which discharge pin got taken, Q1) got its base connected to Qbar. Whenever the output goes low or the flip-flop gets reset, the discharge pin is pulled to ground and capacitor discharges.
Pin 8. Power or VCC: It is connected to positive voltage (+3.6v to +15v).
Operation of Bistable Multivibrator mode of 555 timer IC:

As mentioned, it is the easiest mode and doesn’t require any RC circuit, the states are controlled by the Trigger PIN 2 and the RESET PIN 4. Trigger PIN 2 is the inverting end of the LOWER comparator inside 555 IC and RESET Pin 4 is the RESET terminal of the RS flip flop. Trigger PIN is used to SET the flip flop (Output HIGH) and Reset Pin is used to Reset the flip flop (Output LOW). Push button switches S1 and S2 are connected to the Trigger Pin and Reset Pin respectively, to make them LOW momentarily. Pressing the S1 switch Sets the Output and S2 Resets the Output.
- Trigger PIN 2 and Reset PIN 4 input are kept HIGH using two Pull-up resistors R1 and R2.
- Now when Push button Switch S1 is pressed, Trigger PIN 2 goes Grounded ( < Vcc/3) and Lower comparator output becomes HIGH for a moment, which SETs the flip flop and 555 output is HIGH.
- 555 remains in this state until the Reset input, because now both the comparators are at LOW.
- Now when button S2 is pressed, it makes the Reset PIN LOW and Reset the internal Flip flop and OUTPUT goes LOW.
- So external trigger (PIN2) Sets the flip-flop and output Goes HIGH and Reset signal (PIN4) Resets the flip-flop and output Goes LOW.
Threshold PIN 6 can be kept open but we have connected it to Ground, so that Flip flop can’t be Reset using the PIN 6 and can only be reset using RESET PIN 4.
Here is the practical demonstration of the Bistable mode of 555 timer IC, where we have connected a LED to the output of the 555 IC. This LED will be switched ON when Button S1 is pressed and switched OFF when button S2 is pressed.

The above schematic shows the 555 timer bistable multivibrator circuit. You can find circuits and applications of bistable multivibrator in 555 timer circuits.
Comments
I love the works of electronics..... There is no knowledge that is not power....!
hello admin,
i need your help.
i made 555 ic based circuit which works on bistable mode to controlling relay.
now have a problem, with power supply. i have to use ac to dc converter , but while using it, i have facing problems like spike and earthing.
all i check is to change current and volatage ratio, but problem is same.
while i used battery, circuit runs very perfectly.
show me way to how to make stable or reliable power source or using another ic??
please mail me in detail.
i m waiting for it!
Hi Since i require two separate Bistable timers that can be set and reset independantly i am using the Ne556 timer.
I have connected the pins in the following manner.
Pin1 or pin 13- Disch pin:- Not connected ( floating)
Pin 2 or pin 12 - Thresh :- connected to Ground directly
Pin 3 or pin 11 :- Control :- connected to ground via 10nF capacitor
Pin 4 or pin 10 :- Reset :- Connected to VCC via a 1.8 Kilo ohm resistor.
pin 5 or pin 9 :- output :- connected to optocoupler that is used to turn on a relay.
Pin 6 or pin 8 :- Trigger:- Connected to VCC via a 1.8 Kilo ohm resistor.
Pin 7 :- Ground:- Connected to ground pin.
Pin 14:- VCC:- Connected to +12V supply
That is i have connected the way it is shown in the figure above. Now when i trigger and reset the individual timers they set and reset without any issue. I.e if i make pin 6 low the pin 5 goes high and if i make pin 4 low pin 5 goes low. Simillarly with the second timer pin 9 goes high when pin 8 is low and is reset when pin 10 is low. Now the problem i am facing is that i cannot make both pin 5 and 9 high simultaneously. If i make pin 5 high first by making pin 6 low then the moment in make pin 8 low pin 9 goes high and pin 5 goes low.
Can anyone tell me why this is and if i can solve this so that i can have both Pin 5 and 9 high simultaneously.
Please note that to make pins 4,6,8 and 10 low i am using a push buttton .Hence they are low only for a few milli sec. as i press and release the push button.
Thank you
Khirad

I am currently designing a device that will check out if a given sample of 555 timer I.c is working or not and i found your work useful thanks a alot.