
Let's say you are in the final stage of prototyping or have developed a new electronic product and you are thinking of scaling up and selling your product in the mainstream market. While you can easily source the PCB’s, sensors, and other electronic/electrical components, you often stumble getting a casing, especially when the product needs a customized casing or when the product interacts with the user on a regular basis.
You will know from this article what are the common ways to get a casing for your product, how to choose the right type of casing, and where to look for a service provider. Since most of you will be looking for a cost-effective, durable, easily manufactured casing, we will focus on plastic as it will do a great job for the aforementioned features.
The most common ways of getting your product a casing is-
- Standard housing & panels
- 3D printing
- Injection Molding
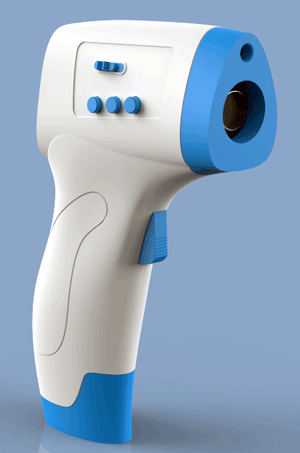
Further to the information in the article, we will evaluate each method with the below Digital IR thermometer enclosure (complex shape, intricate details) to help you get an idea of the real-world scenario.
The main criteria based on which we will evaluate each method are Cost, Time, Customization, Complexity, Quality, and scalability. We will compare Standard housing vs 3D printing vs Injection Molding.
|
Criteria |
Readymade casing |
3D printing |
Injection Molding |
|
Cost |
Cost is proportional to the quantity. However, you can negotiate for a better deal when the quantity is significant ⭐ |
Cost is proportional to printing time. Ranges from 300-600 INR per hour dependent on the material (post-processing additional) |
High initial cost for tool design and very cheap product manufacturing cost. If the quantity is significant, the tool design cost shall be distributed in the per-unit cost. |
|
Time |
No constraints on the time. Order and get it delivered ⭐ |
Post design, the time required to print each part is proportional to the quantity. |
Post design, the tool(mold) design and tool manufacturing takes some significant time (from one week to a month). Once the tool is ready you can manufacture hundreds or even thousands of products in a day. |
|
Customization |
Very low to No |
Completely customizable and multiple iterations possible ⭐ |
Once you finalize the mold design, customization is not possible. |
|
Complexity of the product |
Casings for standard products. |
Complex and intricate structures possible at no additional charge ⭐ |
Complex and intricate structures possible but with some additional charge |
|
Finish Quality |
Mostly good. But, cannot be customized. |
Coarse & Layered Exception: Acetone treated ABS parts |
Glossy and Matt finish ⭐ |
|
Scale |
No limits on the scale ⭐ |
Feasible for less than 1000 quantity |
Feasible for 1000+ quantity |
Standard - Readymade Casing
If your project involves standard components such as Arduino, RaspberryPi, and some standard components or sensors, most probably you will find a standard casing online. Below are the few examples of Readymade enclosures.
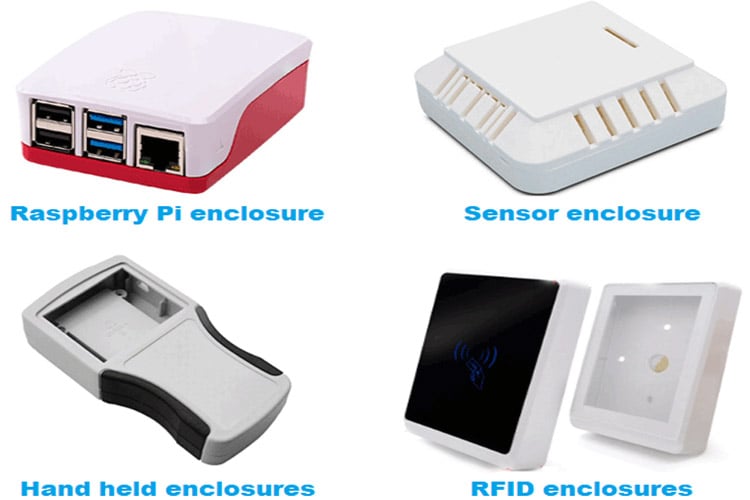
You can find them in local online sites as well as in many international websites like Alibaba or Aliexpress. Some sellers can help you with some customization if you have a certain minimum quantity. If your product is similar to something that exists on the market already, then you can use this sneaky way to trace back to the manufacturer of the product’s enclosure and try to negotiate a deal.
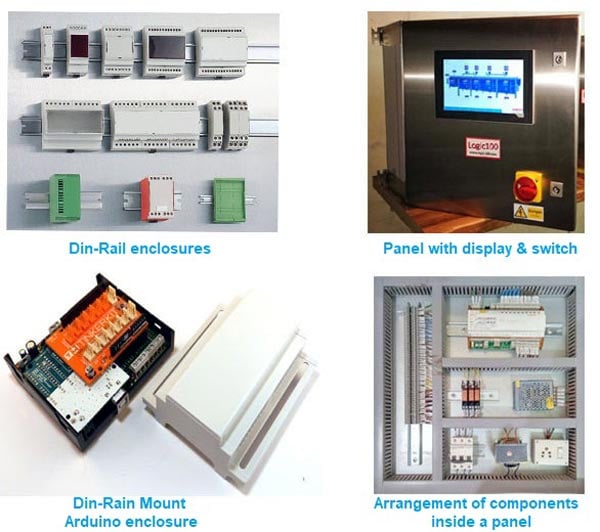
In another likely case, where you have an assembly of multiple components and when aesthetics is not a concern, the best choice is to go for a powder coater metal panel where you can fix the components such as controllers, relays, etc. on din-rails. You can easily find din-rail mount Arduino/raspberry controllers casing, din-rail relays, din rail power supply units, etc. online. You can even tweak the panel a little bit to include displays and switches on the panel door. The panel sizes can vary from a few centimeters to a few meters. This method is a common practice in the Industrial automation industry.
Coming back to our thermometer example casing, we can't find any such casing on any website. However, you are lucky if you can find an injection molding company that already is manufacturing a similar casing that will suit your need. The big disadvantage here is that your product will not look unique on its own since your casing vendor will also sell to anyone across the world.
Advantages of Readymade Casing
If the readymade casing suits your need, then-
- Quicker deliveries
- No need of any investment of time and money
- Better finish quality
Disadvantages of Readymade Casing
- No or very minimum customization
- No material options
3D printing
If the standard casings don't suit you, then 3D printing is a great way to kickstart your product. 3D printing is great for prototyping. Initially, you will be looking for only a few quantities (probably a few hundred) and you wish to test the market for your product before pouring in a significant investment. It does not take much time and cost to have your product printed once the CAD design is ready.
If you are interested in learning about 3D printing, check out the article on getting started with 3D printing and also other 3D Printing Projects that we have built earlier for inspiration.
CAD designing of parts → Slicing (in slicing software) → 3D printing → Post-processing
- First, you prepare a 3D model of the casing
- Import the 3D model into the slicing software such as Cura, Simple3D & Slic3R
Slicing is where your 3D model is converted to layers and codes that the 3D printer can understand.
You can visualize the supports and also estimate the time required for printing by tuning various printing parameters.
- This is then followed by 3D printing & Post-processing. Post-processing involves removing of supports, flash, and chemical treatment for the surface finish in case of ABS material.
Many 3D printing service providers get your design via their website or email, print it, and send the printed product to you - all this within a week's time. Hassle-free! Isn't it. 3D printing service providers will charge you based on the time required for printing your product and the per hour rate varies based on the type of material you choose.
It is important for you to be aware of some important factors while deciding to go for 3D printing. Those factors are materials of the product and factors affecting the processing time, thereby your cost.
Currently, the two most common methods of 3D printing are-
Fused Deposition Modeling (FDM)
Also known as Fused Filament Fabrication (FFF), is an additive manufacturing process where an object is built by selectively depositing melted material in a predetermined path layer-by-layer. The materials used are thermoplastic polymers and come in a filament form.
Stereolithography (SLA)
SLA works by using a high-powered laser to harden the liquid resin in the printing bed to create the desired 3D shape - a process known as polymerization. There are many types of light-based 3D printing which is broadly classified as digital light processing (DLP).
|
|
Fused Deposition Modeling(FDM) |
Stereolithography (SLA) |
|
Application |
Standard parts |
Part with Intricate surfaces (jewelry & small parts) Small electronic enclosures |
|
Cost |
Cheaper |
|
|
Time |
|
Faster |
|
Finishing |
Generally coarse & layered Smooth in case of acetone treated ABS |
Smooth |
|
Materials |
Most Common: PLA, ABS, Nylon, HIPS, PET, PC |
Standard resin, Clear resin, Tough or Durable resin & High-temperature resin. |
For now, let's stick to FDM as it is more widely available and suits our discussion.
Design Considerations for 3D Printing
While designing the product, it is important to understand the limitations of the 3D printers available in the market. It is important that you get an understanding of the working of the FDM 3D printer.
In case you are not great at CAD designing, I advise you to take professional 3D design services and in some cases, the 3D printing service providers themselves offer 3D design services. These services are chargeable - mostly on a per hour basis. The most important design considerations are
Assembly: If you have multiple parts that assemble into a final object, then you have to think of the provisions to make to fit the parts together - parts matching, screws, etc.
Over hanging: The reality is that FDM 3D printers are not great in printing overhanging or steep inclined surfaces. You get rough surfaces, you need support, which you have to post-process.
Complexity: Complexity means intricacy such as thin parts, tiny features, and very complex shapes. While 3D printers are meant to do all these with ease, sometimes they don't work out well.
Here are the factors you have to keep in mind while proceeding from design to the 3D printing process.
Process Considerations for 3D Printing
All the process considerations have an impact on the time of print and the quality of the finished object.
All these parameters can be visualized and analyzed through the slicing software’s (Cura, Simple3D & Slic3R)
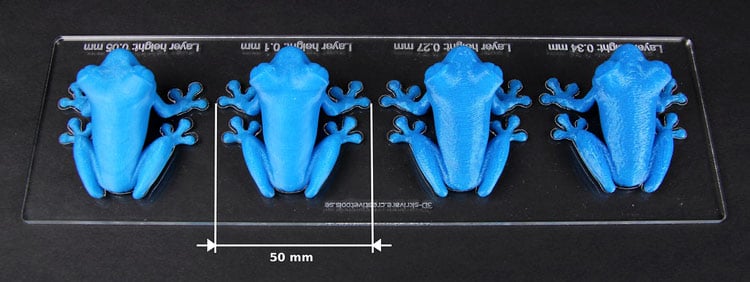
Orientation matters: The image below shows why. Try to orient the part in a way that requires less support and less hanging. The best orientation will result in a better finish and a shorter printing time.
Layer thickness/layer height: Layer thickness is a measure of the layer height of each successive addition of material in the 3D printing process in which layers are stacked. Lower the layer thickness, longer the time taken for printing, and better the finish quality. The below image gives you a perspective of the relationship between layer thickness and print time.
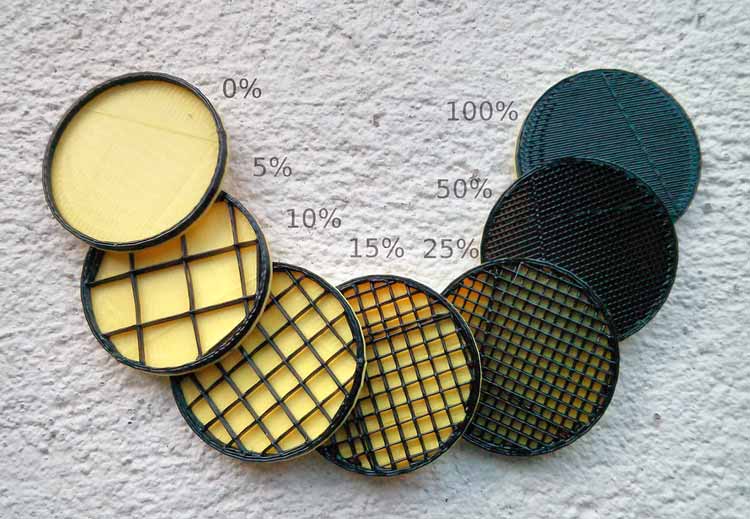
Infill density: Infill density is the amount of filament printed inside the object, and this directly relates to the strength, weight, and printing duration of your print. In our case - enclosure, we won't come across infill density as our part is a shell and not a solid object. In case you have a solid part, then more the infill density, more the strength, and more the print time.
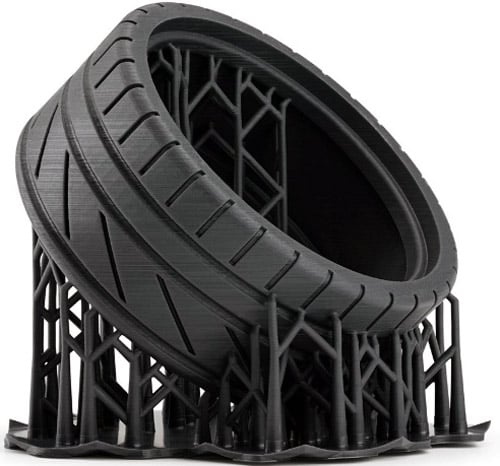
Supports: 3D printing support structures are not part of the model. They are used to support parts of the model during printing. This means that once printing is over, you have the additional task of removing the structures before the model is ready-to-go.
There are other factors such as print speed, shell thickness, nozzle diameter, extrusion temperature and raft which you need not worry about as these will be set at optimum levels by the service provider
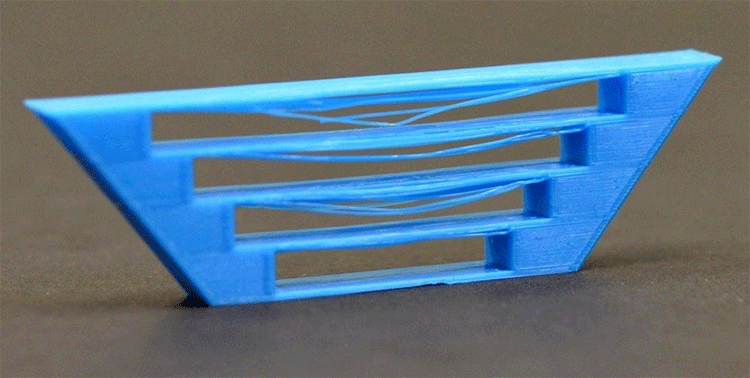
Post-processing: ABS parts can be treated with Acetone after the 3D printing process to get a glossy look.
Below is the comparison of the Acetone treated ABS & non treated ABS objects. The message I want to convey is that go for a print quality which is optimal in terms of functionality and aesthetics.
Softwares Used for design
Free: Sketchup, Blender 3D, Open SCAD.
Paid: Solidworks, CATIA, NX-CAD, 3DS Max
Softwares used for slicing - Free: Cura, Simple3D, Slic3R
3D Printing Cost Analysis
The cost of 3D printing depends on your material choice and the time required to print a product.
The cost usually ranges from 300 - 600INR. Further, add ons such as ABS acetone treatment will be charged extra (50-100INR).
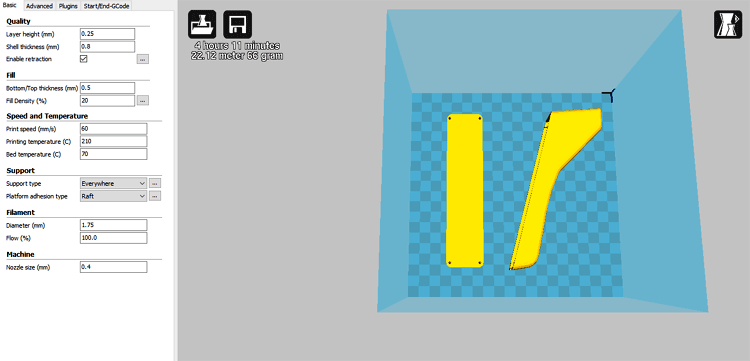
To put that in perspective, let's see the printing cost of our Digital IR thermometer. It takes 4hrs & 11 mins to print a basic version of our Digital IR thermometer with the process. You can also check out the Contactless IR thermometer that we build earlier using a 3D printed enclosure.
Process parameters: Layer height: 0.25mm, Print speed 60mm/s. Since we will go for ABS material without any post-processing, this would cost us somewhere around 1200 INR for a print.
Advantages of 3D Printing
- Freedom of Design
- Rapid prototyping - freedom for iterations
- Print on Demand and pay only for what you print
Disadvantages of 3D Printing
- Limited Materials Choices
- Limited Build Volume
- Finish quality
Market trend for 3D Printing
As the 3D printing services are more readily available, the prices for 3D printing can come down. Azul 3D ‘High Area Rapid Printing technology’ is a revolutionary SLA method but that can print a layer of the entire bed at a time. However, it is going to take some time to reach the market.
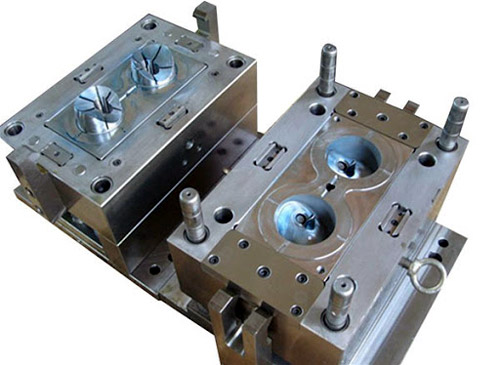
Injection Molding
Injection molding is the most common mass manufacturing method in the industry and best suited when you want to manufacture thousands of products. If you are looking at any product made out of plastic around you, it's probably made through Injection Molding. It takes a lot of time and money to produce the first product, but once that's done, you can manufacture hundreds or even thousands of products in a day at a very cheap price.
How the process flows for Injection molding?
Product design → Tool design (mold design) → Trial runs → Mass manufacturing → Post processing
1. First, you do the product design just as how you did for the 3d printing - either by yourself or through a professional CAD designer.
2. Then you give the product design to a Tool designer (mostly Injection molding service provider) along with other details such as choice of material, quantity, and type of finishing. The service provider designs the tool (i.e. mold) and analyzes the matching of parts, mold flow, and all other parameters as per your product design and the specifications that you want.
Once that's ready, the service provider goes for a trial run and does corrections if required. Finally, he proceeds for mass manufacturing. Post-processing involves actions such as removing flash & gates and polishing.
Mold/Tool is a metal block that has the negative/opposite profile of the object you want to manufacture. It is composed of a core block and cavity block along with other supporting parts such as a cooling system, ejector pin, etc. In the process of Injection molding, the heated plastic flows inside the cavity and cools down. The part is then automatically ejected and then are post-processed, activities such as removing flashes & gates and polishing.
Materials used in Injection Molding
Most of the commercial plastic materials can be used in Injection molding.
So, the property of the finished product will have the property of the material you choose.
Eg: Polycarbonate and polystyrene for transparent products, Polypropylene (PP & PET) are good for food-grade plastic materials, Polyetherimide (PEI) for high heat resistance.
When it comes to flexible materials such as Poly Urethane or Silicone rubber, the injection molding concept varies a bit. Each material has a different cost for manufacturing. Molds are designed for a particular material of plastic. Tools/Molds designed for a particular material might not be useful for a different material because each material shrinks in a different way. So decide your material in the design stage.
The tool or mold has a lifetime. The material & cost of the tool varies based on the estimated number of products you want to make. The minimum life of a tool is approx.5000 pieces. So fairly estimate the quantity in the initial stage.
A lot of factors come into play based on the finishing and the intricacy of the product - for example-
If you need a very fine quality, then the tool design involves certain features that add to the cost.
If there are very intricate structures, which render conventional tool manufacturing difficult, then the toolmaker uses unconventional methods which adds to the cost.
All you need do is be clear about what you want - design, quantity, finishing, and material.
Cost consideration for Injection Molding
Go with the service provider who gives an end to end solution i.e. from tool designing to product manufacturing to avoid coordination issues. The service provider will take care of all the factors as per your design, quantity, material, and finishing requirements.
There are two ways in which you can go about the cost structure. We will take our IR digital thermometer as an example to analyze the difference in the cost structure.
Separate cost for tool design & tool manufacturing and separate per unit cost for product manufacturing, which involves material cost, machinery cost, labour cost, etc. Wherein the service provider charges you for the design and manufacturing of the tool separately. And he charges for the products separately. In this case, you incur a significant initial fixed cost (Eg: 1-2 lac INR) and a per-unit product cost (Eg: 10-50 INR).
Per unit finished product which includes both the product manufacturing cost and tool cost. In this case, the fixed initial cost of tool design and manufacturing is distributed across the quantity of the product. Eg: This cost(eg. 2 lac INR) is distributed into the total quantity( 5000 pieces) that you order in addition to the product manufacturing cost (eg. 20 INR).
So 200000 INR /5000 units = 40 INR(tool cost) + 20 INR(product cost) = 60 INR (total cost)
This cost structure relieves the burden of the initial tool cost and makes the cost of the casing variable.
Advantages of Molding
- Best for large product quantity
- Good finishing - glossy finish or matt finish
- Wide material choice
Disadvantages of Molding
- High initial time & Cost
Bonus Topic
When placing your products in the mainstream market, you might have to design and manufacture the product to be with certain Ingress Protection and Impact Protection. This is to effectively communicate the reliability of the product to your customers.
IP Rating: IP (or "Ingress Protection") ratings are international standards that are used to define levels of sealing effectiveness of electrical enclosures against intrusion from foreign bodies (tools, dirt, etc.) and moisture.
IK Rating
IK ratings indicate the degrees of protection provided by electrical enclosures against external mechanical impacts. The IK rating scale identifies the ability of an enclosure to resist impact energy levels measured in joules (J).
