
Reliable off-grid communication has always been a challenge for hobbyists, makers, and outdoor explorers. Whether you’re hiking deep in the mountains, setting up a temporary field station, or working in disaster-prone areas with poor connectivity, staying connected without mobile networks is often critical. Traditional radios offer range but lack modern features, while Wi-Fi and cellular require infrastructure. To address this, we have designed a Meshtastic Node using ESP32, using an open-source firmware for long-range mesh communication. Building a DIY Meshtastic node with ESP32 S3 offers hobbyists and outdoor enthusiasts a cost-effective entry into off-grid mesh network communication. Unlike commercial Meshtastic LoRa devices that can cost $100+, this custom Meshtastic ESP32 is built with cost efficiency and provides complete control over hardware configuration. Building an entire Meshtastic mesh network for your community, this guide covers everything from PCB design to firmware installation.
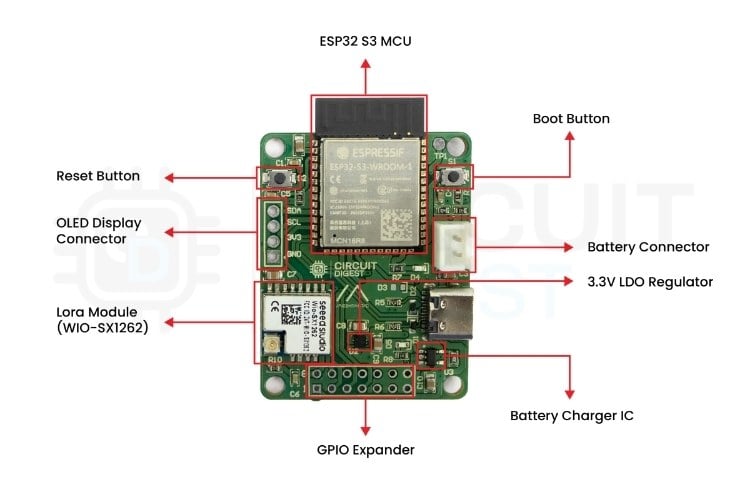
This board integrates everything required for a compact and portable mesh node into a single design. At its heart lies the ESP32-S3-WROOM-1, a dual-core microcontroller with Wi-Fi and Bluetooth connectivity, responsible for running Meshtastic and handling data communication. For long-range wireless links, the board uses the Wio SX1262 LoRa transceiver module, capable of transmitting and receiving over several kilometres while consuming minimal power, ideal for mesh networking.
Power management was another key design goal. The board includes the ADP124ACPZ-3.3-R7 low dropout regulator, ensuring the ESP32-S3 and radio always receive a stable 3.3V supply. For portable operation, an LTC4054 Li-Ion battery charger IC is integrated, allowing the node to seamlessly switch between USB power and battery power. This makes the device versatile enough to be used as both a stationary base node and a mobile, battery-powered communicator.
By combining these elements into one PCB, the design eliminates the need for separate modules and messy wiring, creating a reliable, power-efficient, and field-ready Meshtastic node. Whether for adventure communication, emergency networks, or IoT applications, this custom board demonstrates how hardware integration can enhance the usability and portability of open-source mesh networking.
Code File


PCB Gerber File

Components Selection for Meshtastic ESP32
| Value | Manufacturer | DigiKey Part Number | Datasheet Link | Quantity |
|---|---|---|---|---|
| ESP32-S3-WROOM-1-N16R8 | Espressif Systems | 5407-ESP32-S3-WROOM-1-N16R8CT-ND | 1 | |
| WIO-SX1262 | Seeed Technology Co., Ltd | 1597-114993390CT-ND | 1 | |
| ADP124ACPZ-3.3-R7 | Analog Devices Inc. | 505-ADP124ACPZ-3.3-R7CT-ND | 1 | |
| LTC4054ES5-4.2#TRMPBF | Analog Devices Inc. | 505-LTC4054ES5-4.2#TRMPBFCT-ND | 1 | |
| 10uF | Aillen | 3372-0805W106K250CCTR-ND | 6 | |
| 0.1uF | YAGEO | 311-1088-1-ND | 4 | |
| Diode_TVS_BI | Nexperia USA Inc. | 1727-PESD2V0Y1BSFYLCT-ND | 3 | |
| LED Green | Würth Elektronik | 732-4971-1-ND | 1 | |
| LED Blue | Würth Elektronik | 732-4966-1-ND | 1 | |
| 390K | YAGEO | 311-390KGRCT-ND | 1 | |
| 100K | Stackpole Electronics Inc | RMCF0603FT100KCT-ND | 1 | |
| 10K | Samsung Electro-Mechanics | 1276-3431-1-ND | 3 | |
| 5.1K | Stackpole Electronics Inc | RMCF0603FT5K10CT-ND | 2 | |
| 2K | Panasonic Electronic Components | P2.0KDBCT-ND | 1 | |
| 330R | Stackpole Electronics Inc | RMCF0603JT330RCT-ND | 2 | |
| Tactile Switch SPST | Omron Electronics Inc-EMC Div | SW1021CT-ND | 2 | |
| USB_C Receptacle | GCT | 2073-USB4105-GF-A-060CT-ND | 1 | |
| BAT_JST_Connector | JST Sales America Inc. | 455-B2B-XH-A-ND | 1 |
The board is built around carefully selected components that balance performance with compactness. At the core is the ESP32-S3-WROOM-1 module, which provides dual-core processing power and wireless connectivity. Alongside it, the Wio SX1262 transceiver delivers long-range LoRa communication. Supporting components include the LTC4054 for battery charging, ADP124 as a low-dropout regulator, and a variety of passive elements such as capacitors and resistors to stabilise the system.
These parts are all available through DigiKey, and the full Bill of Materials (BOM) given above provides part numbers and datasheets to simplify sourcing. By consolidating modules into one board, the design reduces the number of external connections and makes assembly more straightforward.
Key Highlights of Our DIY Meshtastic ESP32 Project
- Custom PCB design integrating ESP32-S3, SX1262 LoRa, and power management
- Off-grid mesh network capability with multi-kilometre range
- USB-C charging with Li-Ion battery support for portable operation
- Open-source firmware with ready-to-flash Meshtastic code
- GPIO expansion ports for sensors, displays, and custom modules
- 3D printable enclosure for field-ready deployment
- Cost-effective alternative to commercial Meshtastic LoRa devices ($25-40)
Why ESP32-S3 is Ideal for Meshtastic Projects?
The ESP32-S3 has become the preferred microcontroller for Meshtastic ESP32 projects due to its dual-core architecture, native USB support, and ample GPIO pins. Compared to older ESP32 variants used in many Meshtastic LoRa devices, the S3 offers improved power efficiency and better Bluetooth LE performance, critical for mobile off-grid mesh network applications. The module's 16MB flash and 8MB PSRAM provide enough memory for future Meshtastic firmware updates while supporting additional features like GPS logging and sensor integration.
Features of the Custom DIY Meshtastic Board
This board is designed with versatility and reliability in mind. The ESP32-S3-WROOM-1 serves as the main processor, capable of running Meshtastic firmware while also providing Wi-Fi and Bluetooth for configuration and additional connectivity. Paired with the Wio SX1262 module, it delivers long-range communication, often reaching several kilometres under line-of-sight conditions. Power management is handled by the LTC4054 Li-Ion charger IC, which allows seamless operation between USB-C power and battery input, while the ADP124 3.3V regulator ensures that both the ESP32-S3 and SX1262 receive a clean, stable voltage.
The PCB also integrates status and power LEDs for quick feedback, tactile switches for reset and boot mode, and a JST connector for connecting Li-Ion or LiPo batteries. All of this is packed into a compact layout that eliminates messy jumper wires and makes the board suitable for field use. With its combination of simplicity and robustness, this node can serve as both a stationary base and a mobile off-grid communicator.
Why Build a DIY Meshtastic Node?
» Off-Grid Communication: Stay connected without cellular or internet infrastructure
» Long-Range Capability: Communicate up to 20+ km in optimal conditions
» Decentralised Network: No single point of failure in your mesh network
» Cost-Effective: Build professional-grade nodes at a fraction of commercial prices
» Customizable: Add sensors, GPS, and displays to suit your needs
» Emergency Ready: Perfect for disaster preparedness and remote operations
Schematic Design: Building the Foundation for Your Meshtastic ESP32 Node
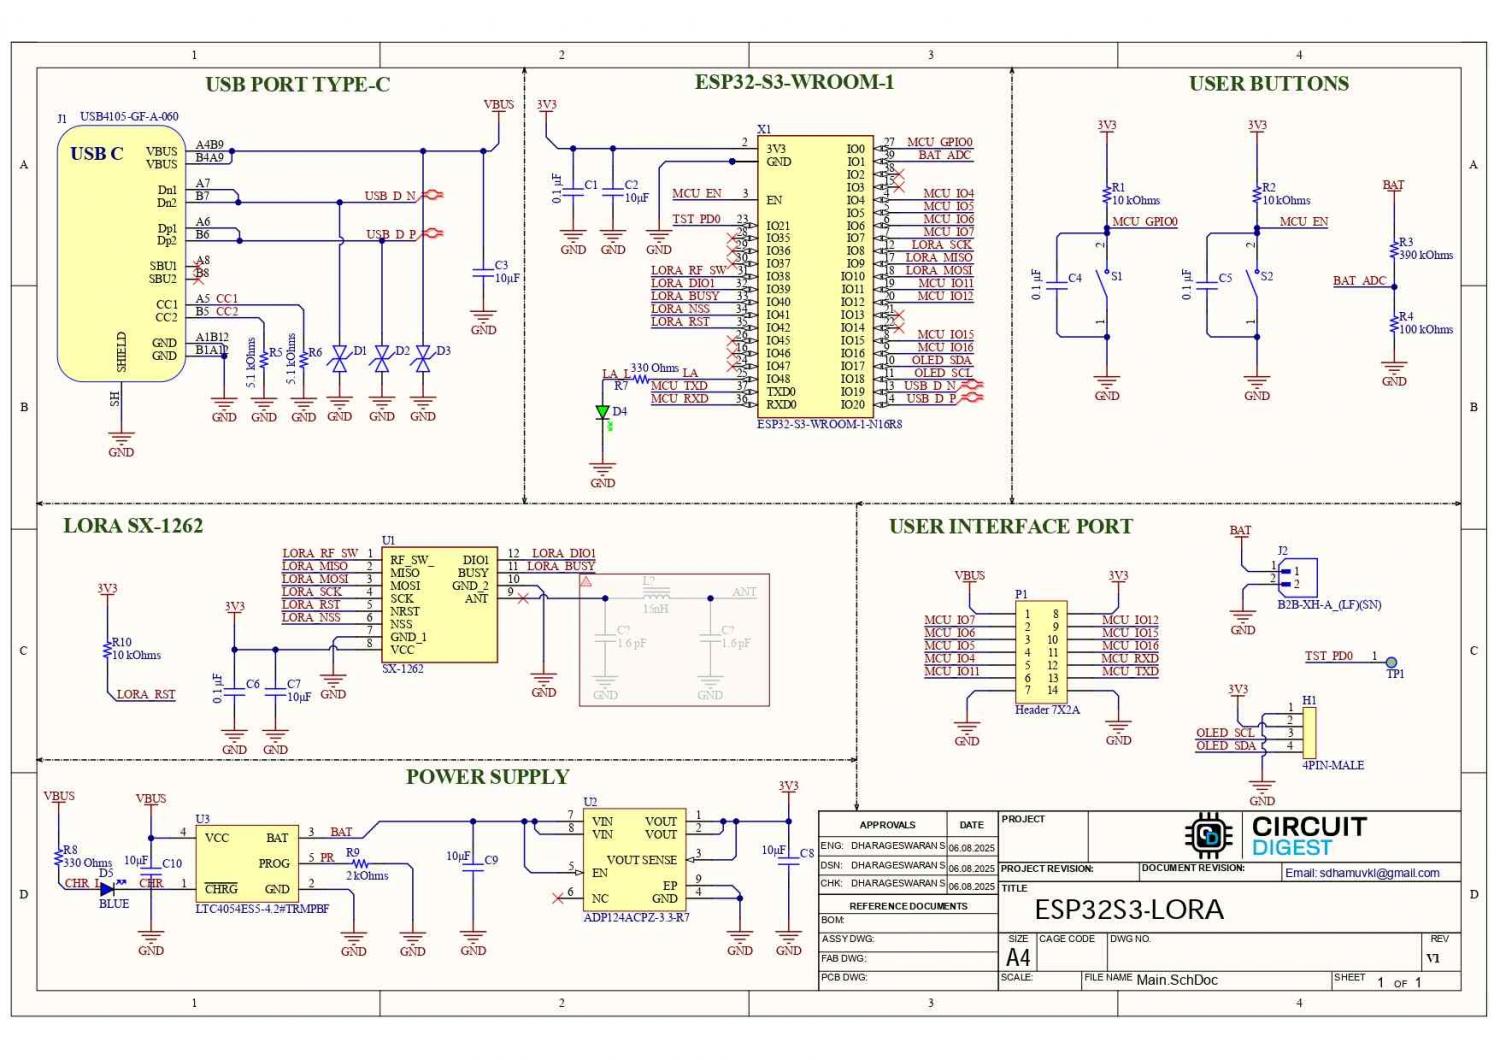
USB Type-C Power Input and Protection:
When starting the design, I knew the USB Type-C port would be the gateway for both power and Meshtastic DIY ESP32 LoRa programming, so it had to be done right. So, I added 5.1 kΩ resistors on CC1 and CC2, which tell any connected device that this port is a sink, making sure power is negotiated correctly. I also wanted the board to be durable in the field, so I placed bi-directional TVS diodes across both the power and data lines. This helps protect against ESD and unexpected surges, which are common when using power banks or plugging into unfamiliar USB sources outdoors. To stabilise the input voltage, I placed a 10 µF capacitor right near the port. This small detail keeps the board from browning out during sudden current draws.

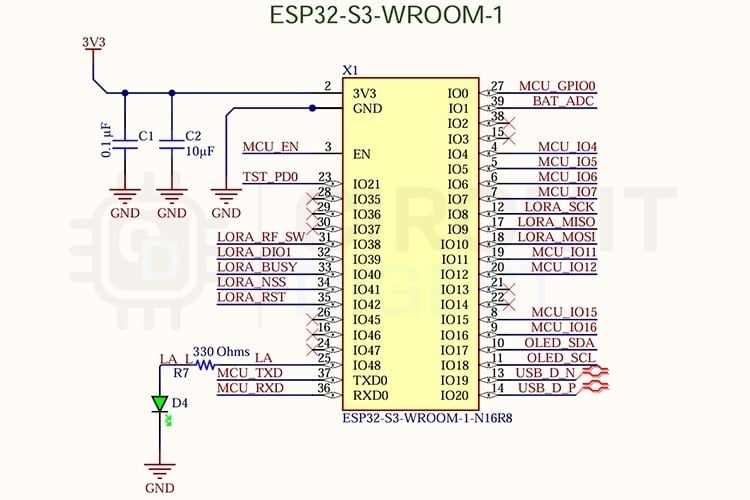
ESP32-S3 Microcontroller Integration:
At the heart of the project is the ESP32-S3-WROOM-1, and choosing this chip was straightforward for Meshtastic ESP32 applications; it offers dual-core processing, Wi-Fi, and Bluetooth, making it perfect for running Meshtastic firmware. To ensure reliable operation of your Meshtastic node with ESP32-S3, I placed 0.1 µF decoupling capacitors as close as possible to the VDD pins to eliminate high-frequency noise, and paired them with 10 µF capacitors for bulk energy storage. This combination keeps the ESP32 stable under heavy loads. For a quick visual indicator, I connected a green LED to GPIO48. This way, I can immediately tell if the board is alive without attaching a debugger. To keep the schematic readable, I NetLabeled all the other pins, which also made routing cleaner when moving to PCB layout.
User Interface and Control Buttons:
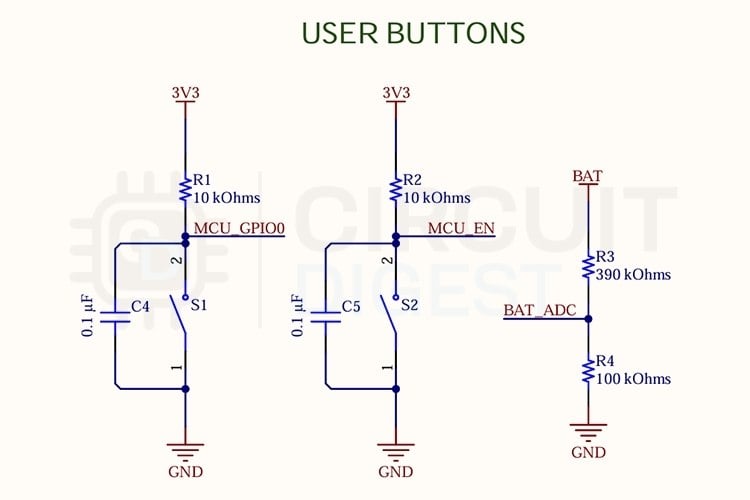
In the user buttons section of your Meshtastic ESP32 design, I added two tactile switches: one for reset and one for boot mode. These may sound basic, but they're essential for flashing Meshtastic DIY ESP32 LoRa programming and troubleshooting in the field. Each switch is pulled up to 3.3 V using 10 kΩ resistors, and I added 0.1 µF capacitors to debounce them at the hardware level. This ensures the ESP32 doesn’t misread switch presses, especially in noisy environments. One extra feature I included here was a simple voltage divider using 390 kΩ and 100 kΩ resistors. By feeding this divider into an ADC pin, the ESP32 can monitor battery voltage and report it through the Meshtastic mesh network. This small detail makes the Meshtastic node with ESP32-S3 much more practical since you can keep an eye on battery health without extra hardware.
Expandable GPIO Interface:
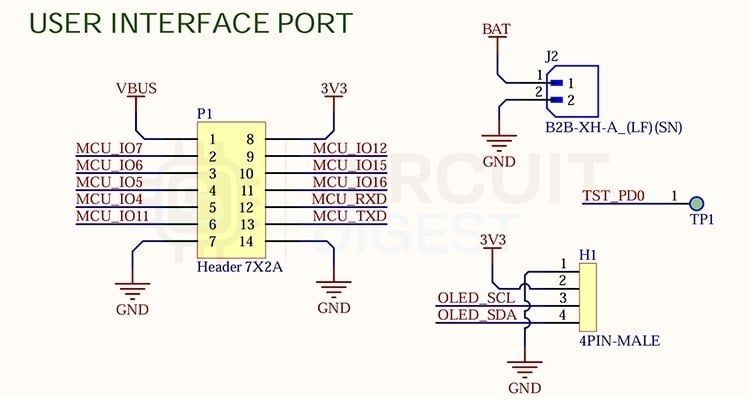
I wanted this board to be more than just a closed-off Meshtastic LoRa device, so in the user interface port section, I broke out several GPIOs on header pins for your off-grid mesh network expansion. This gives flexibility to add environmental sensors, relays, or other peripherals later to your DIY Meshtastic node.I also included a JST connector for the battery and a dedicated header for an OLED display. The OLED support was intentional; having a small screen on a Meshtastic node can be incredibly handy for debugging or field use, showing messages or battery status without needing to pair a phone to your Meshtastic ESP32 device. By giving users these extra interface points, the board isn't just a single-purpose device for your Meshtastic mesh network, but a platform they can build on.
SX1262 LoRa Module Integration
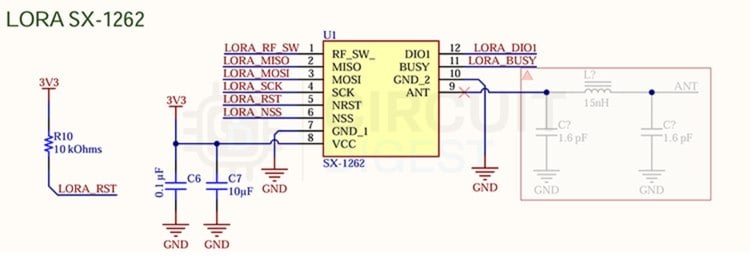
For long-range communication in your off-grid mesh network, I chose the Wio SX1262 module from Seeed Studio. Designing a raw RF section with impedance matching and antenna tuning for Meshtastic LoRa devices would have taken significant time and equipment, but the Wio module integrates all of that into a pre-certified package. This saved me headaches while still delivering excellent LoRa performance for the Meshtastic mesh network. I placed standard decoupling capacitors (0.1 µF and 10 µF) on its supply rails and pulled its reset pin up with a 10 kΩ resistor. Out of curiosity and for future flexibility in your Meshtastic node with ESP32-S3, I added an optional PI-filter antenna network in the schematic. It wasn't populated in this version of the PCB, but if tuning is needed later for your DIY Meshtastic node, the pads are already there. This way, I future-proofed the design without overcomplicating the first build.
Power Management System:
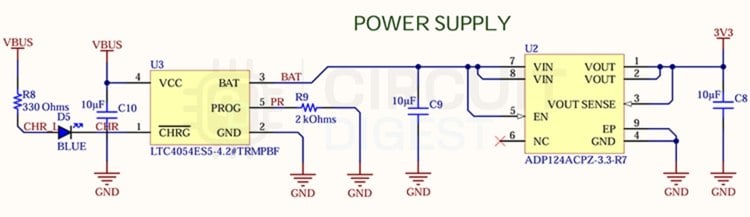
Finally, the power supply section ties everything together for your Meshtastic ESP32 project. I went with the LTC4054ES5 charger IC because it's compact, reliable, and handles Li-Po batteries effortlessly for off-grid mesh network applications. To give visual feedback on your DIY Meshtastic node, I tied a blue LED with a 330 Ω resistor to VBUS, so you'd always know when charging was active. The charging current was set by placing a 2 kΩ resistor on the PROG pin, striking a balance between safe charging and reasonable speed. After the battery is charged, the power flows into the ADP124 3.3V regulator, which provides a clean supply for both the ESP32-S3 and SX1262 in your Meshtastic LoRa devices. Each of these ICs has its own 10 µF capacitors on the input and output to ensure stability. By carefully choosing these parts, I ended up with a power system that can handle USB input, safely charge a battery, and still deliver a rock-solid 3.3V to the rest of the Meshtastic node with ESP32-S3 board.
The entire schematic was created in Altium Designer, which gave me powerful tools for organising the project and verifying connections. For those who don't have access to Altium, a free trial is available, or you could use KiCad, which is open-source and fully capable of handling a DIY Meshtastic node design like this. Both tools make it possible to create professional-quality schematics and PCBs for Meshtastic ESP32 projects, and the choice largely comes down to workflow preference.
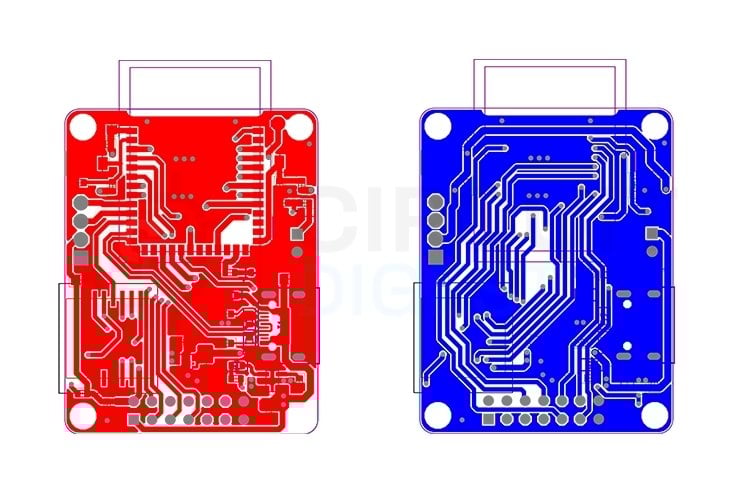
PCB Layout: Optimising Your DIY Meshtastic Node for Performance

USB Type-C Placement and Routing
When it came to the USB Type-C port for your Meshtastic LoRa devices, placement was critical. I positioned it right on the board's edge so it would be easy to access for Meshtastic DIY ESP32 LoRa programming, and I kept the traces from VBUS and GND as wide and short as possible to minimise resistance and heat. The CC1 and CC2 resistors were tucked in close to the connector pads to avoid noise pickup, while the TVS diodes sat right at the entry point; this way, any surge or ESD discharge is clamped before it can travel further into the Meshtastic ESP32 board. The 10 µF capacitor was placed within a centimetre of the connector, directly across the power lines, to act as a first line of decoupling. By keeping the USB power path clean and simple, I ensured the DIY Meshtastic node could charge and program reliably in the field.
ESP32-S3 Central Placement Strategy
The ESP32-S3-WROOM-1 needed to be the star of the show in this Meshtastic node with ESP32-S3, so I gave it a central position on the board. I kept its decoupling capacitors right at the module's power pins, with the 0.1 µF caps almost touching the pads to kill high-frequency noise during Meshtastic mesh network operations. The 10 µF bulk capacitors were spaced nearby to provide stability for larger transients. The GPIO48 status LED was placed along the edge for visibility on your DIY Meshtastic node, but I kept its trace short and direct to avoid unnecessary routing complexity. Since all other pins were net-labelled in the schematic, I had a lot of freedom during layout for the Meshtastic ESP32 design, which allowed me to fan out signals neatly toward the user ports and LoRa module. This central placement reduced trace lengths and helped maintain signal integrity in your off-grid mesh network.
User Controls and Monitoring
For the user buttons, I placed the reset and boot tactile switches side by side near the edge of the board. This makes them accessible even if the board is enclosed. Each had its 10 kΩ pull-up resistor and 0.1 µF debounce capacitor placed right next to the switch pads to avoid long traces that could introduce unwanted noise. The voltage divider for battery measurement was routed directly to an ADC pin on the ESP32, with the resistors placed close to the microcontroller to reduce leakage and improve accuracy. I also ensured that the divider’s high-value resistors were positioned in a way that minimised the risk of contamination or leakage currents, which can affect measurements on high-impedance nodes.
Peripheral Connectivity
The user interface port for your Meshtastic ESP32 device was all about flexibility, so I grouped the GPIO headers, OLED header, and battery connector on one edge of the PCB. This makes it easy to connect accessories to your DIY Meshtastic node without crossing wires over the board. The OLED header was aligned to keep the I²C traces short and parallel, minimising noise on the clock and data lines. The battery JST connector was placed so that a cable could run directly off the board without interfering with other connectors, and I made sure the copper pours around it were reinforced for mechanical strength. These design choices not only made the Meshtastic node with ESP32-S3 more robust but also allowed for cleaner wiring in real-world off-grid mesh network deployments.

LoRa Module Positioning for Maximum Range
For the LoRa SX1262 module in your Meshtastic LoRa devices, I positioned the Wio module along the top edge to give its antenna path the clearest route outward for optimal off-grid mesh network performance. Since the RF section is already integrated into the module, I didn't have to worry about matching networks, but I still left space for the optional PI filter pads. These were routed in line with the antenna path but left unpopulated during fabrication. The decoupling capacitors for the SX1262 were placed right at its supply pins, with short, wide traces to minimise inductance. I also paid attention to the ground via placement around the module, stitching the ground plane beneath it to create a solid RF reference. This careful placement helped ensure the Meshtastic ESP32 module would deliver maximum range and minimal interference in your DIY Meshtastic node.
Power Distribution Network
Finally, the power supply section was placed at the bottom corner, creating a clean flow from USB input to charger to regulator to the rest of the Meshtastic node with ESP32-S3 board. The LTC4054 was placed near the USB-C connector to shorten the charging path, and its blue LED was positioned close by so it could be easily seen when plugged in. The 2 kΩ resistor on the PROG pin was routed directly with minimal trace length to avoid introducing noise into the current setting. The ADP124 regulator sat right next to the ESP32-S3 and LoRa module, delivering 3.3V through wide copper pours. Both ICs had their 10 µF capacitors placed directly at their input and output pins, ensuring stable regulation. I kept the entire power path on one side of the board, with careful ground stitching, to prevent noise coupling into sensitive analog or RF traces in your off-grid mesh network.
PCB Fabrication: Ordering Your DIY Meshtastic Node Board
Once the schematic and layout were finalised for your Meshtastic ESP32 design, the Gerber files were exported. These can be uploaded to popular PCB fabrication services such as ALLPCB, PCBWay, or JLCPCB. The process is straightforward: log in to the fabrication site, upload the Gerber files, and the system automatically detects board dimensions. From there, you can customise parameters such as PCB thickness, solder mask colour, silkscreen, and surface finish.
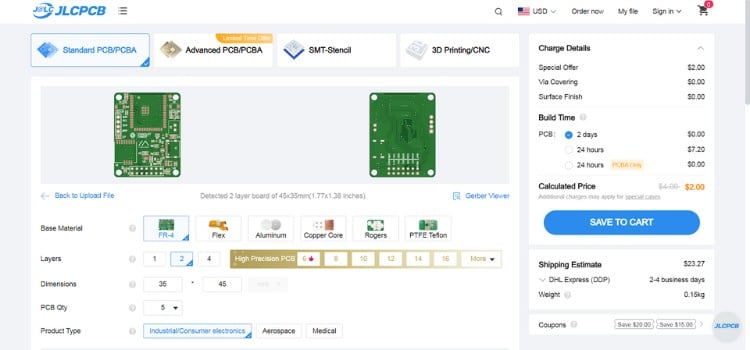
For prototyping the Meshtastic LoRa devices, standard FR4 boards with a 1.6 mm thickness and HASL finish are usually sufficient. After confirming specifications, the order can be placed, and boards typically arrive within a week. By combining all functions into one design for your Meshtastic node with ESP32-S3, the fabricated PCB feels closer to a finished product than a DIY prototype.
Assembly Guide: Building Your DIY Meshtastic Node
Assembly of your Meshtastic ESP32 board begins by preparing all the components listed in the BOM. The recommended approach is to start with the smallest components, such as resistors and capacitors, before moving on to ICs and connectors. If available, an SMD stencil can be used to apply solder paste to the pads, followed by placing the components and reflowing them with a hot-air station or reflow oven. For those without such equipment, careful manual soldering with fine-tipped tools is also possible for your DIY Meshtastic node.
After soldering the passives, the LTC4054 charger IC and ADP124 regulator should be placed next, as they form the power section. Once these are in place, the ESP32-S3 module and SX1262 LoRa module can be soldered, taking care to ensure alignment for proper contact. Finally, the USB-C connector, JST battery header, LEDs, and tactile switches can be added to complete your DIY Meshtastic node. Once complete, the assembled board should be inspected under magnification for solder bridges or cold joints before proceeding to Meshtastic DIY ESP32 LoRa programming.
3D Enclosure Design: Protecting Your Meshtastic Node
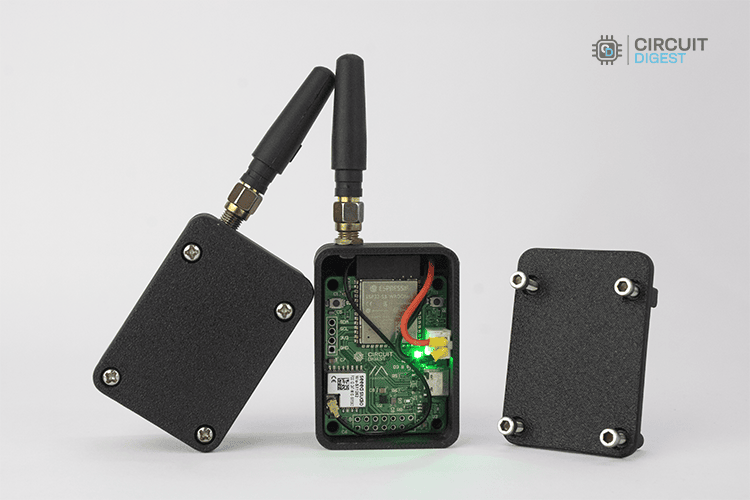
Once the PCB is assembled and tested, protecting it in a durable, portable enclosure becomes crucial for real-world deployment of your Meshtastic LoRa devices. I designed a custom 3D-printed case that houses the PCB, a LiPo battery, and the LoRa antenna, creating a compact, rugged node ready for outdoor use.
The design process started by measuring the assembled PCB and key components, including the USB-C connector, tactile switches, LEDs, and the JST battery connector. I ensured that each feature would be accessible through cutouts in the enclosure for easy charging, resetting, or status checks on your DIY Meshtastic node. The antenna was given a dedicated slot that extends outside the case to maximise signal strength without interference from the electronics.
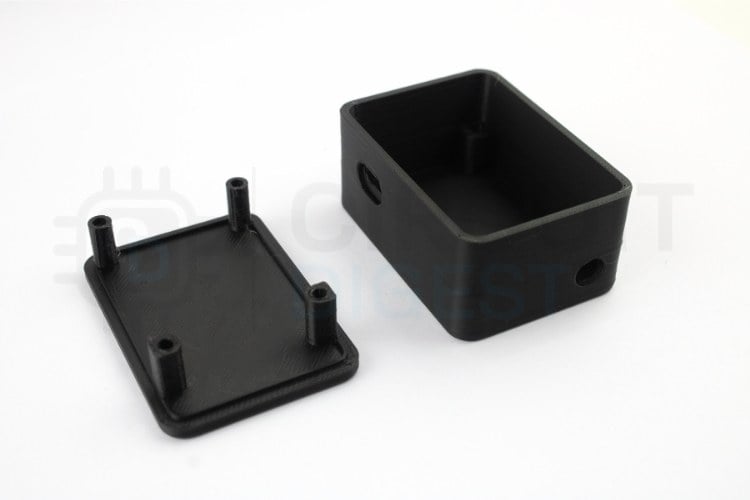
For assembly, the enclosure was designed in two parts: a bottom tray to hold the PCB and battery, and a top cover that snaps securely in place. I incorporated ventilation slots to prevent heat buildup and rounded edges for ergonomic handling. Using PLA or PETG filament provides a lightweight yet sturdy structure, while allowing for quick iterations and modifications.
This 3D enclosure not only protects your DIY Meshtastic node from drops and environmental factors but also gives it a polished, professional appearance. With the electronics secured inside, your Meshtastic node with ESP32-S3 is now truly portable and ready for field deployment in your off-grid mesh network, whether for hiking, camping, or emergency communication setups.
Firmware Installation: Programming Your Meshtastic ESP32 Node
I have developed custom firmware specifically for this PCB, so you don't need to configure Meshtastic from scratch for your DIY Meshtastic node. You can get it directly by cloning my GitHub repository, which includes pre-configured settings for the ESP32-S3 and SX1262 LoRa module used in this Meshtastic LoRa device design.
To start, clone the repository to your local machine using Git.
Next, open the project in Visual Studio Code with the PlatformIO extension installed. PlatformIO provides an easy-to-use environment for building and uploading firmware to ESP32 boards without manual configuration, perfect for your Meshtastic ESP32 project.

Within PlatformIO, select the project environment named CD-Mesh_S3, which is preconfigured for the ESP32-S3 and SX1262 LoRa module. All necessary Meshtastic DIY ESP32 LoRa pinout settings for this PCB are already included, so you don't need to modify anything for your off-grid mesh network deployment.
Finally, build and upload the firmware to your board using the PlatformIO toolbar. Once uploaded, the device will boot into the custom firmware and be ready to join your Meshtastic mesh network immediately, allowing your DIY Meshtastic node to communicate with other Meshtastic LoRa devices.
Configuration and Testing: Setting Up Your Off-Grid Mesh Network
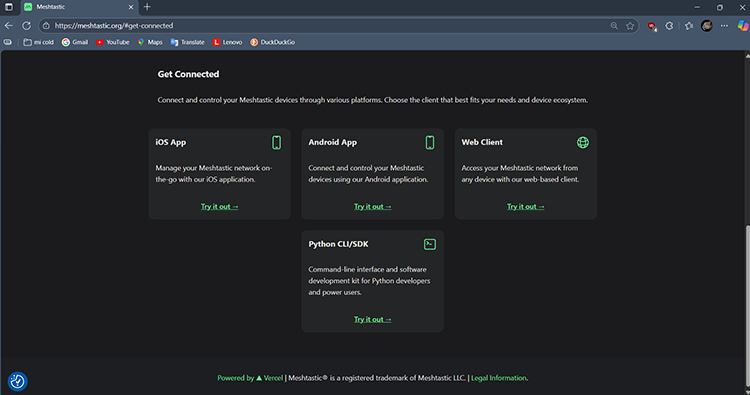
After uploading the custom firmware to your PCB, the first step is to install the Meshtastic app from the Play Store (Android) or App Store (iOS). Open the app and scan for Bluetooth devices; your Meshtastic ESP32 node should appear in the list. On first connection, the app will prompt for a PIN; use 123456 as the default. Once connected, the app fetches system details from your DIY Meshtastic node, giving you access to its current configuration for your off-grid mesh network.
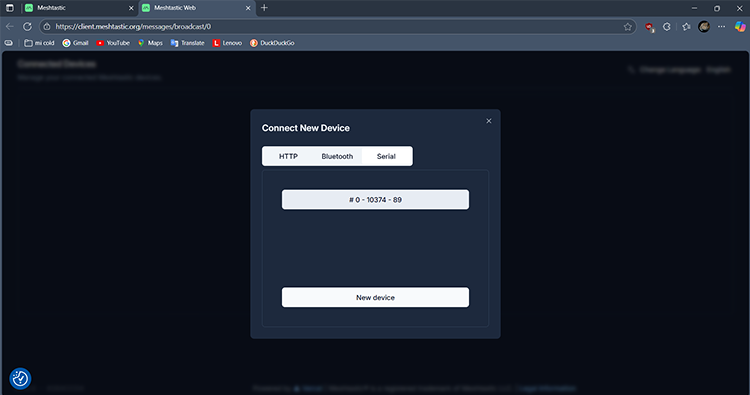
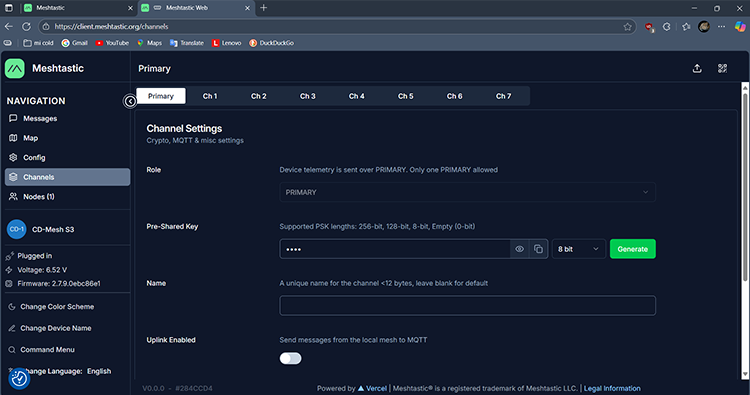
Although the app allows you to modify system settings over Bluetooth on your Meshtastic LoRa devices, changes can take time to apply. To speed up configuration, it’s better to connect the node to a PC and use the Meshtastic Web Client via USB: https://client.meshtastic.org/. Select the correct COM port, and the interface will load all system details from your DIY Meshtastic node quickly and reliably.
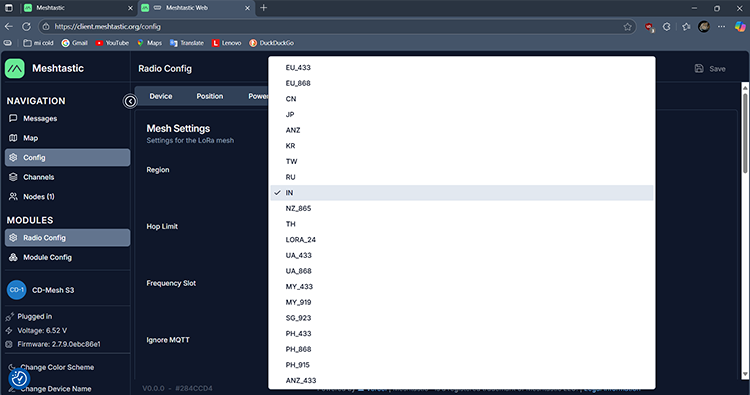
Once everything is loaded in the web client, the first configurations you should set for your Meshtastic LoRa devices include your LoRa region (mine is set to India for this DIY Meshtastic node), node name, channel key (use the same channel key for all the nodes that you want to communicate in your off-grid mesh network), and any other system settings you want to customize. Using the web client ensures all changes are applied immediately to your Meshtastic ESP32 board and provides an easier way to manage your Meshtastic node with ESP32-S3 configuration compared to Bluetooth.
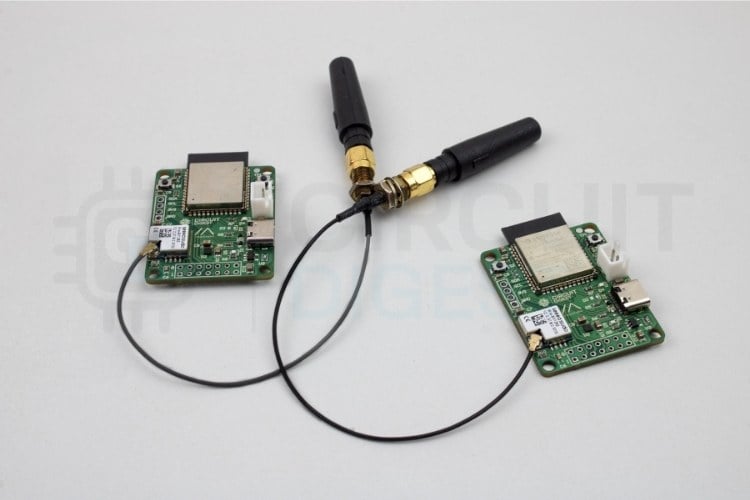
After pairing with the first node via Bluetooth, I was able to send a test text message through the app. The message hopped over the LoRa link to the second node, and from there, it was visible in the web client on my laptop. This felt like magic; my phone and laptop weren’t directly connected, but they communicated flawlessly through the two nodes forming a mesh. It was also possible to reverse the test: typing a message in the web client on my PC and watching it arrive in the app on my phone, routed entirely through the LoRa mesh.
As I explored further, I found that the Meshtastic ecosystem offers far more than simple text messages. One of the most useful features is position sharing. With a GPS-equipped node, location data can be broadcast periodically so that everyone in the mesh can see where each participant is. Even though my custom board didn’t have GPS built in, I could pair it with a mobile app that shared my phone’s GPS location, which the node then relayed over LoRa. This is extremely useful during group hikes or off-grid adventures, where keeping track of team members can make the difference between convenience and safety.
Another feature I enjoyed experimenting with was channel encryption and private groups. By setting a unique channel key, only devices with the same key could join the conversation. This ensured that the messages weren’t just secure but also prevented interference from other Meshtastic users operating in the same region. In practice, this meant I could create a closed network for my own use case, whether for a small hiking team, a family group during an outing, or even a research team in the field
From a usability perspective, I was surprised by how smooth the mesh forwarding worked. Even when the nodes were placed farther apart than a single link could cover, the intermediate node automatically relayed the message without any special configuration. This hop-to-hop forwarding is the essence of mesh networking, and seeing it work in practice was a real highlight of the project. It showed me how a few strategically placed nodes could extend coverage across an entire campsite, a farm, or even a small village, all without relying on cellular towers.
Essential Meshtastic Configuration Settings
| Setting | Purpose | Recommended Value |
| Region | Set LoRa frequency band | US, EU868, IN865, etc. (based on location) |
| Node Name | Identify your device | Unique, descriptive name |
| Channel Key | Encrypt mesh communications | Same key for all nodes in your network |
| Radio Preset | Balance range vs. speed | Long Range - Fast (default) |
| Node Role | Define device behavior | Client (mobile) or Router (fixed) |
| Transmit Power | Signal strength | Max allowed for your region |
Practical Applications for the DIY Meshtastic Node
The versatility of this Meshtastic ESP32 node makes it suitable for a wide range of real-world uses in off-grid mesh networks. In hiking and camping scenarios, it allows groups to stay connected without relying on cellular coverage. In emergencies or disaster recovery, quick-deploy mesh networks can provide critical communication when infrastructure is down. For IoT applications, these nodes can forward sensor data across wide areas, useful for environmental monitoring or agricultural projects. Research teams working in remote regions can also benefit from reliable, decentralised communication.
This custom PCB demonstrates how thoughtful hardware design can simplify the process of building and deploying a Meshtastic mesh networking node. By integrating the ESP32-S3 microcontroller, SX1262 LoRa transceiver, power management ICs, and essential connectors into a single board, the design eliminates the need for fragile wiring or multiple modules. The result is a compact, durable, and field-ready Meshtastic LoRa device that bridges the gap between open-source firmware and practical hardware for your off-grid mesh network.
Whether you are an outdoor adventurer, a maker experimenting with IoT, or a responder preparing for emergencies, this DIY Meshtastic node project provides a reliable foundation for staying connected off-grid. With a little effort in assembly and Meshtastic DIY ESP32 LoRa programming, you can build your own network of Meshtastic nodes with ESP32-S3 and experience firsthand the power of decentralised communication in your Meshtastic mesh network.
Future Enhancements
» Outdoor Recreation
Hiking, camping, and backpacking groups can stay connected using Meshtastic LoRa devices without relying on cellular coverage. Your DIY Meshtastic node enables group coordination and emergency communication in remote areas.
» Emergency Preparedness
In disasters or power outages, your off-grid mesh network provides critical communication when infrastructure fails. Meshtastic nodes with ESP32-S3 can be quickly deployed to establish community networks.
» Agricultural Monitoring
Deploy sensor-equipped Meshtastic ESP32 nodes across farms to monitor soil moisture, temperature, and other environmental factors. The Meshtastic mesh network enables data collection from remote field locations.
» IoT and Research
Researchers and science scientists in remote areas can establish a mesh network; that is, a group of DIY Meshtastic nodes, to monitor equipment, collect data from sensors, or connect with team members off-grid without cellular data.
» Event Coordination
Use Meshtastic LoRa devices, like the TBeam, to track volunteers and staff at festivals, large outdoor events, or community gatherings, without relying on cellular service or crowded connectivity to others.
» Boating Communication
Boats and vessels are enhanced within your off-grid mesh by ES32-S3 waterproof Meshtastic nodes to communicate 'on the water' with shore and other vessels, within the mesh coverage.
» Remote Work Sites
Construction, mining operations, or oil fields can deploy DIY Meshtastic nodes to provide reliable communication networks throughout the site. These communication devices are helpful in locations where cellular service is unreliable, sparse, or nonexistent.