

A USB sound card along with the microphone is used to add audio capabilities to Raspberry Pi Zero that lacks an audio connector like other Pi versions. We all know that the Raspberry pi zero W does not have audio hardware and pin-based PWM situation. The USB sound card or bespoke analogue with an ADC (analog-digital converter) can be used to connect the additional hardware to Raspberry Pi. This tutorial is the part of our Raspberry Pi Zero series where we are going to install USB sound card in Raspberry Pi zero W and we will use ALSA utilities to test sound card and sound device.
Component Required for installing and testing USB Sound Card on Pi Zero
- Raspberry Pi Zero W
- Monitor
- USB Hub
- OTG Cable
- Micro HDMI
- Micro SD card
- Speaker
- Mic
- USB sound card
Pre-requisite
It's expected that your Raspberry Pi already has an operating system installed and can connect to the internet. If it is not, then you can follow our previous tutorial on Getting Started with the RASPBERRY PI ZERO W – Headless Setup without Monitor. It is also assumed that you have access to your Raspberry Pi terminal window. In this tutorial, we are going to use MobXterm in SSH mode to connect it with Raspberry Pi Zero W.
USB Sound Card
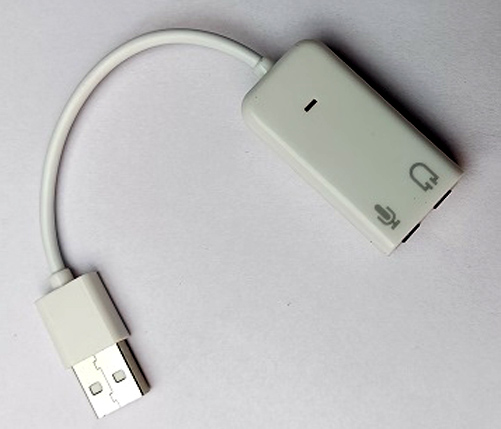
USB Sound Card is a USB to 3.5mm microphone and headphone jack converter that we will use for connecting mic and speaker with Raspberry pi zero W. The 3.5mm Earphone Splitter Adapter converts one USB plug into two 3.5mm female jacks, allowing you to use a USB port to add a mono microphone input and a stereo output to your PC or laptop. In the image given below, you can see image of USB sound card.
Features of USB Sound Card
- One male USB plug
- Two 3.5mm (3-position) Female Jacks (1 for the mic, 1 for headset)
- Specifically for mic-capable headphones
- Overcomes the limitation of some portable USB ports, Turning a USB port in two distinct positions 3.5mm audio ports, allowing you to connect a microphone as well as external speakers
- Convenient tangle-free flat cable design
- Allows the use of older audio accessories with newer computers
- Can be used with any device which uses USB portable devices
Installing USB Sound Card in Raspberry Pi Zero W
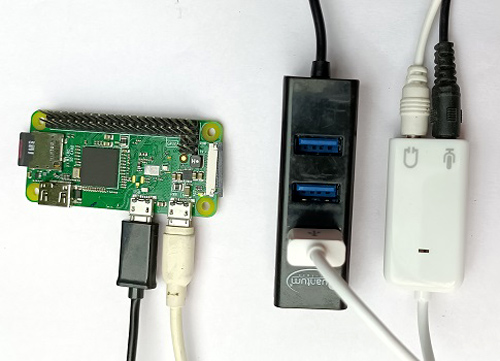
Now, connect your monitor with Raspberry Pi zero W by using micro-HDMI cable and connect OTG cable to Raspberry Pi zero W. Thereafter, connect the USB sound card to Raspberry Pi zero W using USB hub and connect Speaker and Mic to USB sound card by using 3.5 mm audio jack. In the image given below, you can see all connections on Raspberry Pi zero W. Now, every connection has been completed, so power up the Raspberry Pi zero W by using micro-USB cable.
Now, first you have to figure out chipset for your device. There are four different types of chipset available. Your device should support one of the four chipset from following list.
1- CM108 Type
2- CM-Headphone Type
3- CM109 Type
4-GeneralPlus
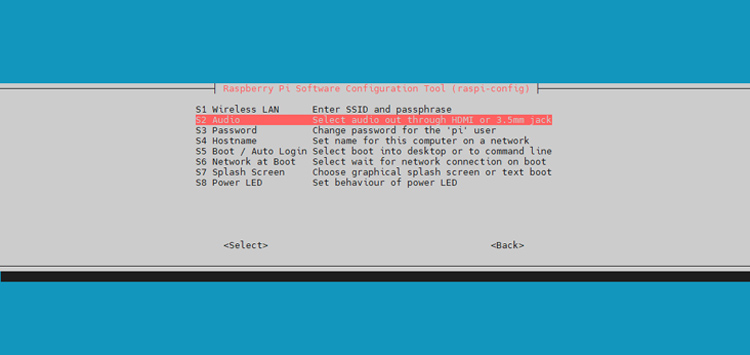
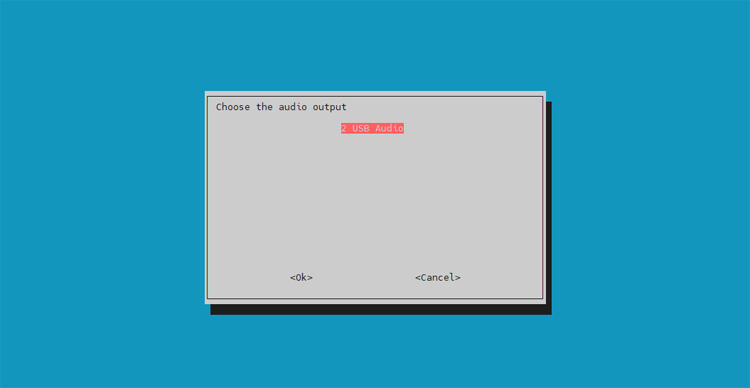
Connect your USB audio card with Raspberry Pi zero W by using USB hub and OTG cable. Then boot Raspberry Pi zero W normally. Now, change your audio from 3.5 mm jack to USB in configuration setting.
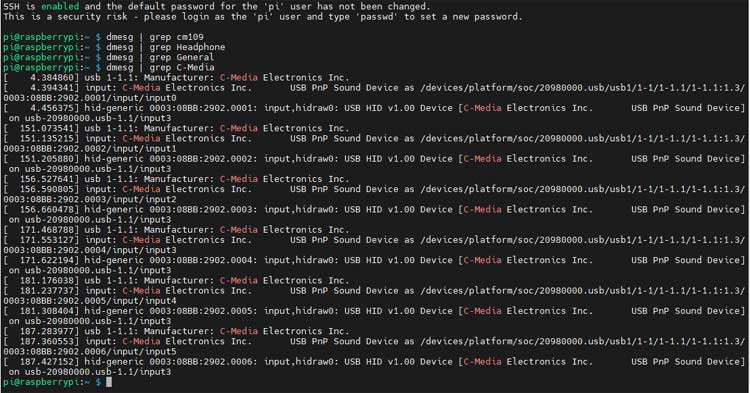
Now, type command dmesg | grep cm109 in terminal window then if you have a CM109 chipset, you would be able to see some lines about it. If it doesn't work, try dmesg | grep Headphone The C-Media USB Headphone Set driver will appear. This indicates that it is a CM-headphone. If nothing appears, then write command dmesg | grep C-Media on terminal window. There are some C-Media notes, however the cm109 driver is not mentioned. This indicates that it's a CM108. If again nothing appears, then write command dmesg | grep General on terminal window and you’ll come across the term "GeneralPlus." This indicates that it is a GeneralPlus. In the image given below, you can see for my device only one command is working and others are not working. It means chipset type for my device is C-Media (C-108). First, we will do configuration for type C-Media (C-108).
Enter lsusb command in terminal window. You should see an output similar to below image.

Now, enter aplay –l command in terminal window. you will see list of playback hardware devices.

Installing ALSA Configuration on Raspberry Pi zero W
ALSA is advanced linux sound architecture. We are going to install ALSA driver for our raspberry Pi zero W. By modifying the system file “alsa.conf,” the USB sound device can be set as the default audio device. Enter the command sudo nano /usr/share/alsa/alsa.conf in terminal window them you will see below two lines.
defaults.ctl.card 0
defaults.pcm.card 0
Change audio card 0 to card 1 because card 0 is used for default audio and card 1 is used for built in audio.
defaults.ctl.card 1
defaults.pcm.card 1
Now, enter the command sudo nano /etc/asound.conf in terminal window and copy the following code in this file and save. It will make the default PCM (audio) and default control card 1.
pcm.!default {
 type hw
 card 1
}
ctl.!default {
 type hw
 card 1
}
We've configured ALSA for your OS. Now, we’ve rebooted with sudo reboot and logged in again. Now, we are going to test audio () so first enter the below command line in terminal window.
speaker-test -c2
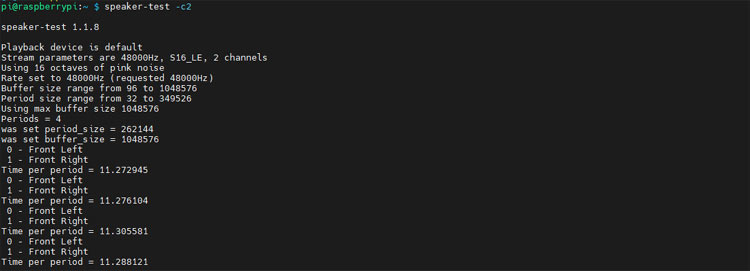
This will play white noise through the audio card's left and right speakers. Try playing an audio file using speaker-test once you've got something going (for WAV files, not MP3).
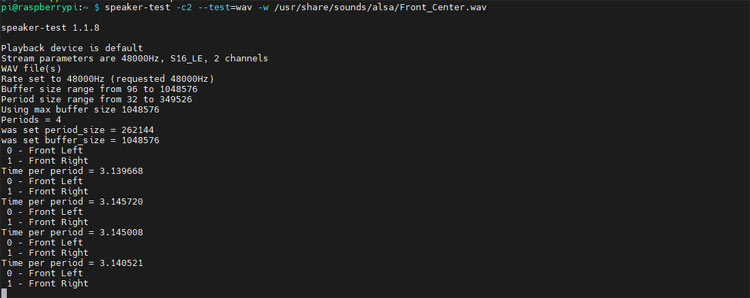
Enter the command given below to check front and center audio.
speaker-test -c2 --test=wav -w /usr/share/sounds/alsa/Front_Center.wav
Now, we have tested speaker audio (output audio) for Raspberry Pi zero W. Now, we are going to record audio by using CM-headphone type adapter. We can record audio by using the below command.
arecord --device=hw:1,0 --format S16_LE --rate 44100 -c1 sample.wav
It will record signed 16-bit (S16_LE) audio at 44100 Hz (--rate 44100) mono (-c1) audio to home.wav. Recorded sound will be echoed out from the speaker. If you add to the-V mono command line, a little VU metre will appear.

We can playback the recorded audio by using the below command.
aplay --device=plughw:1,0 test.wav
So, this is how you can install USB sound card on Raspberry Pi zero W and check the speaker and mic connected to this sound card. Hope you enjoyed the project and learned something useful, if you have any questions, please leave them in the comment section below or use our forum to start a discussion on this.

Thank you for sharing this. But i am having trouble with my raspi zero w recognizing the C-media sound card. When I go to the raspi configuration, to choose an audio output it says that there are no internal audio devices found. did i miss a step? I feel like the raspi is prioritizing in recognizing what's in the mini hdmi (which there's nothing plugged into it) than what's plugged into the micro usb port, which is the micro usb to usb and the sound card plugged onto it.