
Smoke Detectors are very useful in detecting smoke or fire in buildings, and so are important safety parameters. In this project, we are going to build a Simple Smoke Detector Circuit without using any Microcontroller. This circuit triggers the Buzzer whenever it detects Smoke or fire nearby. This circuit mainly uses the MQ6 Smoke/Gas sensor to detect the level of smoke. The MQ6 gas sensor is also sensitive to LPG, Alcohol, and Methane, etc. Here we have used a Buzzer as a Smoke alarm, which is driven by a BC547 NPN transistor.
We have previously built a Smoke Detector Arduino Shield using an MQ2 Gas Sensor, which not only senses the smoke in the air but also displays the level of Smoke in the Air in PPM.
Table of Contents
What is a Smoke Detector Alarm Circuit?
The smoke detection circuit is an important safety device that warns building occupants of fire and smoke. This smoke detector project uses an MQ6 gas sensor to detect smoke particles and activate a buzzer for an audible alarm. Learn how to build an effective smoke detector alarm circuit diagram using the MQ6 gas sensor and BC547 transistor. When building your smoke detector connection diagram, ensure the MQ6 sensor is genuine for reliable smoke detection.
Key Features of This Smoke Detector Alarm Project
- No microcontroller is needed with this simple analog design.
- The MQ6 gas sensor is reliable for detecting smoke.
- The sensitivity adjustment is simple using a 10K potentiometer.
- Both visual and audible alarms.
- Low power consumption design.
- Low-cost components.
Components Required for Smoke Detector Circuit
- BC547
- Bread Board
- Smoke Sensor (MQ2/MQ6)
- 1K
- 10k POT
- Power Supply
- LED
- Buzzer
- Connecting wire
- Jumper wire

Smoke Detector Alarm Circuit Diagram
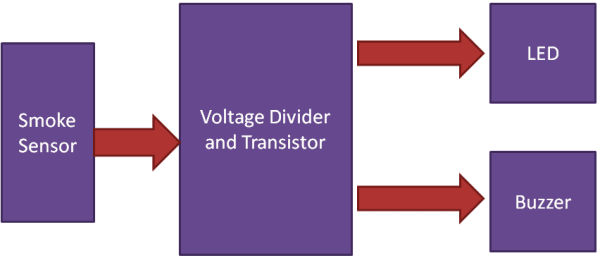
The smoke detector diagram below shows the complete circuit connection for building an effective smoke alarm system. The Circuit Diagram of this Smoke Detector Project is given below:

In this circuit, we have used an MQ2/MQ6 Smoke or Gas Sensor Module to detect smoke present in the air. A BC547 NPN transistor is used to drive the buzzer whenever it detects smoke. A 10K pot is also used for calibration. Basically, in this project, we have designed a Voltage Divider Circuit by using an MQ6 smoke sensor (as a resistor) and a potentiometer. MQ6 has a resistance, and its value changes whenever it senses smoke. This smoke detector circuit operates on the principle of variable resistance.
Working Principle of Smoke Detector Alarm Circuit
Understanding the working principle is crucial for building an effective smoke detector project. Working of this Smoke Detector Alarm Circuit is easy. In this project, we have used transistor operating properties to work this circuit as a smoke detector. As we already know, we have used a BC547 NPN transistor, which will turn on whenever it gets at least 0.70V at its base terminal. So we have applied a Voltage Divider Circuit at its base. Follow this detailed assembly guide to build your smoke sensor circuit correctly.
Technical Specifications
| Parameter | Value | Notes |
| Operating Voltage | 5V DC | Regulated supply recommended |
| Current Consumption | 50-150mA | Depends on alarm state |
| Detection Range | 200-10000ppm | Adjustable with potentiometer |
| Response Time | 10-30 seconds | Sensor warm-up required |
| Operating Temperature | -10°C to +50°C | Standard room conditions |
But before using this circuit, we need to calibrate it by using a pot. In calibration, we have applied a voltage just below than 0.70V at the transistor base. Whenever the smoke sensor senses smoke, it reduces its resistance, and due to this decrease in resistance, the voltage across the base of the transistor increases. Now, when the voltage at the base terminal of the transistor becomes more than or equal to 0.70V, the transistor turns on, the LED lights up, and the buzzer also starts beeping. And when there is no Smoke, both the indication components turn off as the voltage across the base terminal of the transistor goes below 0.70V. Check the Demonstration Video given below. Proper calibration is essential for the reliable operation of your smoke detector alarm project.
Troubleshooting Common Issues
Here are solutions to common problems encountered when building this smoke detector connection diagram.
| Problem | Possible Cause | Solution |
| No response to smoke | Incorrect calibration | Re-calibrate potentiometer settings |
| Continuous alarm | High sensitivity setting | Reduce sensitivity by adjusting pot counter-clockwise |
| LED not lighting | Wrong LED polarity | Check and correct LED anode/cathode connections |
| Buzzer not working | Insufficient current | Verify transistor connections and power supply voltage |
| Erratic behavior | Loose connections | Check all breadboard connections and re-seat components |
Conclusion
This detailed guide shows you how to create a basic smoke detector alarm circuit diagram using basic components. The smoke detection project based on MQ6 has a reliable smoke detection capability, and it can be used as an educational project or for basic safety. You might consider upgrading this basic smoke sensor circuit integrated with a microcontroller; it can make logging your data easier, make it wireless and allow it to communicate with your device remotely, or you might consider integrating it with your home automation system.
Also, check our LPG Leakage Detector using Arduino.
This tutorial was created by the Circuit Digest engineering team. Our experts focus on creating practical, hands-on tutorials that help makers and engineers master Raspberry Pi projects, Arduino, and IoT development projects.
I hope you liked this article and learned something new from it. If you have any doubts, you can ask in the comments below or use our forum for a detailed discussion.
Frequently Asked Questions on Smoke Detector Alarm Project
⇥ 1. What other gases are detected by this circuit using the MQ6?
The MQ6 sensors are also responsive to LPG, methane, alcohol vapours, and cooking wine. This cross-sensitivity is what enables the sensor to provide a general gas leakage detection feature. I am not suggesting the sensor for smoke detection alone; instead, please consider adding filtering to your design or using a different type of sensor, such as a photoelectric smoke sensor.
⇥ 2. How often must I recalibrate my smoke detector that I built for it to work most effectively?
The device must be recalibrated every month or if there is a significant change in the environmental conditions. Temperature variation, humidity modification, and time are all issues that affect recalibration. You should actually test it daily using a controlled source of smoke to ensure consistent alarm levels and to have proper functionality for safety protection.
⇥ 3. Can the circuit be modified so that it sends a wireless alert or notification?
Yes, you can attach an ESP32 or an Arduino with a WiFi module so your smartphone is notified. Simply connect the collector to a digital input to the microcontroller. Then, program the microcontroller to send an alert/SMS/email after the device detects smoke. This is a much better solution to allow detection remotely and have better protection of areas that aren't being monitored directly.
⇥ 4. Why does the smoke detector falsely alarm because of humidity?
High humidity can impact the readings from the MQ6 and cause false alarms. Water vapour is affecting the gas-sensing element of the sensor. The solution is after the initial smoke test to either recalibrate the potentiometer to your local humidity or to just place an enclosure around the sensor that would minimise moisture around the sensor.
⇥ 5. What is the effective detection distance of the smoke detector?
The actual detection distance ranges from 1 to 3 meters (1 to 3 yards) in the open, depending on smoke density and air movement variations. Theoretically, the range increases to around 3-5 meters in rooms and confined areas. Since smoke moves upward, the sensor should be placed at a height available below the ceiling.
⇥ 6. How does the MQ2 sensor detect smoke differently from the MQ6, leading to more sensitivity?
MQ6 sensors are designed solely for enhancing sensitivity specifically to smoke particles for the detection of liquefied petroleum gas (LPG) and combustible gas, whereas MQ2 sensors are intended for sensing a wider variety of gases (ethanol, SP propane, etc.), making MQ6 sensors more applicable to smoke detection for performance in scenarios than the MQ2 smoke detector sensing unit.
⇥ 7. What is the warm-up period for the MQ6 sensor before it is accurate?
The MQ6 gas sensor will require a warm-up period of 2-3 minutes before accurately detecting smoke; this is the time taken for the internal heating element inside the sensing chamber to stabilise at the correct temperature. For the most accurate results, please allow the sensor a warm-up time of 5 minutes before calibration of your smoke detector circuit.
Hands-on Projects with Alarm Detection Circuits
In previous projects, we applied Alarm Detection to create various useful applications. Find the details in the links below.

This burglar alarm project is based on a PIR sensor, UM3561 and a Speaker. PIR sensor used to detect body motion and UM3561 & speaker to produce a Police siren after any movement detection. Our simple burglar alarm circuit diagram provides an affordable DIY solution for enhancing your home security.

Simple Water Level Indicator Alarm with Buzzer
This comprehensive water level indicator project tutorial will guide you to build a simple DIY water level indicator circuit that detects water levels and raises an alarm when your tank reaches preset levels - perfect for preventing overflow and water wastage.

Door Alarm using Arduino and Ultrasonic Sensor
This Arduino-controlled door alarm can be installed near the door to detect the presence of anybody at the door. Whenever somebody comes within the range of the Ultrasonic sensor, the buzzer starts beeping. You can adjust the sensor detection range according to your door.
Comments
Both the sensors can be used.
This kit is just a project you can use the same concept with some protective circuits to make it run for a long time as a prototype however it cannot be a consumer grade product
How would I use an mq2 gas sensor with 4 pins, grnd, Do, Ao, Vcc? Where can I buy the sensor itself with no circuit?
hello sir i have connected all components in same manner led is lowing whenever it is detecting gas but buzzer is not beeping .how to solve this problem??
In the circuit diagram the LED and buzzer are connected in parallel. If your LED is working but not the buzzer the problem could be
1. You mis-matched the polarity of the Buzzer. Buzzers have polarity make sure if you have followed it correctly
2. Try replacing your buzzer, the one in your circuit might not be working properly
3. Check your connections
Has anyone measured the power consumption?
How long would the 9V battery last?
How did you calibrate ng MQ-2 sensor? Or does it need to be calibrated first or is it good-to-go?
Pin connection
I have connected the MQ-6 sensor for detection of smoke to raspberry pi but the smoke of incense stick same as the video or any other is not detecting but detecting LPG gas.So please help me to solve it.
We can help only if you share your circuit and brief your problem
I have connected in same manner as shown in diagram. I have used MQ 6 sensor but when we put smoke, nothing happen.
Plz tell me what is reason behind it.
Is required MQ-2 sensor for Smoke detection.
Does MQ6 sensor also work on this circuit?? i have mq6 module, how do i connect?
can I use mq2 sensor module without arduino or any microprocessor
How much will it cost?? Please answer because I have to make it for my school project.
It will not cost much. Assuming you are from India, the whole project should be completed for less than 300INR
Sir,
I have a tyco smoke detector (24vdc) & would like to get an output (24vdc) to drive a relay whenever it detects smoke.
Can you please describe & draw the needful circuit.
Badly need help can bc547 be replace with MOSFET ?, if ever what MOSFET

1.which sensor has the higher level of sensitivity to kitchen burning smoke MQ2 or MQ6?
2.Is this kit can be used for longtime domestic purpose or just for making projects?
plz reply as soon as possible.