

If you have worked with RC planes, Drones or any other hobby grade DIY aerial vehicles, then you would probably know that controlling these vehicles from land needs skill and practice. The operator (person who controls the drone) should have rightly calibrated his drone with his trainmaster before the flight and should also know how to control the vital signals to his drone during flight to have a successful flight. One of the most popular and commonly used transmitter to control these drones and most other aerial vehicles these days is the FS-i6 Transmitter manufactured by a company called FLYSKY.
The FS-i6 is a digital proportional radio control system that operates on the global ISM band of 2.4GHz frequency, making it suitable usage across the globe. Further the transmitter is built on AFHDS 2A (Automatic Frequency Hopping Digital System Second Generation) technology, which not only makes the communication between you and your drone secure but also reduces the power consumption of your transmitter. These features along with the affordable price of this transmitter has made a go to choice for drone enthusiasts across the globe. The FLYSKY FS-i6 transmitter and receiver comes with a lot of bells and whistles allowing you to fully customize your flight setting and use it from basic drones, airplanes, helicopters to complicated multi copters and racing drones. But, if you are a beginner you might probably be overwhelmed with all the buttons, toggle switches, joysticks and customization options on this transmitter module. That is why exactly we have written this article.
This article will explain the basic functionalities and specification of the FLYSKY FS-i6 transmitter and help you understand when, where and how you can use them to have a seamless flight with your drone. We have a lot of things to discuss but lets start with a basic introduction to the FLYSKY FS-i6 transmitter.
Specifications of FS-i6 transmitter & FS-iA6B Receiver
Transmitter FS-i6 has the following specifications.
| Channels | 6 |
| RF range | 2.4055 – 2.475 GHz |
| Bandwidth | 500KHz |
| Band | 140 |
| RF Power | Less than 20dBm |
| 2.4G system | AFHDS 2A and AFHDS |
| Sensitivity | 1024 |
| Low voltage warning | Less than 4.2V |
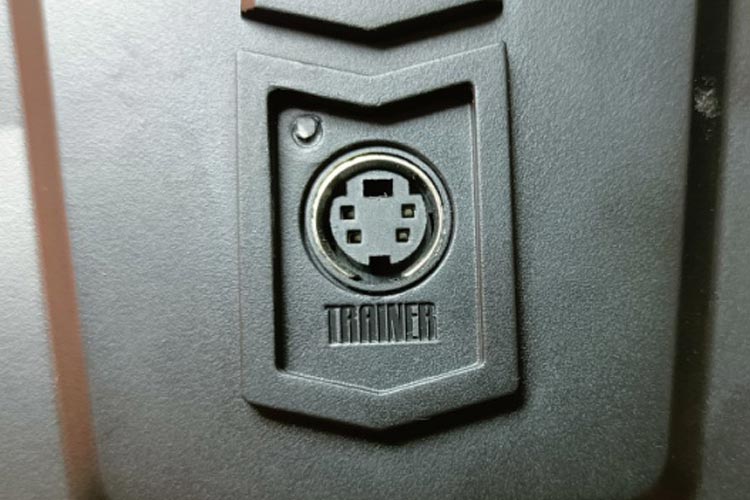
| DSC Port | PS2 |
| Output | PPM |
| Charger Point | No |
| ANT length | 26mm*2 (dual antenna) |
| Weight | 392gm |
|
Power |
6V 1.5AA*4 |
|
Display mode |
Transflective STN positive type 128*64 dot matrix |
|
Size |
174*89*190 mm |
|
On-line update |
Yes |
|
Certificate |
CE0678, FCC |
Receiver FS-iA6B has the following specifications.
|
Channels |
6 |
|
RF range |
2.4055 – 2.475 Hz |
|
Band |
140 |
|
RF Power |
Less than 20dBm |
|
2.4G system |
AFHDS 2A |
|
ANT length |
26mm*2(dual antenna) |
|
weight |
16.4g |
|
Power |
4.0-6.5V |
|
Size |
42.6*26.1*15.1mm |
|
RX Sensitivity |
-105dBm |
|
Certificate |
CE0678, FCC |
|
i-Bus port |
Yes |
|
Data acquisition port |
Yes |
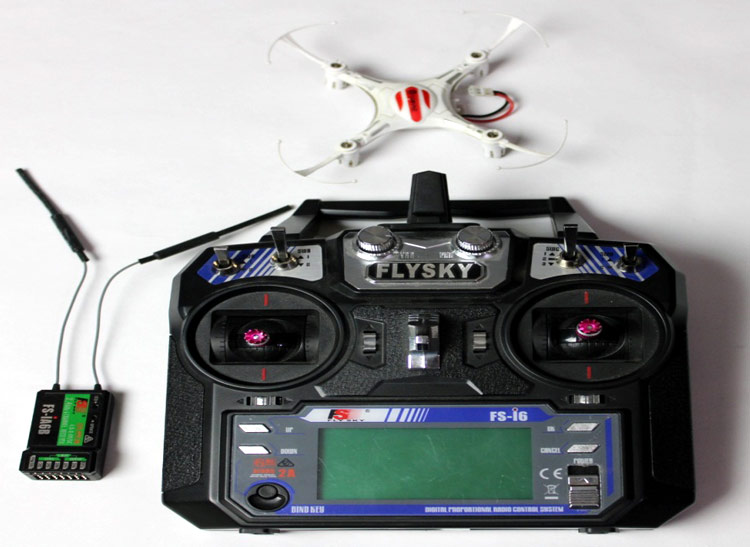
Overview of FS-i6 Transmitter
The main advantage of this transmitter is that we don’t need any PC or laptop to set up this transmitter. It has one LCD display on it and we can easily set up this transmitter by using the buttons given on it. It can operate up to 1500 meters. The range of transmitters depends on magnetic interference. If the magnetic interference is more at someplace, then the transmitter will have less range and if the magnetic interference is less, then the transmitter will operate at a higher range.
Now, we can say the average range of this transmitter is 1500 meters.
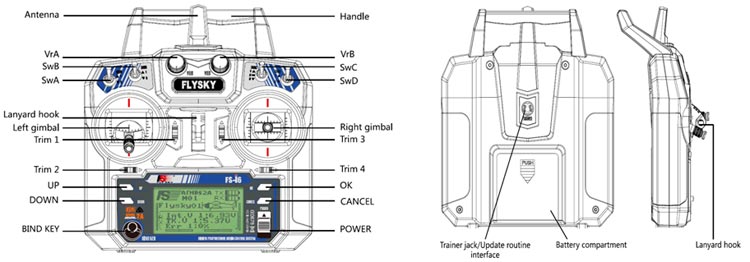
LCD Screen- The LCD screen is a user interface of this transmitter. We set up the transmitter by using the button by seeing at the LCD display. We can see the battery indicator, mode indicator, etc. on the LCD display. The battery indicator is used to indicate the power and status of the transmitter and receiver. A receiver's battery status will not be displayed if it is not bound to the transmitter.
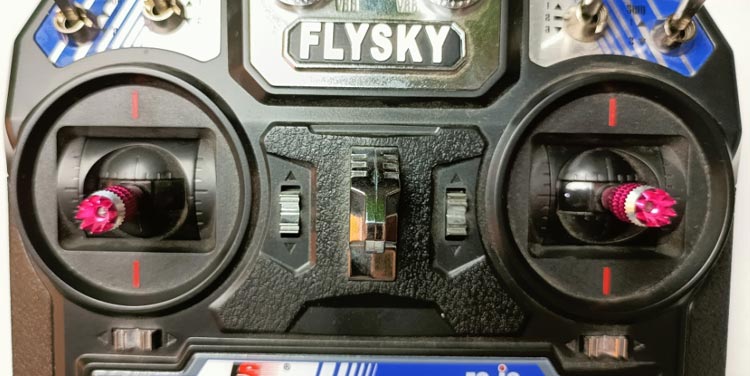
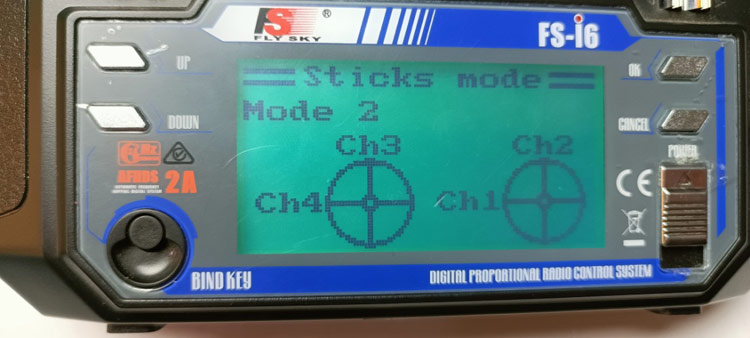
Gimbals (Sticks)- This transmitter has two sticks, one is on the left side and another is on the right side. Using these gimbals, we can control four channels viz. Channel1- Ailerons (Roll), Channel2- Elevator (Pitch), Channel3- Throttle, and Channel4- Rudder (Yaw); these are the default channel settings for mode 2. We have further explained the mode. In the image given below, we can see that there are 2 gimbals in the image. One is on the right side and the other is on the left side.
Trims - We use trims for stabilizing the drone. We adjust these trims when the drone destabilizes during flight. These four trims are given for four channels. By holding the trim in the desired direction, we may perform faster trim adjustments. The transmitter starts beeping in a higher tone when the trim position reaches the middle.
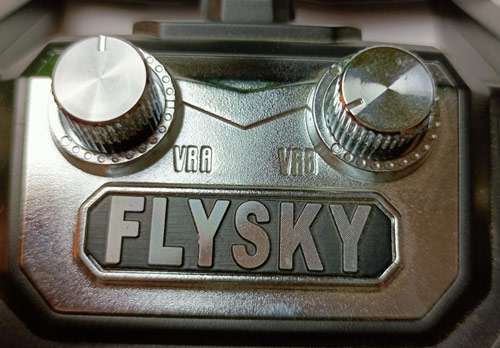
VRA & VRB Knobs - These two knobs are given at the top of the transmitter. These are auxiliary channels that can be used to attach switches to extra channels to control parts of the model like landing gear and headlight. In the image given below, we can see that it has two knobs. The knob on the left is VRA and the knob on the right is VRB.
Switches- There are four switches given on top of this transmitter i.e, switch A (SWA), switch B (SWB), switch C (SWC), and switch D (SWD). A, B, D are two mode switches and C is a three mode switch. We can put the function of channel 5 and 6 in any one of the two-mode switches. We use switch C when we use GPS in drones.

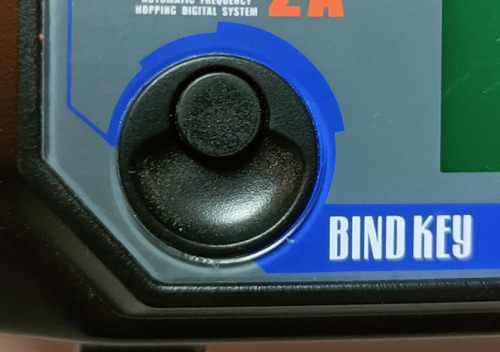
Bind Key- We use bind-key when we bind the transmitter to the receiver. In the image given below, we can see the black-colored bind-key. This button is at the bottom of the left side of the transmitter.
In the video guven below, we have explained all the input buttons, keys, knobs, switches present on this transmitter.
Overview of FS-iA6B/FS-iA6 Receiver
This receiver has 2 antennas and 6 channels. For the best quality signal, the receiver should be mounted away from the motors or metal parts. The connectors are used to connect the parts of the model and the receiver.
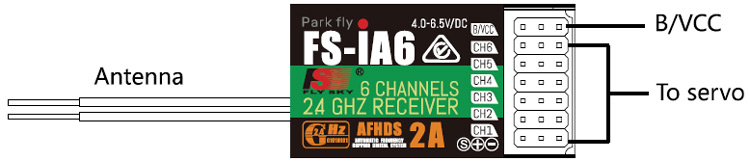
CH1 to CH6: These channels are used to connect the ESCs (Electronic speed controller), Vcc, or other parts.
B/VCC: It is used to connect the binding cable for the binding receiver and transmitter.
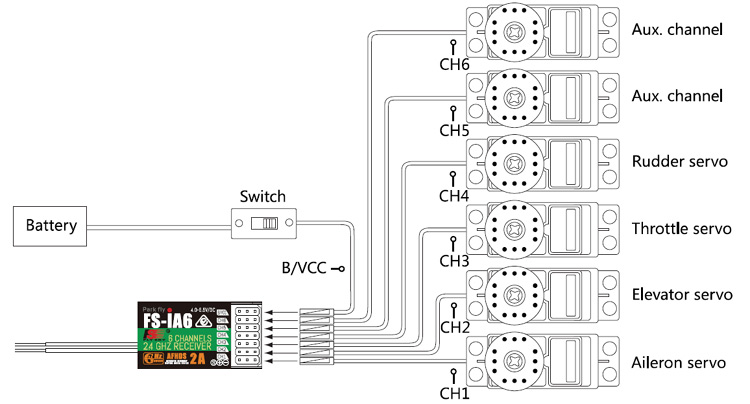
FS-IA6B/FS-iA6 Receiver Connections
We connect motors with the receiver through ESCs (electronic speed controllers). The connection of the receiver is shown in the figure given below.
In this video, we have given a brief introduction of the receiver.
Fight Controls-
The sticks are used for controlling the aircraft, each stick has 2 functions. The right stick controls pitch and roll, the left stick controls throttle and yaw.
For mode 2, channels are controlled by left and right sticks according to the below diagram.
Pitch Control: It is also called elevator operation. For mode 2, we can control the pitch in Channel 2 at the right side stick.
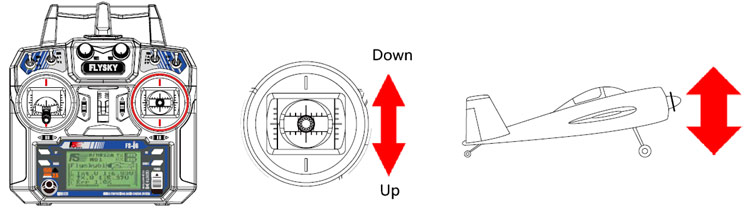
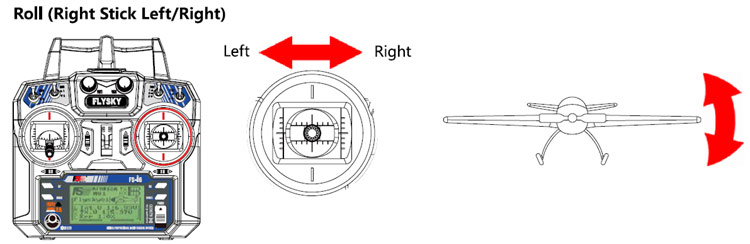
Roll Control: It is also called aileron operation. For mode 2, we can control roll in Channel 1 at the right side stick.
Yaw Control: It is also called rudder operation. For mode 2, we can control yaw in Channel 4 at the left side stick.

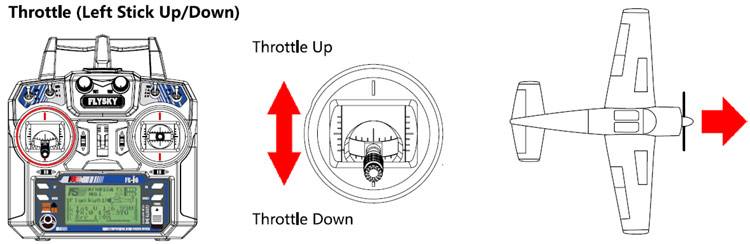
Throttle Control: For mode 2, we can control throttle in channel 3 at the left side stick.
Function Description
Reverse:
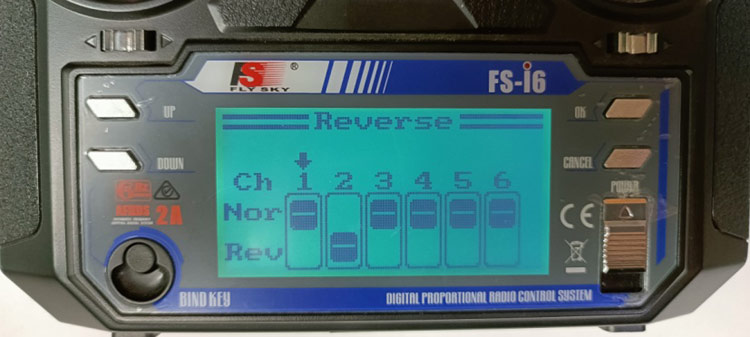
This function is used for reversing the channel function. For example, by turning the channel 1 stick right side, the drone rolls on the right side but we want the drone to roll left side when we turn the right side stick. Here we are trying to do exactly the reverse. We can do this easily by using the reverse function.
End Points:
The end-points function alters a channel's range of motion. This can be used to avoid model damage when a servo travels too far, potentially damaging pushrods and other components. The low-end point is in the left box, while the high-end point is in the right box, as seen below, with low being red and high being blue.
Display:
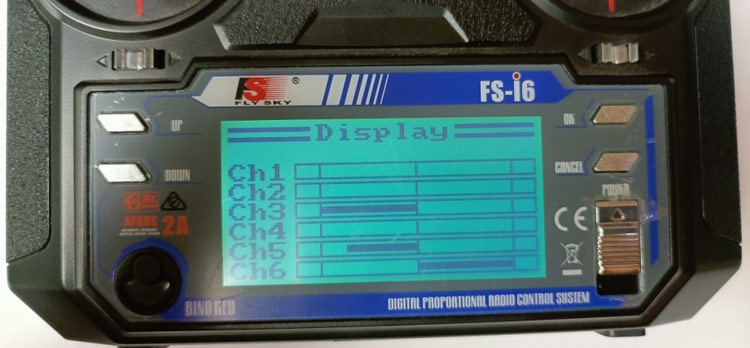
Using this function, we can check the operation of the stick in the display in real-time.
Aux. Channels:
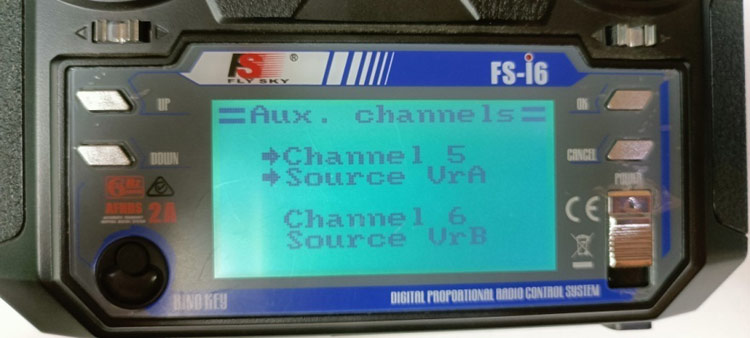
Auxiliary channels can be used to attach switches to extra channels to control parts of the model like landing gear and headlight. For example, we can control the function of channel 5 using switches VRA, VRB, SWA, SWB, SWC, and SWD.
Subtrim:
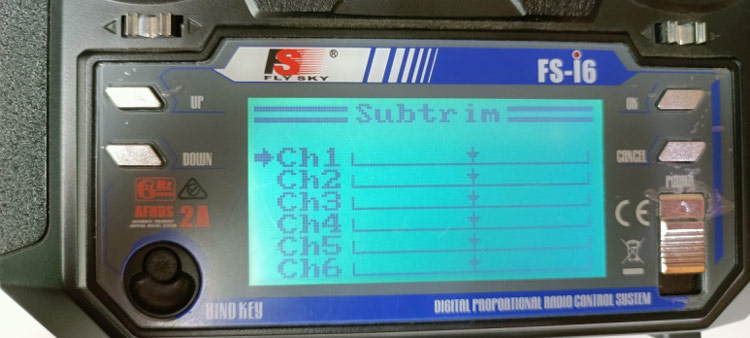
It is used to change the center point of the channel. For example, if a drone’s Rudder is slightly out of alignment, this function could be used to fix this.
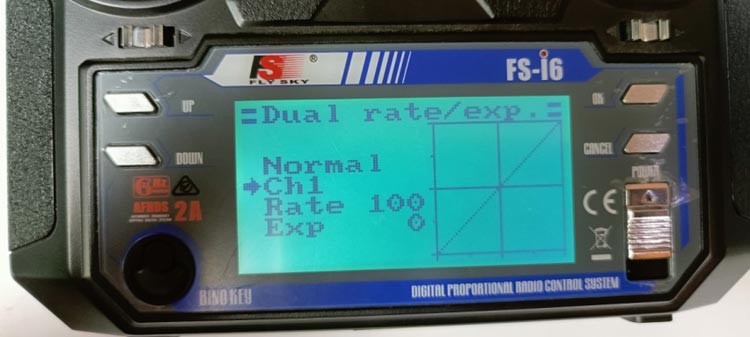
Dual rate/exp.
This function can be applicable on only channels 1, 2, 4.
Dual Rate: It is used to change the difference between the highest and the lowest possible value. If we applied a throw of 20cm to the rudder and we move the stick to ½, we would get 10cm rudder movement. If we move the stick ¼ of the way, the rudder will move 5cm, so at 100%, there is a direct, linear relationship of stick movement and surface movement. We can set different dual rates for different channels. For example, for channel -1, we can set 100%, and for channel -2 we can set 50%.
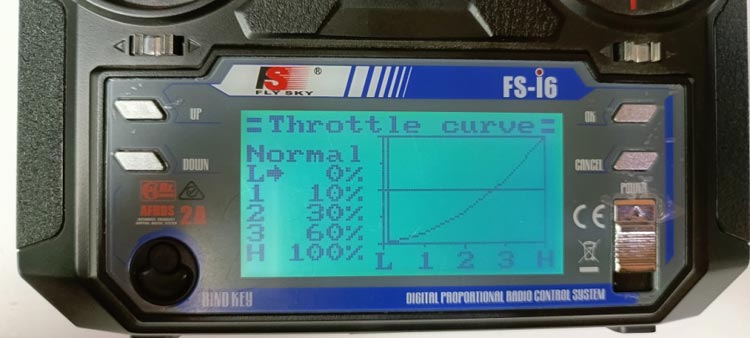
Throttle Curve
This function is used to control the movement of the motor from the throttle or we can say by using this function; we adjust the ratio of the movement of the stick and motor by using non-linear and linear curves. For example, if we want a lower throttle change in 0-40% and a larger throttle change in 40% to 100%. We can adjust throttle change using this function.
For example, in the figure given below, we can see throttle is lower in 0-30% and in 40-100% throttle is higher.
In the video below, we have briefly explained all the functions mentioned above.
System Description
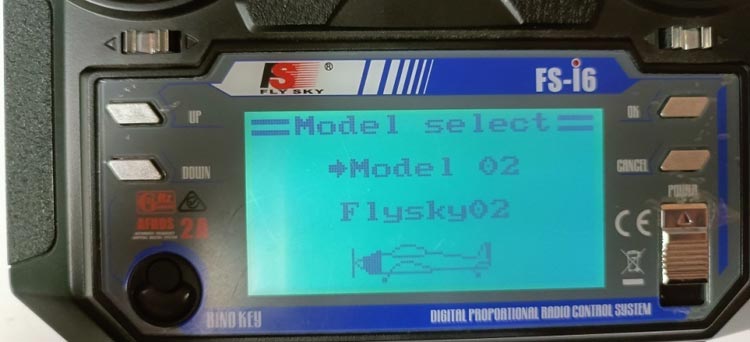
Model Select- Here we can select a model which we want to connect with our transmitter. We can connect a maximum of 20 models with this transmitter, for example; we can store up to 20 receivers.
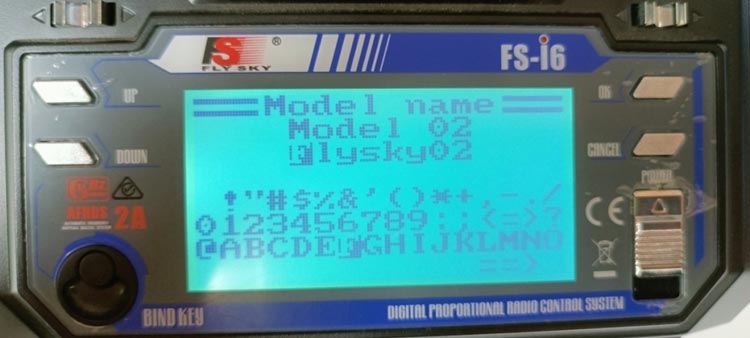
Model Name- Here we can rename the currently selected model.
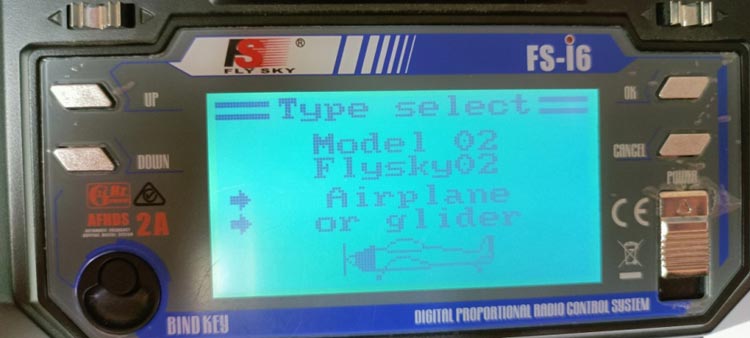
Type select- This function changes the type of the currently selected model, including airplanes and helicopters with different types of swash plates. For drones, we will select airplane and glider options.
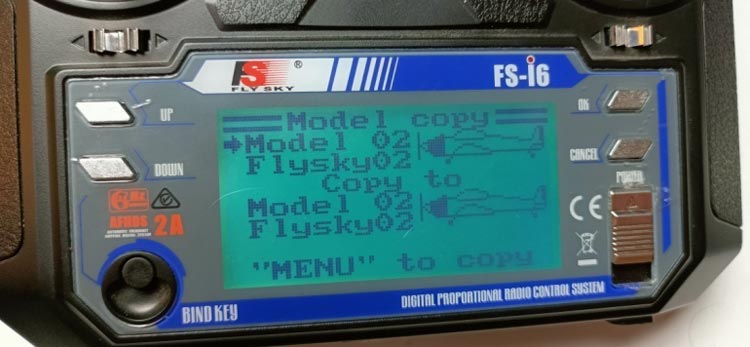
Model Copy- This function is used to copy one model to another model slot. For example, if we want the same setting of model 2 in model 3, then using this function, we can easily copy the settings of model 2 in model 3.
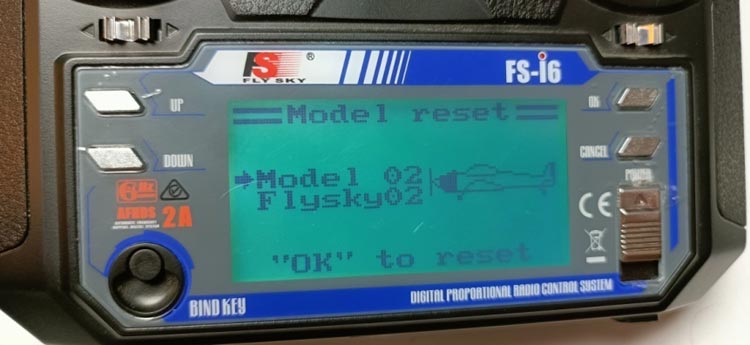
Model Reset- This function resets the current model to the default setting.
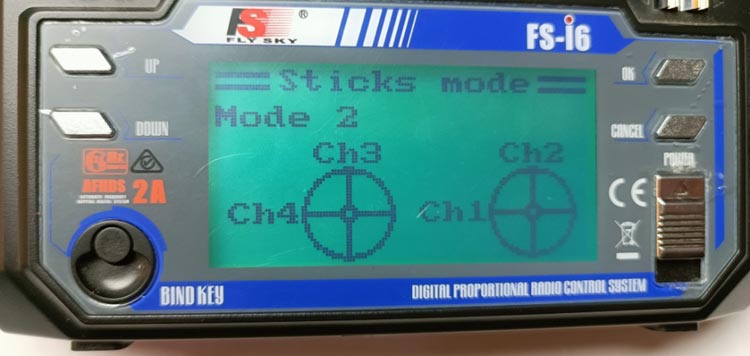
Stick Mode- There are four stick modes available. For example, when we use stick mode 2, then we operate all channels according to this figure.
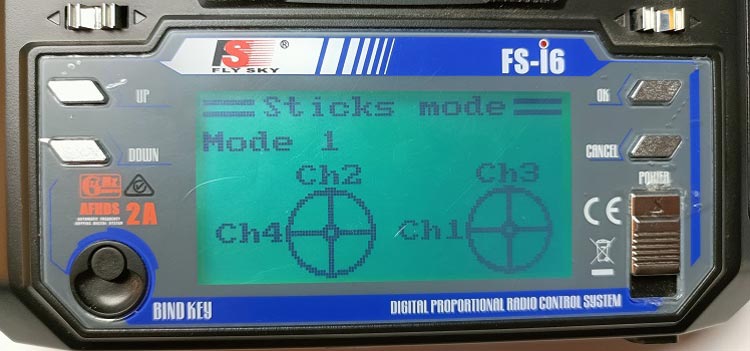
When we use stick mode 1, then we operate all channels according to this figure.
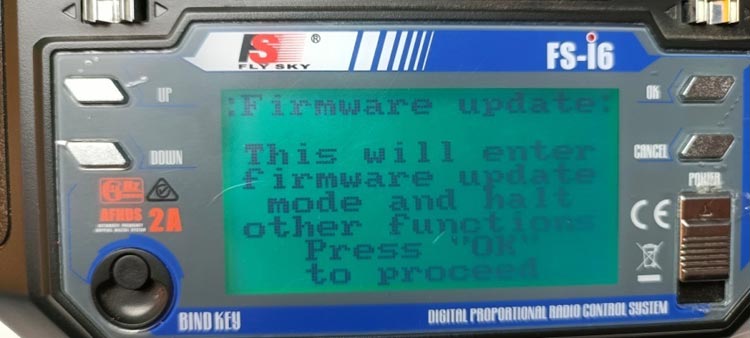
Firmware Update- This function is used for firmware updates. We connect the transmitter with the PC by using a USB TO PS/2 cable.
Setup:
1- First, open this website HTTP ://www.flysky-cn.com, and then download the latest firmware update available on this website.
2- Connect the transmitter to the PC by using USB to PS/2 cable and press “OK” in this function.
3- Wait for a minute, PC takes time to recognize the transmitter system.
4- Now, open the update on the PC and select “Start Upgrade”.
5- When the update has been completed, then cycle the system power.
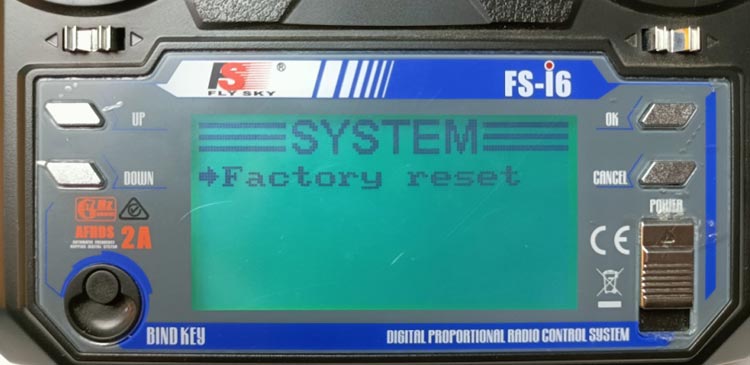
Factory Reset - This function resets all the settings made in the transmitter.
RX Setup
1- RF Standard- In this menu, we change the communication protocol for the transmitter. For example, for AFHDS Protocol, we use R9B, GR3F, GR3E, R6C, and R6B receivers. For AFHDS 2A, we use iA6B, iA10, iA10B, iA6, iA4B, X6, A6, A3 receivers.
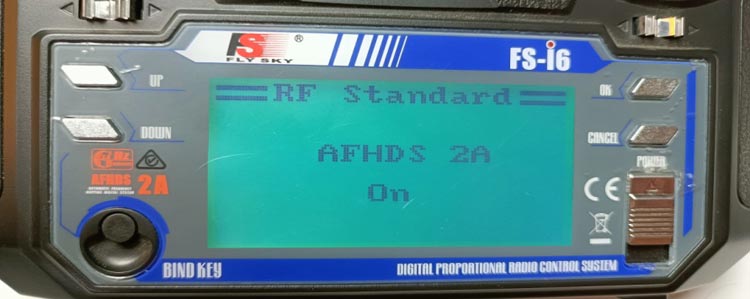
Here in this tutorial, we are using an iA6B receiver, so we will select AFGHD 2A protocol.
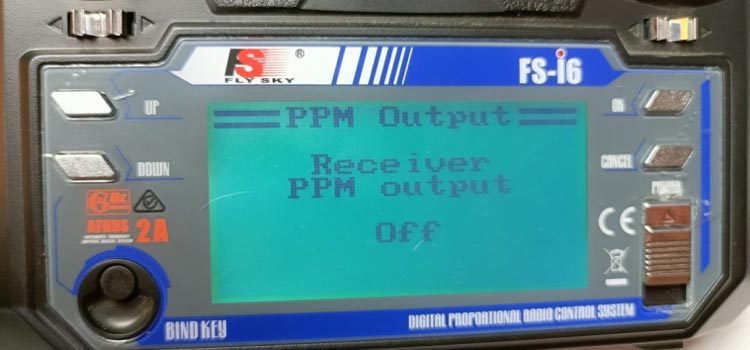
2- PPM OUTPUT- We use it for transferring all channels through one physical output. If PPM output is ON then it will transfer all channels through one physical output. If PPM output is off, then it will transfer via channels 1-6.
3- RX Battery- By using this function, we can change the battery monitoring setting. There are 4 options in this function.
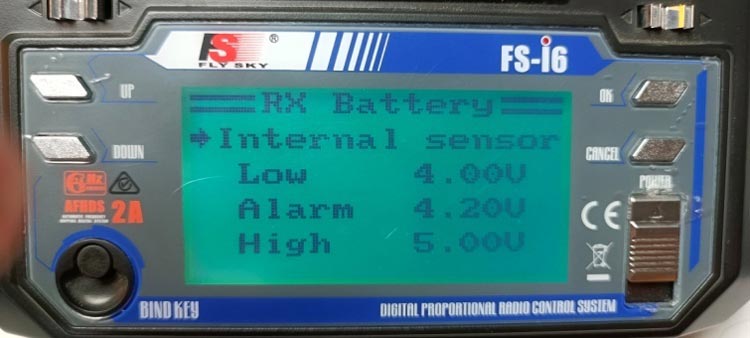
1- Internal sensor – This system has a voltage sensor inside this. If we want to use an external voltage sensor, then we can change it from an internal sensor to an external sensor as well.
2- Low- Here, we set the low voltage value for the battery. When the battery voltage reaches this low voltage value, then the monitor displays battery level is low.
3- Alarm – Here, we set voltage value for alarming, when the battery voltage reaches less than the set voltage level, then the transmitter starts beeping.
4- High- Here, we set the highest voltage value of the battery.
4- Failsafe- This system is used to protect our drone when the receiver loses the signal and the drone becomes uncontrolled. Here, we set all 6 channels values in terms of percentages. If the receiver loses the signal, then it uses these preset 6 channel values.
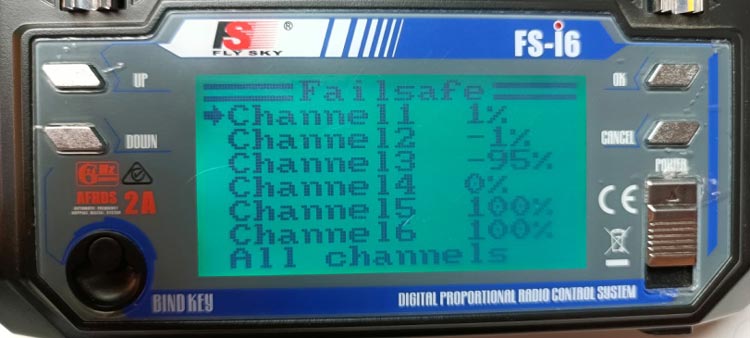
For example, if the drone has a signal loss, then it comes back to the ground, then for this, we have to set the throttle to the minimum value of -100%.
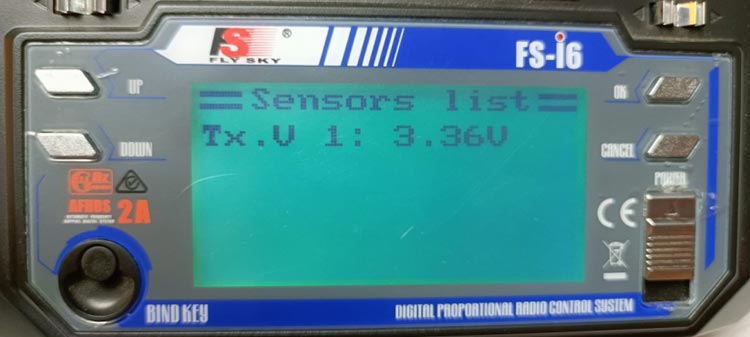
5- Sensors List- This function is used to display information from the sensor. For example, currently, we have only a voltage sensor inside this so it displays only the current-voltage of the battery.
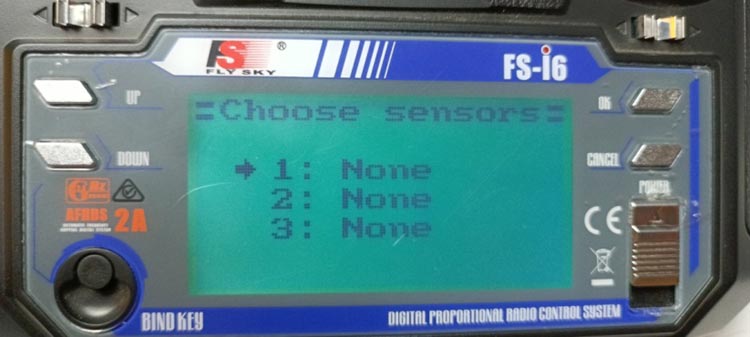
6- Choose Sensor- This function is used for which sensor value will be displayed on the LCD display. We use this function when we have to display the value of only one sensor in the LCD screen out of many sensor values.
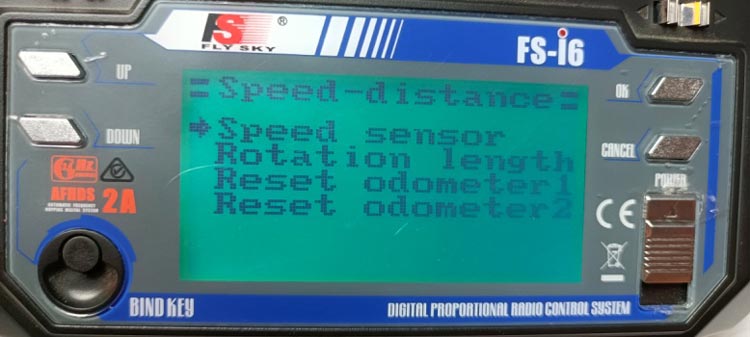
7 -Speed-distance - This function is used to detect speed and distance traveled by drone. We use this function when we connect speed and distance sensors.
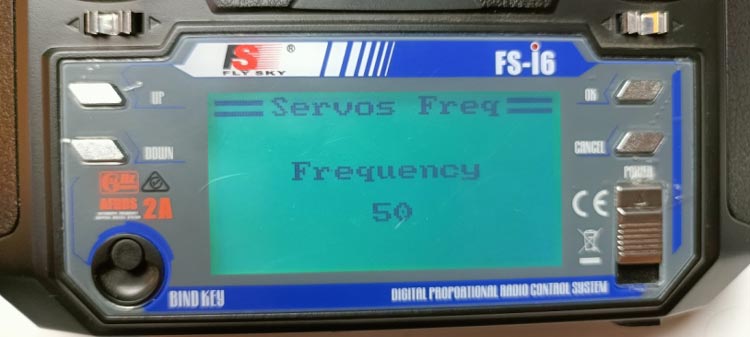
8 - Servo frequency - The frequency that the receiver sends to the servos is determined by this function.
In the video below, we have explained the system setting of this transmitter.
Safety Points
- Interference can result in control loss; keep the FS-i6 system away from high-voltage power lines and communication broadcasting antennas.
- When operating a model, never hold the transmitter antenna. It lowers the RF signal's quality and intensity, and it may result in a loss of control.
- Before turning off the transmitter, make sure the receiver battery is disconnected.
- After we switch on the transmitter, the 2.4GHz system may cause interference with nearby planes or automobiles.
can we use 10 channel Rx on same remote fs-i6

Love that and I want to have a fill