
Whenever we hear the name “Electronics”, the first thing which comes immediately in mind is LED and Resistor. LED and Resistors are the first few components which are introduced in the starting of Electronics subject in schools. So here we are building the simplest circuit in Electronics which is Glowing the LED using a Resistor and Battery.
This is the first basic LED circuit I built many years ago in my school days and had given me immense pleasure to see glowing LED. For building this circuit you only need four things:
- LED- 1
- Resistor- 1 (220k or 330k or 1k)
- Power Source- Battery- 9v
- Breadboard
Simple LED Circuit Diagram

Here is the Circuit Diagram for simple LED circuit. You just need to connect positive terminal of LED with the one end of resistor and then connect another end of resistor with the positive terminal of Battery. Then connect the negative terminal of LED with the negative terminal of Battery. This Negative Terminal of Battery is also referred as the Ground. The whole setup is built on the breadboard as shown above.
Finding the Polarity of LED:
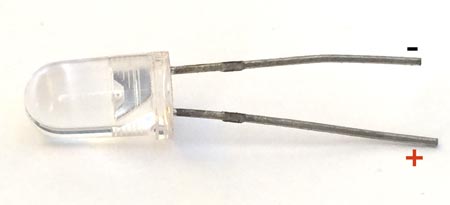
If you look at the LED carefully you can find one leg of the LED is bigger than another. So the bigger leg is the positive side of the LED and the smaller leg is negative side. Below is the picture for the same:
Battery polarity can be easily found by looking at the battery, positive(+) and negative(-) is mentioned on the battery itself. We can also make the same circuit using two AA size 1.5v batteries.
Choosing the Resistor Value for LED:
Resistor is very important component here, if you connect LED to the Battery without any resistor, then your LED will burn immediately. So we must use resistor in series with the LED to limit the current flowing through the LED.
Now the common question is “What value of resistor should we use with LED”, the answer is simple. Generally LED consumes 20mA current and has voltage drop of 2-3v, this voltage drop is called Forward Voltage (Vf). Some LEDs have more or less current consumption according to their colors and ratings, but here we are explaining this in general.
So here we can calculate the resistor value by using the basic OHM law which states:
R = V/I (Resistor = Voltage / Current)
So if you are using a 9v battery and voltage Drop on LED is, let’s say 2.4v, and current flowing is 20mA, then we should have a resistor value on which remaining voltage can be dropped (9 – 2.4v). So according to the formulae:
R = (9 – 2.4) / .02 = 330 Ohm
So the remaining voltage (9 - 2.4= 6.6v) will be dropped at 330ohm resistor. You can also calculate the resistance value by using this LED resistor calculator.
These current and voltage values are not exact and can be vary according to the Battery capacity and LED. But generally you can use 330 or 220 ohm resistor with any LED, or you can also use 1k resistor if the proper values are not available.

Correct the resistor value unit, it should not be 220 k or 330 k, it should be 220 ohm or 330 ohm as it is mentioned in description too.because it is vast difference between ohm and kohm