

The STM8 is a series of 8-bit Microcontrollers from STMicroelectronics that has become a common choice of Microcontroller for cost-sensitive product development. I have previously work with AVR, PIC, and a few other ARM Cortex Microcontrollers, but surely in some applications, they become overkill and increase the BOM cost considerably. Recently, after tearing down a few cheap Chinese products, I found that most of them had an STM8 microcontroller inside it. The IC is not only cheap but also packed it with lots of features and options making it suitable to be used in many different applications. For instance, the STM8S series of controllers (which we will learn in this tutorial series) is a general-purpose controller but there are other series like the STM8A for Automotive Designs and STM8L for Low Power battery-powered designs which extends the application of these controllers.
In this series of tutorials, we will learn how to program the STM8S microcontrollers, more specifically the STM8S103F3P6. The reason for getting started with this specific part number is just for its price to performance factor. Like!! just look at it just for 0.25$ (approx. 20 Rupees) we get an 8-bit microcontroller with 16Mhz Internal Oscillator, 8kB Flash, 10-bit ADC, UART, SPI, and I2C. Who would not be intrigued? Also, the STM8S103F3P6 is widely popular, and hence as a beginner, you will find enough support if you need help outside the tutorials. Starting from this, we will have a sequence of tutorials, similar to the PIC Programming Tutorials where we will learn how to program this controller from a basic blink to various display and sensor interfacing. You can also check out the STM32F103C8 Tutorial and projects if you are interested in 32-bit STM Microcontrollers.
Selecting the Hardware and Software Development Tools
Now that we have deicide the microcontroller, we will have to select hardware and software development tools to begin our learning process. There are many options, here I have selected the ones that are free to use and easily available to everyone.
STM8S103F3P6 Development
The official development board for ST’s 8-bit Microcontroller is called the STM8 Discovery kit, but we will use another low-cost development board that you can easily find with a local supplier or on online store. The image of the STM8S103F3P6 Development board that we will use in this tutorial is shown below.
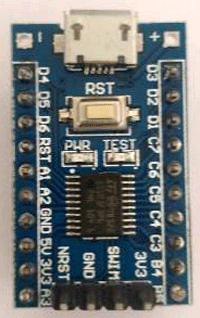
The board only consists of the bare minimum components that are required to begin development. It is breadboard friendly and suitable for compact applications. The internal circuit diagram for the development board is shown below.

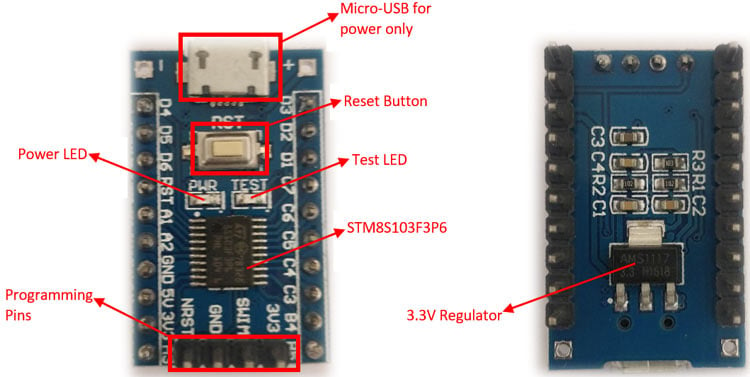
Taking a closer look, you will notice, apart from the STM8S103F3p6 controller, we have a reset button to reset the controller. A power led and a test led connected to PB5 (Port B pin 5) and an AMS1117 Voltage regulator that converts the 5V from a USB port to 3.3V for the controller. The controller can also be made to operate on 5V if required. The different parts on the controller are marked below. We also have 4 programmer pins namely 3.3V, GND, SWIM, and NRST which can be used to easily program and debug our microcontroller.
STM8S103F3P6 Programmer
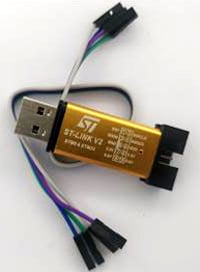
For programming our controller, we will be using the ST-LINK v2 which is cheap and easily available online. There are many variants (metal, plastic, gold, pink, bare board) of this ST-LINK v2 board and all serve the same purpose. Mine is shown below but you can use any type of ST-LINK programmer, the pinout will differ, so just make sure you read the pinouts on the casing correctly. There is also ST-LINK V3 from ST-Microelectronics itself which can be used for some serious debugging. We won't be using that for now since it’s a bit expensive, we will save it for the future.
STM8S103F3P6 IDE and Compiler
Selecting the right IDE and Compiler for STM8S103F3P6 is perplexing, simply because there are a lot of options to choose from. The official tools that are available for the STM8 Microcontroller are shown in the below image.
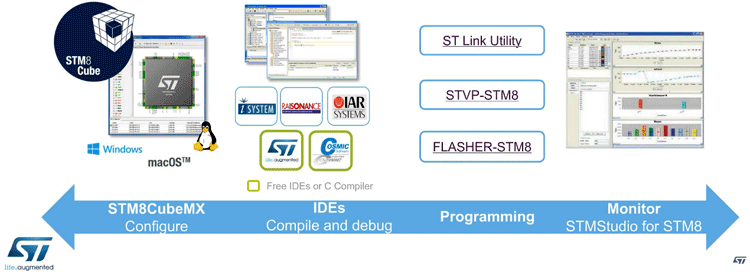
On the Configuration side, we have the STM8CubeMx, I tried the software and it was a complete let down for me. Unlike the STM32Cube, the STM8Cube cannot auto-generate code. It can only generate pin mapping for visualization purposes and might come in handy if you are porting your code from one controller to another. Other than that, I would not use it. So in this tutorial series, we won’t be using this.
For the IDE and Compiler, we have a lot of options to choose from. The top two options for IDE are IAR workbench and ST Visual Develop (STVD), both the software feels like they are from the 90s but after some time playing with it, I found the STVD is a good choice only because it is totally free. Similarly, for the Compiler, we will be using the Cosmic C Compiler, again only because it is totally free. Another reason for choosing this IDE and Compiler is that, once we get familiar with the environment, it should be easy to use any other 8-bit Microcontroller from ST without much effort. We will get into how to install and set-up STVD with Cosmic C compiler later in this article.
For Flashing, we will be using ST Visual Programmer (STVP), this tool will automatically get installed when we install STVD. It will be integrated in the IDE itself, helping us to quickly program and debug. The final software will be STMStudio which is an STM8 Monitoring software. The software can help with real-time debugging of STM8 and has some cool features like monitoring variable value, plotting graph, etc. I have not experimented enough with this software. And, at least for the first few tutorials, we won’t be using this software since we won’t need big debugging requirements.
STM8S Standard Peripheral Library: ST Microelectronics provides a set of libraries to make code development easier for the STM8S Microcontrollers, this library is called the “Standard Peripheral Library” or SPL in short. The library is cool except for that it is written by keeping in mind all the possible controllers in the STM8S/A 8-bit family and not just the STM8S103F3P6 controller which we will be using. Hence, we have to make some tweaks here and there to make it work (which I will share later). But still, I believe it worth giving it a try because it can make development very fast, and hence, we will be using it in our tutorial.
If you do not want to use the library, you have to directly access the Registers of the controller or do bare metal assembly programming. Both of these are fun, provided you have the time to learn and use it. My idea is to use the SPL library wherever it works well and then also work on register and assembly level if required. Let’s try not to re-invent the wheel!
STM8S with Arduino using Sduino
Discussing the software options will never be complete if I do not mention the Arduino IDE support STM8S. Yes, the same STM8S103F3P6 board can be programmed directly from Arduino IDE using Sduino, thanks to Michael Mayer. But, the project is still in the development stage and would likely take some time and community support for Sduino to provide complete platform support. However, just within a few minutes of playing with Sduino, I started to like it and hence decide to also do a separate article on how to program STM8S Microcontroller with Arduino. I will link the article here when it is ready. That article will discuss why and why not you should use the Arduino IDE for programming your STM8S Microcontrollers.
So, these are my choices for Software and Hardware, let me know in the comment section if you think some other software would have been a better choice and why. I would like to explore other options as well.

Downloading Required Software’s
Now that we have decided on the software will we use for this tutorial, let's go ahead and download them using the following link. All the software is free to download and use, you would just have to register a free account on ST and Cosmic if you had not already.
- ST Visual Develop (STVD)
- Cosmic C Compiler
- Standard Peripheral Library
- STM8Cube Mx (Optional)
- STMStudio for STM8 (Optional)
Setting up the STVD and Cosmic C Compiler
After you have downloaded both the software, just follow the on-screen instructions to install them. I would recommend to leave them at the default directories to avoid later confusion. The STVD IDE will install without any effort. For the Cosmic C compiler, you have to get a free license key during the installation processes. You just have to provide company information with E-mail ID, if you are a student, just mention that. The processes of getting the license key are instantaneous and automatic, although the set-up instructions say that it might take a day or two, I received the license key automatically on my E-Mail ID as soon I submitted it, just make sure you check the SPAM. My Confirmation E-Mail is shown below.
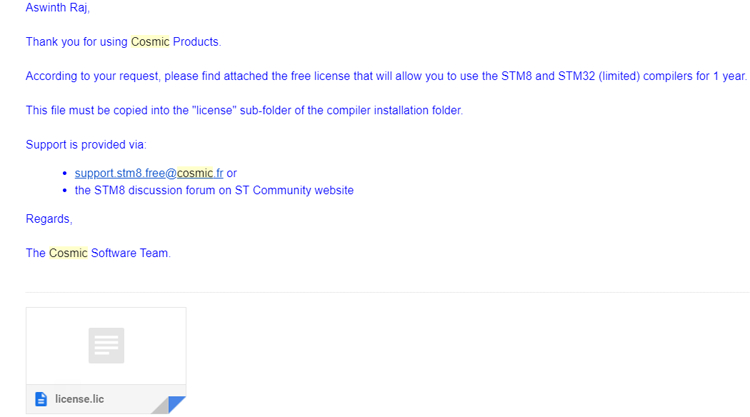
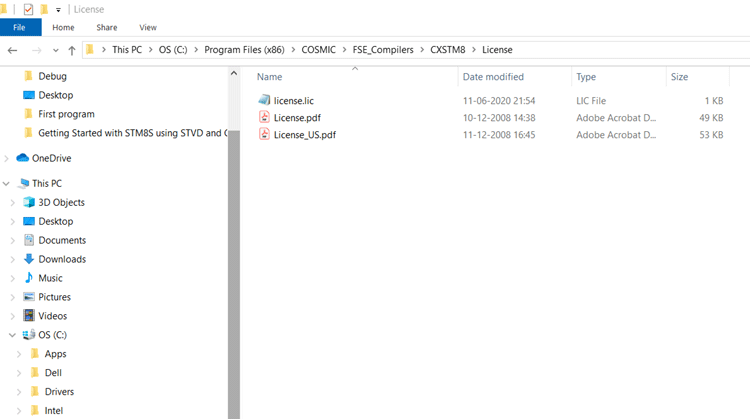
As per the E-mail instruction, just copy the license.lic file and paste in the “license” sub-folder in your installation folder. For me the path was “C:\Program Files (x86)\COSMIC\FSE_Compilers\CXSTM8\License”. Just paste the file in location as shown below.
Standard Peripheral Library for STM8S103F3P6
As told earlier, ST Microelectronics provides Libraries called SPL which can be used for all 8-bit STM8S/A Microcontrollers. You can either download the original SPL from ST Microelectronics and make the required changes or download my STM8S103F3P6 SPL libraries and use them as such. I would recommend the later.
Original SPL from ST Microelectronics
While you are there also ensure to download the SPL User Manual, which will be very handy when programming the controller.
Compiling the First Program
Now that everything is ready, let’s try compiling our first program to check if the IDE, Compiler, and Library are all working the way they should. You can also check the video at the bottom of the page for detailed instructions.
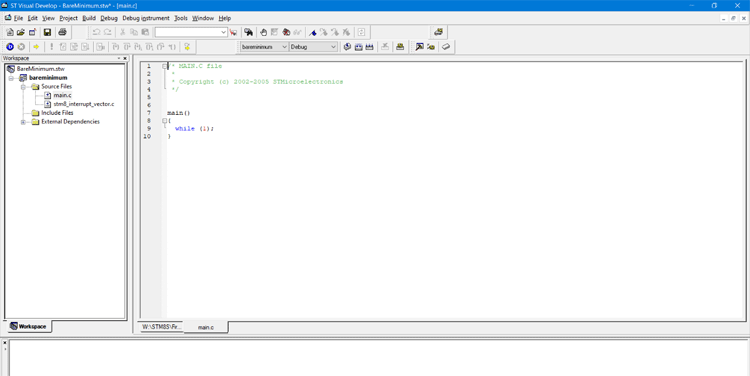
Start by opening STVD and select File -> WorkSpace, in the pop-up, select “New Workspace” and enter the Project name and path where the program should be saved. I am naming my program BareMinimum and saving it in a folder on the desktop. Click OK and you will get the New Project dialog box as shown below.
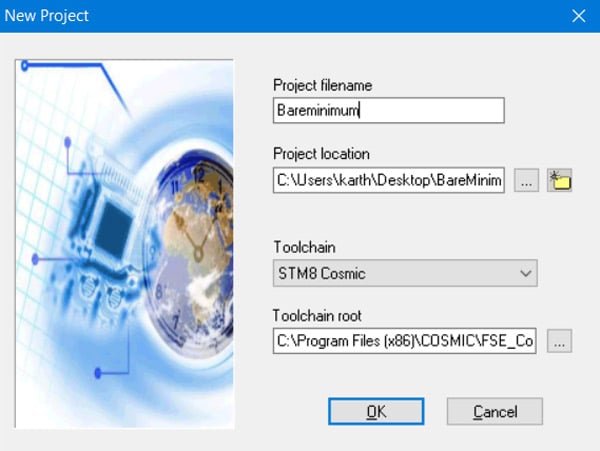
I am naming the project as bareminimum again and under toolchain we have to specify the toolchain root to the path where the STM8 Cosmic compiler is installed. The default path address is “C:\Program Files (x86)\COSMIC\FSE_Compilers\CXSTM8”. After that just click OK to get the “MCU Selection” window.
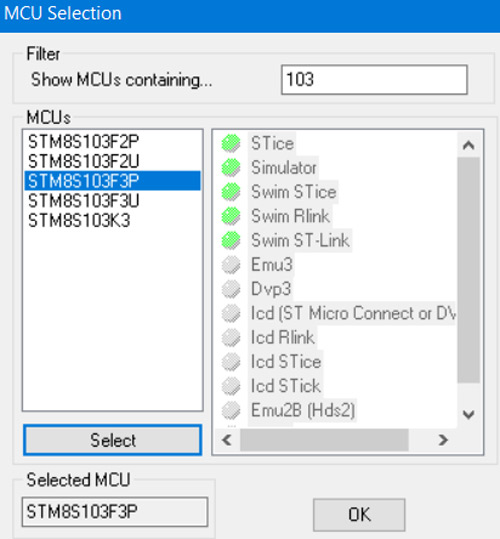
Search for STM8S103F3P and select it and click OK. This will open a new project for STM8S103F3P on STVD, the windows should look like this when done.
Right-click on “source file” and select “Add files to folder” to include all the c files from our SPL library, similarly right-click on Include files to include all the header files. If you have any questions, you can refer to the video below. Once all the files are added, click Build -> rebuild all and then Compile to check if the compiler and SPL are working as expected. If everything goes well, you should see the following screen with build result 0 error and 0 warning.
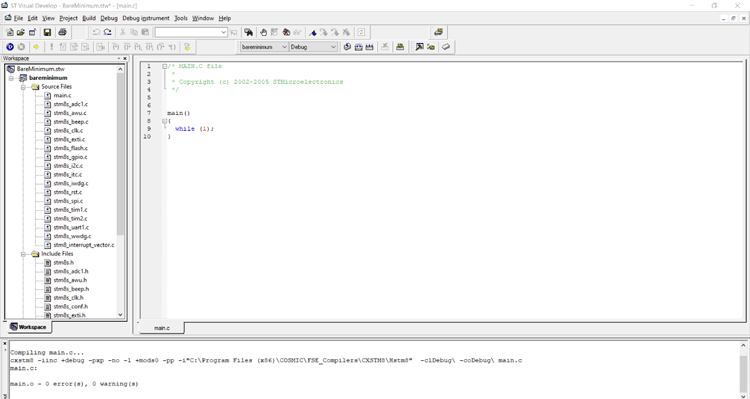
With this done, now we can be sure all our SPL libraries are working with Cosmic compiler and STVD. This is the standard procedure that we will follow for every new project. You can also include only the necessary header and source files that are needed for the project to reduce build time if required.
Uploading the Code from STVD to STM8S Development board using ST-Link V2
Connect the ST-Link V2 with the development board as shown below.
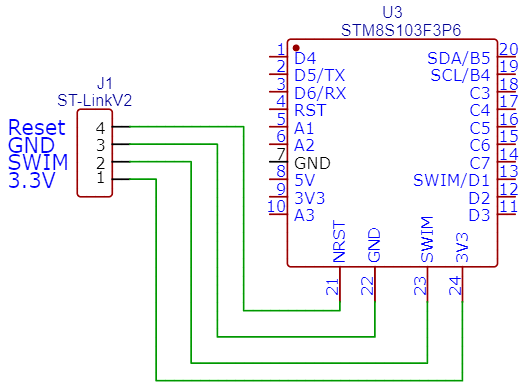
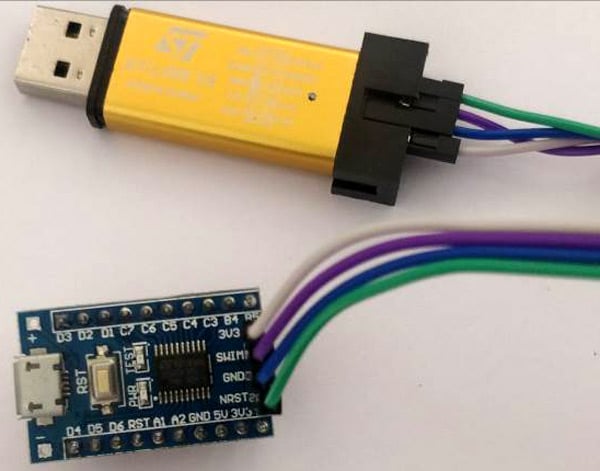
The connections are pretty straight forward and the best part is you need no external components. My hardware setup for programming is shown below, I have just used the female header wires to make my connection. However, do note that the pinout of your ST-Link might differ from mine, make sure to follow the pinout on the device before making the connections.
Make the connection and connect the device to your computer, the driver installation should begin automatically. You can use the device manager to ensure if your computer has discovered ST-LINK V2 correctly. You will also notice the test LED on the board blinking if this is the first time powering the board. As soon as we have successfully compiled the code on STVD, we will get an “S19” Extention file under the debug directory of the project folder. My S19 file is shown below.
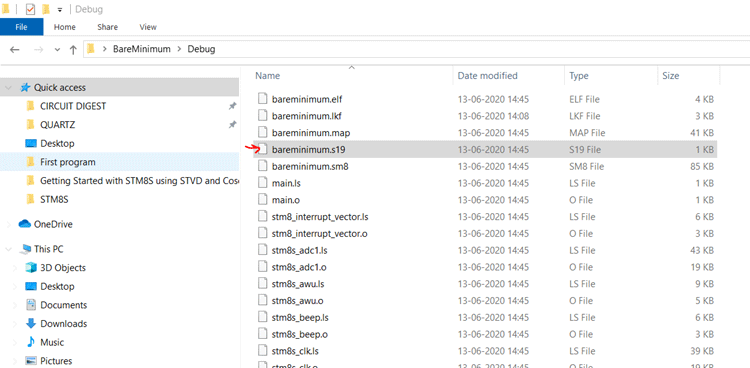
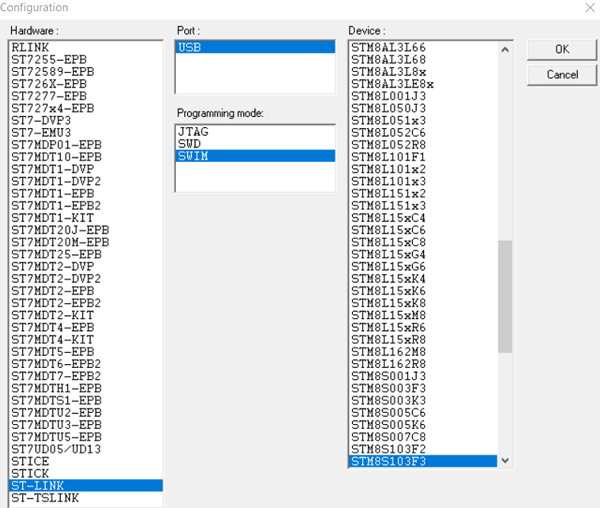
This S19 is like the Hex file which should be uploaded to the controller. To upload the program, open ST Visual Programmer (STVP) which should have installed along with STVD. Then in the configuration window, select as shown in the below image and click OK.
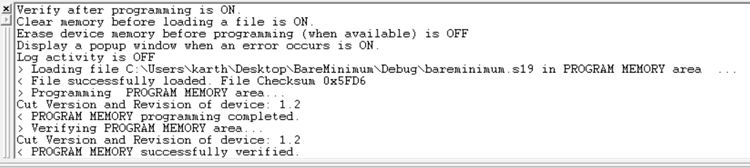
Then click on File->Open and navigate to the S19 file that we showed earlier. Then to flash the device, follow Program -> Current Tab. If the flashing was successful, you should see the following output.
By default, when you purchase the STM8S, it will have a blin program that blinks the test LED. Now after uploading this blank code, the LED will no longer blink.
Important: I found that my ST-Link did not reset the board automatically after programming. I had to disconnect and reconnect it to check the output of my program. I am not sure if this is a problem for everyone, let me know in the comment section. Also, check out the video at the bottom which explains the solution to this.
With this, let's wind up this tutorial, we have learned the basics of hardware, have set up the development environment and learned how to compile and upload code. We are now ready to progress and we will be using this in all our upcoming tutorials. If you have any questions, please post them on our forums and stay tuned for more!!
Complete Project Code
/* MAIN.C file
 *
 * Copyright (c) 2002-2005 STMicroelectronics
 */
#include "STM8s.h"
main()
{
GPIO_Init(GPIOB, GPIO_PIN_5, GPIO_MODE_OUT_PP_HIGH_SLOW);
while (1);
}
Comments
Rebooted and tried again and get error that Access to C:\Program Files (86)\STMicroelectronics\st_toolset\stvd\default.wed was denied. I ran the installer as Aministrator by right click.??
Didn't change toolchain to Cosmic. It compiled.
Dear Aswinth Raj,
I get error when I click the "Rebuild All" button.
The command: "cxstm8 -istm8s_stdperiph_driver\inc -i..\..\stm8s_stdperiph_lib\libraries\stm8s_stdperiph_driver\inc +debug -pxp -no -l +mods0 -pp -iD:\Hstm8 -clDebug\ -coDebug\ stm8s_stdperiph_driver\src\stm8s_adc1.c " has failed, the returned value is: 1
exit code=1.
project2.elf - 181 error(s), 0 warning(s)
Please help me to solve this problem.
Thank you & Best Regards,
Octarudin
Dear Aswinth Raj,
Fortunately, I solve the error by doing this.
- Click "Project" on menu bar
- Choose "Settings" (or SHIFT+F7)
- Open "C Compiler" tab
- Change the category from "General" to "Preprocessor"
- Under "Preprocessor Definitions" write your device in the textbox. (ie. STM8S103)
- Click "OK" button then problem solved.
But, I got new error
#error cpstm8 stm8s_stdperiph_driver\inc\stm8s.h:2708 can't open stm8s_conf.h
I am still find out the problem.
Thank you & Best Regards,
Octarudin
Hey both the errors are because of improper workspace settings. Please follow the first tutorial https://circuitdigest.com/microcontroller-projects/getting-started-with…
Make sure you have added all the needed src and header files before you compile.
Bro as you showed in end of video in which code is not actually uploaded ob the stm8s ....
I am getting that issue , i have seen your next tutorial also but still when i upload the normal blink code it compiles, shows sucessful uploading of code into programing ,data, option memory via STVP. But on board leds does not link.
Stlink programmer turns out red at first then i reset it and then it led turns out blue , but what i suppose no led blinks on onboard stm8.
Will be waiting for your reply if u want can send u video also via drive link
for those of you having compile errors you have to add the stm8s_config.h in you project directory else you'll keep getting compile errors you can find it in the standard peripheral library zip you downloaded open project folder you'll see STM8S_StdPheriph_Template you'll find the stm8s_config.h file there just copy that file to you project directory you don't have to include it in you code you only need stm8s.h included and it compiles successfully
While making the programming connections the LED does not turn on.
However when i use the USB micro connection , LED starts blinking.
Can you please help with the issue?
while trying to program, its giving an error message
Error : The device is protected
Operation aborted
Error : < PROGRAM MEMORY verifying failed.
whaat can be done for this problem
Hello Mr Aswinth Raj,
I have followed your wonderful tutorial till the end but you lost me at final steps of build and debug the examples I have loaded as recommended. I wonder if you can verify and highlight the folders where you saved the software, especially the folder of the Bareminimum project example.
I have saved my project in my desktop as you recommended but the only folder I have is bareminimum_programer which is an empty folder. When I have tried to build the projects using STVD I get error message as follows:
error cpstm8 C:\Program Files (x86)\COSMIC\FSE_Compilers\CXSTM8\HSTM8\mods0.h:1 FlexLM Invalid host.
I wonder If you can help me solving this error and understanding how to work using the tools I have.
Thanks Oded Zur
Hello Mr Aswinth Raj,
I wonder why I have not gotten any answer, pls tell me the reason.
Oded Zur

Hello,
I get this error:
Compiling main.c...
rcst7 main.c OBJECT(Debug\main.o) PIN("C:\Program Files (x86)\COSMIC\FSE_Compilers\CXSTM8\INC\STM8") PIN("C:\Program Files (x86)\COSMIC\FSE_Compilers\CXSTM8\INC\ST7") PIN("C:\Program Files (x86)\COSMIC\FSE_Compilers\CXSTM8\INC") WRV(0) STM8(SMALL) DEBUG DGC(page0) AUTO OT(0) PR(Debug\main.lst) CD CO SB LAOB PIN(..\..\downloads\downloaded\st8\stm8s103f3_spl-master\inc)
Error creating process for executable rcst7
The system cannot find the file specified.
and I don't see and INC directory under CXSTM8.
Looks like compiler did not install correctly, but it didn't get any errors.