India Automation Challenge 2021
OR


Hello all!!! Today, I am here with the latest technology being using Augmented Reality, we will make our home as smart and AR based in very less expense. I have created one smart switch board along with the mobile application to control the entire home all the electric appliances being used. From the way we live, work, and even connect, progressed smart innovation has made the idea of a completely utilitarian savvy home a reality, worked with interconnected gadgets, sensors, and voice colleagues. Also, presently, joining this shrewd climate is expanded reality (AR) applications and innovation. Here, we have used multiple hardware as well software for making it possible to control home by sitting it anywhere in the globe. Also, I have tried merginf different technologies in one go! I have used electricity, Cloud and Augmented Reality for making the normal analog appliance a smart one. Additionally, the project is being made by keeping latest researches ongoing in the AR. The same integration can be made with upcoming technologies like smart eye glasses and more. Let me explain everything in detail as below.
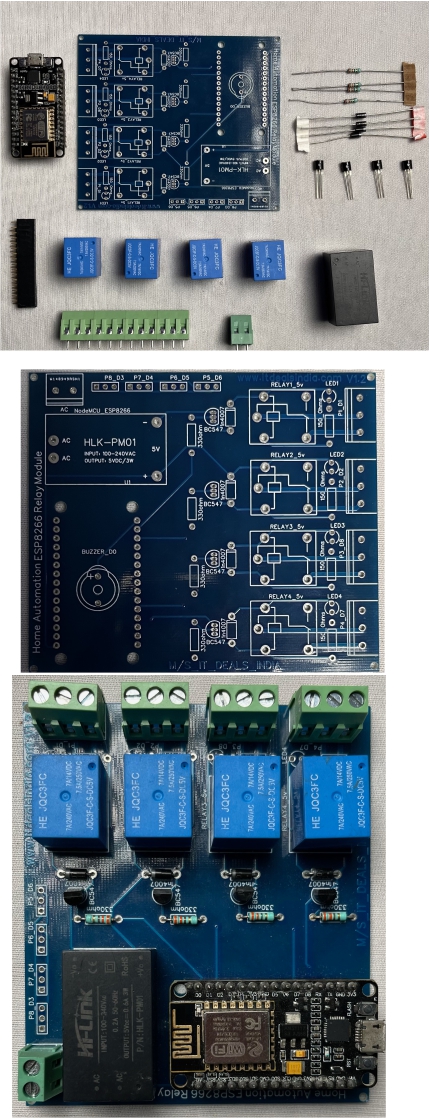
NodeMCU(ESP8266) board, Power Supply (HLK-PM01), Relay_5V,330Ω resistor, Diode 1N4007,BC547 Transistor, Screw terminal 2p*1, Screw terminal 3p*1
Arduino IDE, Blynk App, Unity Hub, XCode
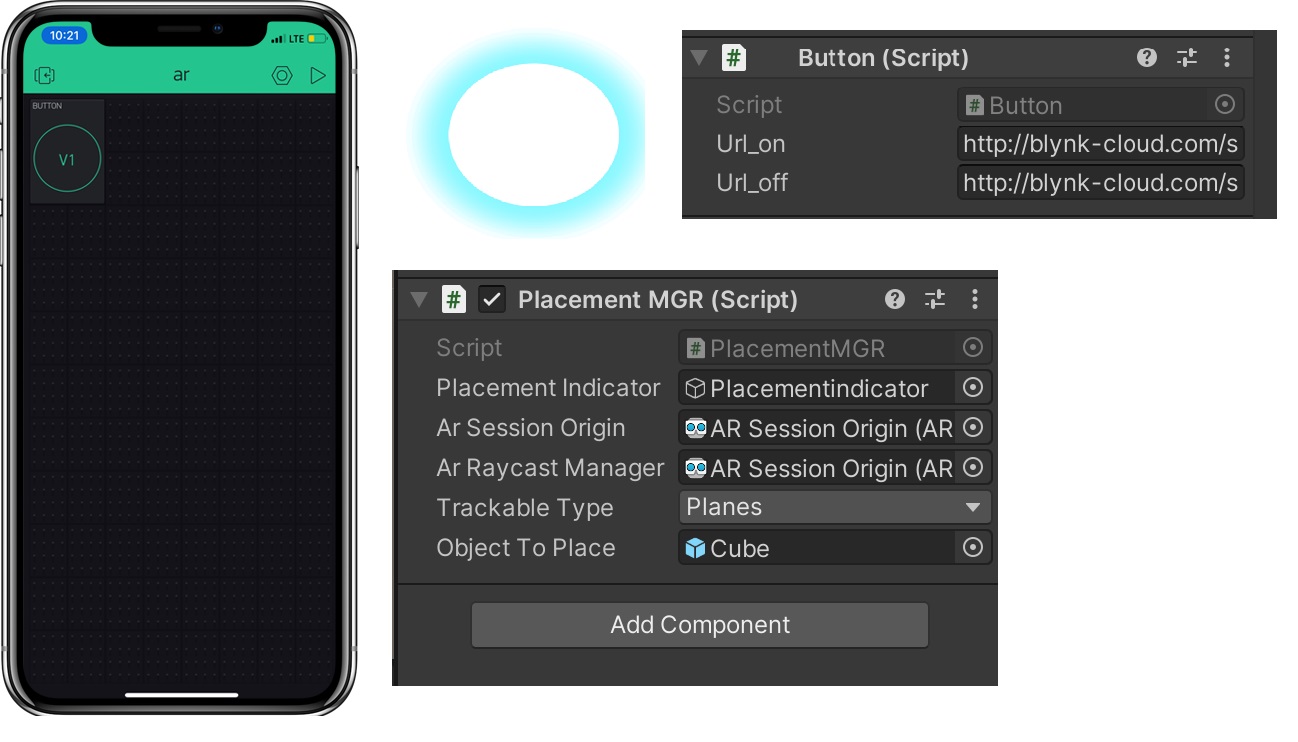
IoT part of the project: - For the IoT part, I have used Blynk IoT Platform. In which, I just made a simple blynk project of adding a button in the dashboard which will send data 0 & 1 to virtual pin V1. After that, we have made a code in which, if we receive the data 1 from virtual pin V1, we just send the signal high to digital pin of NodeMCU board which ultimately turns on Relay. And as soon as we receive 0 the relay gets turned off. You can copy and paste the code from Blynk library. Just change these three parameters (auth [], said [], pass [] ) in the code, to make it work on your side as well. Till this step, we will be easily able to control the relay using the Blynk App. But we want to control that using API so that later on we can integrate it with AR. And the good news is that, Blynk do provide us APIs. So, to send the data to virtual pin of our blynk device, the format of API is something like this. " http://blynk-cloud.com/auth_token/update/pin?value=value " For example, If I want to send data ‘1’ to virtual pin ‘V1’ of my blynk project, the API will be like this, " http://blynk-cloud.com/MY_AUTH_TOKEN/update/V1?value=1 " So, with this, we have successfully covered the IoT part of our project. Now let’s jump on to the AR part. AR part of project: - For AR, we will be using Unity Hub software on our computer. Just Goto Download Unity and download unity hub Then Goto Package Window->Package Manager and Install some library 1)Universal RP 2)AR Foundation 3)ARCore XR Plugin 4)ARKit XR Plugin 5)Core RP Library First of all, right click in Hierarchy, then remove main camera in project and Add AR Session Origin, AR Session and Create Empty and remove name to Placementindicator. Then right click in Placementindicator add 3D Object-> Quad ->After that add Placement Image in to Quad again. Create Empty and remove name to PlacementManager and add Script(PlacementMGR in Code section) Then create folder Prefabs in Assets and add 3D Object-> Cube and then add Script (Button) Goto Build Setting and Build application for iOS (you can also Build application for android. switch Platform to android and click build so .apk file create on your select location) XCode part of project: - Open Unity-iPhone.xcodeproj file in XCode connect your iPhone to laptop and click on start the active scheme so the application installs on your iPhone. Thank you.

Here Nodemcu connect with the 330 Ω resistor for Reduce current flow resistor connect to the BC547 Transistor for Amplify as well as switching purpose Transistor connect to the Diode 1N4007 for Works as circuit protection and also stop reverse current flow Diode connect to the 5v Relay for Switching device use to turn on and off the ac loads Relay connect to the Screw terminal 2p*1 for use for connect home appliances. Power supply (HLK-PM01) for the For the Ac 240V to Dc 5V connect to the Screw T2p*1 for input. Not need to connect buzzer and led.
//This code for esp8266 /* Fill-in your Template ID (only if using Blynk.Cloud) */ // You should get Auth Token in the Blynk App. // Your WiFi credentials. BLYNK_WRITE(V1) void setup() void loop() // 1)PlacementMGR using System.Collections; [SerializeField] private Pose placementPose; public GameObject objectToPlace; int i = 0 ; void Update() if(i != 1 && j != 1) void PlaceObject() private void UpdatePlacementIndicator() } private void UpdatePlacementPose() placementPoseIsValid = hits.Count > 0; var cameraForward = arSessionOrigin.camera.transform.forward; } //2) button code using System.Collections; IEnumerator GetRequest(string uri) // Fuction for the GetRequest APi public void OnMouseUp(){
#define BLYNK_PRINT Serial
//#define BLYNK_TEMPLATE_ID "YourTemplateID"
#include <ESP8266WiFi.h>
#include <BlynkSimpleEsp8266.h>
// Go to the Project Settings (nut icon).
char auth[] = "sbaRMaPtJamrTQ-k9stmWb3I8Ec4fSPR";
// Set password to "" for open networks.
char ssid[] = "SmS_jiofi";
char pass[] = "sms123458956";
#define R5 05 //Control D1 appliances
{
int pinValue = param.asInt(); // assigning incoming value from pin V1 to a variable
digitalWrite(R5, pinValue);
// process received value
}
{
// Debug console
Serial.begin(9600);
pinMode(R5, OUTPUT);
Blynk.begin(auth, ssid, pass);
// You can also specify server:
//Blynk.begin(auth, ssid, pass, "blynk-cloud.com", 80);
//Blynk.begin(auth, ssid, pass, IPAddress(192,168,1,100), 8080);
}
{
Blynk.run();
}
//Unity Code
code in C#
using System.Collections.Generic;
using UnityEngine;
using UnityEngine.XR.ARFoundation;
using UnityEngine.XR.ARSubsystems;
public class PlacementMGR : MonoBehaviour
{
// declarations
public GameObject placementIndicator;
private ARSessionOrigin arSessionOrigin;
[SerializeField]
private ARRaycastManager arRaycastManager;
private bool placementPoseIsValid = false;
[SerializeField]
TrackableType trackableType = TrackableType.Planes;
int j = 0;
// update the location move the mobile
{
{
UpdatePlacementPose();
UpdatePlacementIndicator();
}
if(placementPoseIsValid && Input.touchCount>0 && Input.GetTouch(0).phase == TouchPhase.Began && i<1 ){
PlaceObject();
Debug.Log("Object Place thay che");
i++;
if(i==1)
{
j = 1; // place only one cube // remove this more more cube place at one time
}
}
}
// place the cube
{
Instantiate(objectToPlace, placementPose.position, placementPose.rotation);
}
// indication place change while move the mobile
{
if (placementPoseIsValid)
{
placementIndicator.SetActive(true);
placementIndicator.transform.SetPositionAndRotation(placementPose.position, placementPose.rotation);
else
{
placementIndicator.SetActive(false);
}
}
{
var screenCenter = arSessionOrigin.camera.ViewportToScreenPoint(new Vector3(0.5f, 0.5f));
var hits = new List<ARRaycastHit>();
arRaycastManager.Raycast(screenCenter, hits, trackableType);
if(placementPoseIsValid)
{
placementPose = hits[0].pose;
var cameraBearing = new Vector3(cameraForward.x, 0, cameraForward.z).normalized;
placementPose.rotation = Quaternion.LookRotation(cameraBearing);
}
}
using System.Collections.Generic;
using UnityEngine;
using UnityEngine.Events;
using UnityEngine.Networking;
public class Button : MonoBehaviour {
bool isRed;
public string url_on; //create variable for on api
public string url_off; //create variable for off api
{
using (UnityWebRequest webRequest = UnityWebRequest.Get(uri))
{
// Request and wait for the desired page.
yield return webRequest.SendWebRequest();
}
}
isRed = !isRed;
if(isRed){
GetComponent<Renderer>().material.color = Color.red; // change the cube color to red
StartCoroutine(GetRequest(url_on)); // On APi working
Debug.Log("LED IS ON");
}
else{
GetComponent<Renderer>().material.color = Color.white; // change the cube color to white
StartCoroutine(GetRequest(url_off)); // Off API working
Debug.Log("LED IS OFF");
}
}
}