India Automation Challenge 2021
OR


PROBLEM: As we have heard many fire accidents takes place around us. The Surat fire accident in which many students were trapped in an institute by fire. Even in many homes and offices such fire accidents takes place due to lack of attention to extinguish fire after firing on match sticks, incense sticks, cigarettes, etc. “Humans are bound to make mistakes”. So due to such mistakes many times a small fire is enough to destroy everything on its way . In such situations fire brigades if reaches late due to traffic at hotspot area then there is a huge risk on lives of many peoples. Even firemen kept their lives in danger to protect peoples.
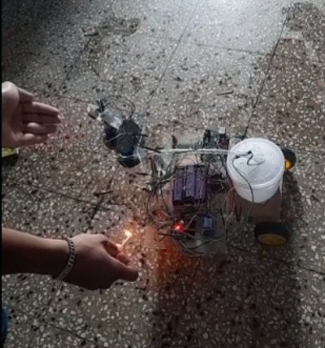
SOLUTION: Thus, to combat the situation instead of human beings, fire fighting robots are used in modern world which navigate the area and extinguishes fire in given environment with avoiding any obstacles it faces in its. The principle used in design is such that it enable the robot to be extended for a more robust system which is to be used to combat actual fires in residential or commercial settings of area .The main purpose of this project is to create a fully autonomous robot, which means, once the robot is started by the user, it navigates, it searches, and extinguishes the fire on its own, with no assistance or input from the user, with giving an alert message to your phone number and also avoids obstacles in its way. In order to reach this goal, I have selected motors, sensors, fire extinguishes mechanical parts and general design according to the requirement of the robot. For future scope and for large system , replica of the same robot to a large scale with fire resistant material so that robot cannot be harmed through fire and prevents any cause of harm to humans and properties at an accurate timing level could be made.
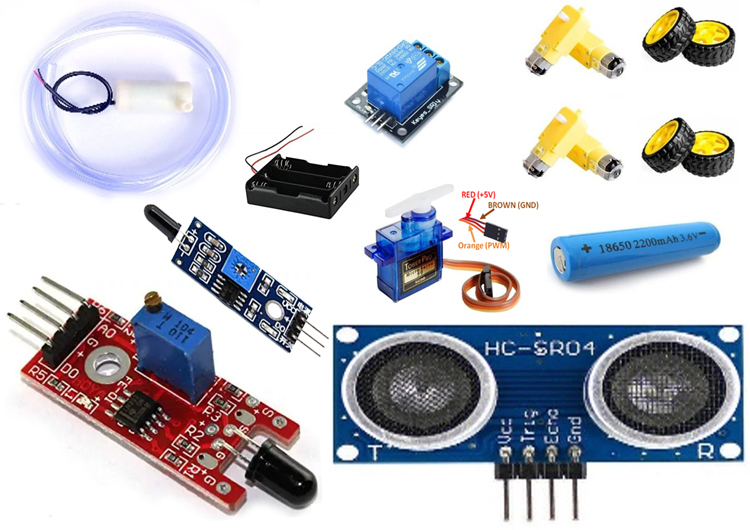
Arduino UNO/ Arduino mega 2560r3, Flame sensors [(x 3 pieces) out of which 1 has 4-pins and other 2 has 3-pins] ,Servo Motor (SG90)[x2 pieces ], L298N motor Driver module, Mini DC Submersible Pump, Robot chassis with 4 motors and 4 wheels, A small container, Connecting wires, jumper wires, Water tube, Relay module(5v 1 channel), Batteries(4 li-ion 3.7v 18650 � 3 used in series to make 12v supply and 1 battery is used to power on gsm module, Switch, BMS board, Ultrasonic sensor (HC-SR04), Battery holder, GSM 800l module, 2g sim card, 1kohm and 2kohm resistors, soldering machine, soldering wire, wire cutter, screw driver, glue sticks and glue gun and some small screws and nuts.
ARDUINO IDE
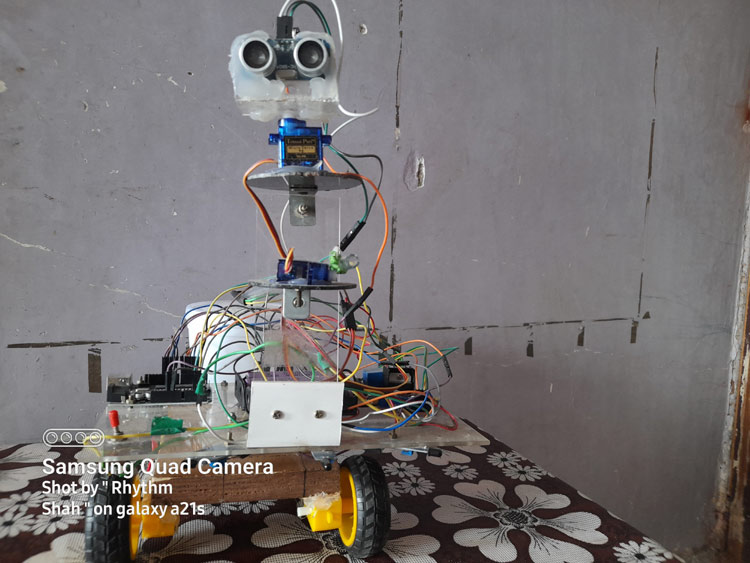
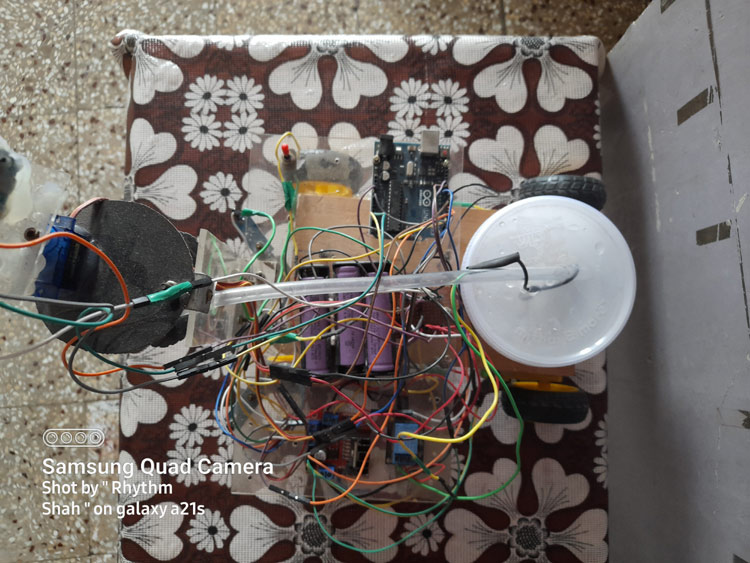
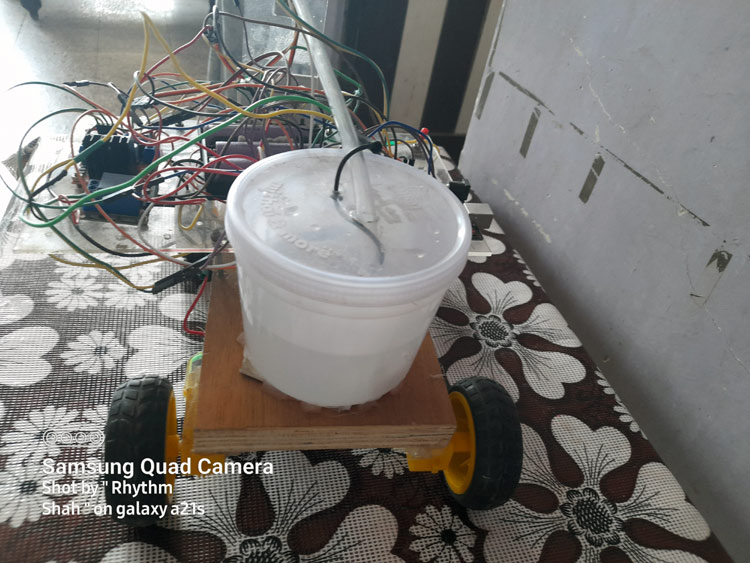
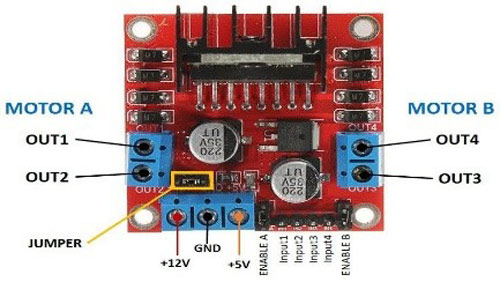
The main brain of this project is Arduino uno/mega depending upon applicating features. In my case I‘m using gsm module as features are more all pins of Arduino uno are full so Arduino mega is used. But I cannot find 2g sim card anywhere so without 2g sim card, alert message feature is useless so without sms feature Arduino uno can be used. L298n motor driver is used to run the 4 motors of the robot. L293d motor driver shield has only some pins left for Arduino so here l298n is used rather than l293d for efficient used of all pins. 2 motors of two directions (left, right) are connected parallelly to run all 4 motors. Relay of 5v 1 channel is used to on/off the pump for water flow, for that 9v battery is used. Ultrasonic sensor is used to detect obstacles, with that two servo motors are used one for obstacle to detect obstacle in both directions and other is for water tube motion up and down. 3 flame sensors are used to detect fire in all 3 directions � left, center, right out of which the center should be of 4 pins so that the fourth pin is of analog pin used to calculate distance of fire from robot. Gsm 800l module is used with 2g sim card properly inserted and connected according to circuit diagram. Arduino ide software is used to write and admin/upload the code to Arduino.
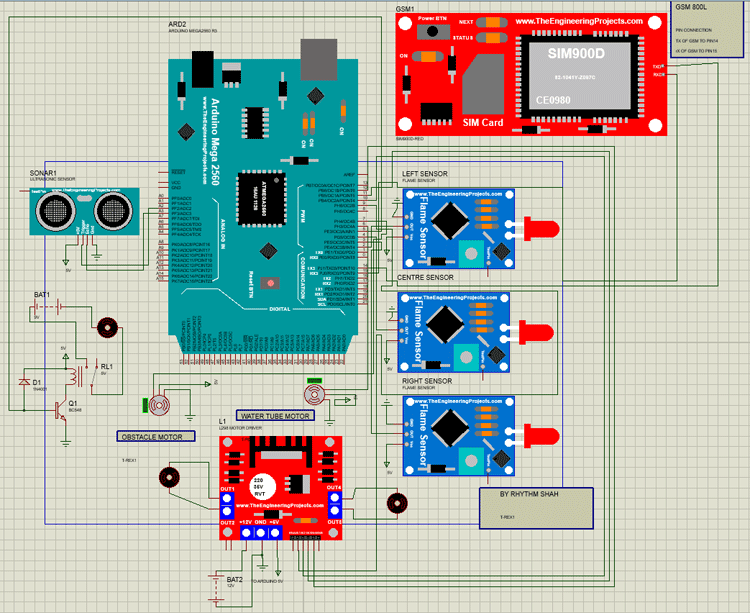
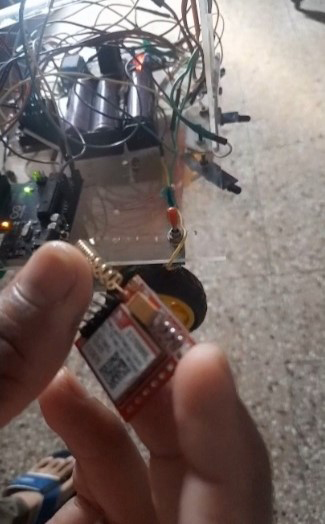
According to circuit diagram shown, Arduino mega is here the main component. Left flame sensor is connected to pin 2, right flame sensor is connected to pin 3, center flame sensor is connected to pin4. The center flame sensor if using has 4 pins � vcc,gnd,d0,a0 then a0 (analog) pin of sensor goes to a1 analog pin of Arduino and d0 goes to digital pin 4 of Arduino and vcc and gnd are connected together with all vcc gnd pins of other components and finally vcc and gnd iof that is connected to arduino. IN1, IN2, IN3, IN4 of L298n motor driver are connected to digital pin numbers 9,10,11,12 respectively. moto1 out point of driver is connected to any 2 motors that are parallelly connected of any direction similarly with motor 2 out . check the polarity of motors as both mot1 and mot2 ports has to be connected with same polarity . So that when forward function is called by Arduino then all four motors move in forward directions. signal pin of relay goes to pin 5. 9v battery positive and pump positive both goes to no and common pin of relay respectively. Both negatives are interconnected. Now signal of servo of water tube is connected to pin no 6 and signal of servo of obstacle is connected to pin no 7. Trigger pin of hc -sr04 ultrasonic sensor is connected analog pin a2 of Arduino and echo pin of ultrasonic sensor is connected is connected to analog pin a3 of Arduino. All +5v and grounds are connected together and then connected to 5v and gnd of arduino. Make 12v power supply by connecting 3 li-ion 3.7v in series, the positive of it goes to +12v of l298n through switch and ground to gnd of l298n, connect +5v and gnd of l298n to +5v and gnd of Arduino. Connect +5v and gnd of gsm to 3.7v 18650 li-ion battery . Insert 2g sim card properly as shown in picture. Now connect TX of gsm to digital pin 14 of Arduino and RX of gsm to digital pin 15 of Arduino with 3.3v voltage divider in between using 1k ohm and 2k ohm resistors, connect both resistors together and connect to rx of gsm and other point of 2k resistor is connect to gnd and other point of 1k resistor is connected to pin 15 of Arduino.
								    				//FIREROVER //

//*------ Arduino Fire Fighting Robot Code----- *//

//By ~ RHYTHM SHAH //

#include <NewPing.h>

#include <Servo.h>

#include <SoftwareSerial.h>

//Create software serial object to communicate with SIM800L

SoftwareSerial mySerial(14, 15); //SIM800L Tx & Rx is connected to Arduino #14 & #15

Servo myservo;

Servo servo;

int pos = 0;

boolean fire = false;

/*-------defining Inputs------*/

#define Left_S 2      // left sensor

#define Right_S 3     // right sensor

#define Forward_S 4  //forward sensor

#define TRIGGER_PIN A2

#define ECHO_PIN A3

/*-------defining Outputs------*/

#define IN1 9       // left motor

#define IN2 10       // left motor

#define IN3 11      // right motor

#define IN4 12       // right motor

#define pump 5

const int sensorMin = 0;     // sensor minimum

const int sensorMax = 1024;  // sensor maximum

#define max_distance 50

NewPing sonar(TRIGGER_PIN, ECHO_PIN, max_distance);

int distance = 0;

int leftDistance;

int rightDistance;

boolean object;

void setup()

{

  randomSeed(analogRead(0));

  //Begin serial communication with Arduino and Arduino IDE (Serial Monitor)

  Serial.begin(9600);

 //Begin serial communication with Arduino and SIM800L

  mySerial.begin(9600);

  Serial.println("Initializing...");

  pinMode(Left_S, INPUT);

  pinMode(Right_S, INPUT);

  pinMode(Forward_S, INPUT);

  pinMode(IN1, OUTPUT);

  pinMode(IN2, OUTPUT);

  pinMode(IN3, OUTPUT);

  pinMode(IN4, OUTPUT);

  pinMode(pump, OUTPUT);

  myservo.attach(6);

  myservo.write(90);

  servo.attach(7);

  servo.write(0);

}

void put_off_fire()

{

    delay (500);

    stop() ; delay(10);

   digitalWrite(pump, HIGH);  delay (500);

   for (pos = 50; pos <= 130; pos += 1)

   {

    myservo.write(pos);

    delay(10);

  }

  for (pos = 130; pos >= 50; pos -= 1) {

    myservo.write(pos);

    delay(10);

  }

 digitalWrite(pump, LOW);

  myservo.write(90);

  fire=false;

}

void loop()

{

   myservo.write(90); //Sweep_Servo();

    // read the sensor on analog A0:

 int sensorReading = analogRead(A1); int range = map(sensorReading, sensorMin, sensorMax, 0, 3);

    if (digitalRead(Left_S) ==1 && digitalRead(Right_S)==1 && digitalRead(Forward_S) ==1) //If Fire not detected all sensors are zero

    {

    //Do not move the robot

    stop() ;

    }

    else if (digitalRead(Forward_S) ==0) //If Fire is straight ahead

    {

      switch (range) {

  case 0:    // A fire closer than 1.5 feet away.

    Serial.println("** Close Fire **");

    fire = true;

    break;

  case 1:    // A fire between 1-3 feet away.

    Serial.println("** Distant Fire **");

    objectAvoid();

    moveForward(); //Move the robot forward

    break;

   sendSMS();

   Serial.println("message sent.");

   delay(1000);

    }

    else if (digitalRead(Left_S) ==0) //If Fire is to the left

    {

    //Move the robot left

    objectAvoid();

    moveLeft();

    sendSMS();

   Serial.println("message sent.");

   delay(1000);

    }

    else if (digitalRead(Right_S) ==0) //If Fire is to the right

    {

    //Move the robot right

    objectAvoid();

    moveRight();

    sendSMS();

   Serial.println("message sent.");

   delay(1000);

    }

delay(300); //Slow down the speed of robot

     while (fire == true)

     {

      put_off_fire();

     }

}

void objectAvoid() {

  distance = getDistance();

  if (distance <= 15) {

    //stop

    stop();

    lookLeft();

    lookRight();

    delay(100);

    if (rightDistance <= leftDistance) {

      //left

      object = true;

      turn();

    } else {

      //right

      object = false;

      turn();

    }

    delay(100);

  }

  else {

    //forword

    moveForward();

  }

}

int getDistance() {

  delay(50);

  int cm = sonar.ping_cm();

  if (cm == 0) {

    cm = 100;

  }

  return cm;

}

int lookLeft () {

  //look left

  servo.write(150);

  delay(500);

  leftDistance = getDistance();

  delay(100);

  servo.write(90);

  return leftDistance;

  delay(100);

}

int lookRight() {

  //look right

  servo.write(30);

  delay(500);

  rightDistance = getDistance();

  delay(100);

  servo.write(90);

  return rightDistance;

  delay(100);

}

void turn() {

  if (object == false) {


    moveLeft();

    delay(700);

    moveForward();

    delay(800);

    moveRight();

    delay(900);

    if (digitalRead(Right_S) ==0) {

      loop();

    } else {

      moveForward();

    }

  }

  else {

    moveRight();

    delay(700);

    moveForward();

    delay(800);

    moveLeft();

    delay(900);

    if (digitalRead(Left_S) ==0) {

      loop();

    } else {

      moveForward();

    }

  }

}

void moveRight() {

  digitalWrite(IN1, HIGH);

  digitalWrite(IN2, LOW);

  digitalWrite(IN3, LOW);

  digitalWrite(IN4, HIGH);

}

void moveLeft() {

 digitalWrite(IN1, LOW);

 digitalWrite(IN2, HIGH);

 digitalWrite(IN3, HIGH);

 digitalWrite(IN4, LOW);

}

void stop() {

 digitalWrite(IN1, HIGH);

 digitalWrite(IN2, HIGH);

 digitalWrite(IN3, HIGH);

 digitalWrite(IN4, HIGH);

}

void moveForward() {

  digitalWrite(IN1, HIGH);

  digitalWrite(IN2, LOW);

  digitalWrite(IN3, HIGH);

  digitalWrite(IN4, LOW);

}

void sendSMS()

{

  mySerial.println("AT"); //Once the handshake test is successful, it will back to OK

  updateSerial();

  mySerial.println("AT+CMGF=1"); // Configuring TEXT mode

  updateSerial();

  mySerial.println("AT+CMGS=\"+ZZxxxxxxxxxxx\"");//change ZZ with country code and xxxxxxxxxxx with phone number to sms

  updateSerial();

  mySerial.print("FIRE DETECTED !!"); //text content

  updateSerial();

  mySerial.write(26);

}

void updateSerial()

{

  delay(500);

  while (Serial.available())

  {

    mySerial.write(Serial.read());//Forward what Serial received to Software Serial Port

  }

  while(mySerial.available())

  {

    Serial.write(mySerial.read());//Forward what Software Serial received to Serial Port

  }

}