
In previous tutorials, we have covered the basics of FreeRTOS with Arduino and the Queue kernel object in FreeRTOS Arduino. Now, in this third FreeRTOS tutorial, we will learn more about FreeRTOS and its advance APIs, which can make you understand the multi-tasking platform more deeply.
Semaphore and Mutex (Mutual Exclusion) are the kernel objects that are used for synchronization, resource management and protecting resources from corruption. In the first half of this tutorial, we will see the idea behind Semaphore, how and where to use it. In the second half, we will continue with Mutex.
What is Semaphore?
In previous tutorials, we have discussed about task priorities and also get to know that a higher priority task pre-empts a lower priority task so while execution of high priority task there may be a possibility that data corruption can happen in lower priority task because it is not executed yet and data is coming continuously to this task from a sensor which causes data loss and malfunctioning of the whole application.
So, there is a need to protect resources from data loss and here Semaphore plays an important role.
Semaphore is a signaling mechanism in which a task in a waiting state is signaled by another task for execution. In other words, when a task1 finished its work, then it will show a flag or increment a flag by 1 and then this flag is received by another task (task2) showing that it can perform its work now. When task2 finished its work then the flag will be decreased by 1.
So, basically, it is a “Give” and “Take” mechanism and semaphore is an integer variable that is used to synchronize access to resources.
Types of Semaphore in FreeRTOS:
Semaphore is of two types.
- Binary Semaphore
- Counting Semaphore
1. Binary Semaphore: It has two integer values 0 and 1. It is somewhat similar to the Queue of length 1. For example, we have two tasks, task1 and task2. Task1 sends data to task2 so task2 continuously checks the queue item if there is 1, then it can read the data else it has to wait until it becomes 1. After taking the data, task2 decrement the queue and make it 0 That means task1 again can send the data to task2.
From the above example, it can be said that binary semaphore is used for synchronization between tasks or between tasks and interrupt.
2. Counting Semaphore: It has values greater than 0 and can be thought of queue of length more than 1. This semaphore is used for counting events. In this usage scenario, an event handler will ‘give’ a semaphore each time an event occurs (incrementing the semaphore count value), and a handler task will ‘take’ a semaphore each time it processes an event (decrementing the semaphore count value).
The count value is, therefore, the difference between the number of events that have occurred and the number that has been processed.
Now, let's see how to use Semaphore in our FreeRTOS code.
How to use Semaphore in FreeRTOS?
FreeRTOS supports different APIs for creating a semaphore, taking a semaphore and giving a semaphore.
Now, there can be two types of APIs for the same kernel object. If we have to give semaphore from an ISR, then normal semaphore API cannot be used. You should use interrupt protected APIs.
In this tutorial, we will use binary semaphore because it is easy to understand and implement. As interrupt functionality is used here, you need to use interrupt protected APIs in ISR function. When we are saying synchronizing a task with an interrupt, it means putting the task into Running state right after the ISR.
Creating a Semaphore:
To use any kernel object, we have to first create it. For creating a binary semaphore, use vSemaphoreCreateBinary().
This API does not take any parameter and returns a variable of type SemaphoreHandle_t. A global variable name sema_v is created to store the semaphore.
SemaphoreHandle_t  sema_v;
sema_v = xSemaphoreCreateBinary();
Giving a semaphore:
For giving a semaphore, there are two versions- one for interrupt and another one for the normal task.
- xSemaphoreGive(): This API takes only one argument which is the variable name of semaphore like sema_v as given above while creating a semaphore. It can be called from any normal task that you want to synchronize.
- xSemaphoreGiveFromISR(): This is the interrupt protected API version of xSemaphoreGive(). When we need to synchronize an ISR and normal task, then xSemaphoreGiveFromISR() should be used from the ISR function.
Taking a semaphore:
To take a semaphore, use API function xSemaphoreTake(). This API takes two parameters.
xSemaphoreTake( SemaphoreHandle_t xSemaphore, TickType_t xTicksToWait );
xSemaphore: Name of the semaphore to be taken in our case sema_v.
xTicksToWait: This is the maximum amount of time that the task will wait in Blocked state for the semaphore to become available. In our project, we will set xTicksToWait to portMAX_DELAY to make the task_1 to wait indefinitely in Blocked state until the sema_v is available.
Now, let's use these APIs and write a code to perform some tasks.
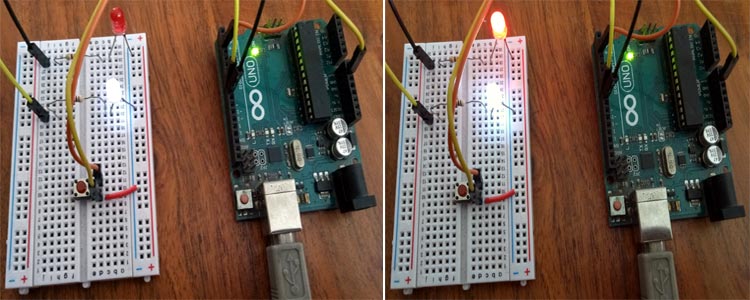
Here one push-button and two LEDs are interfaced. The push-button will act as an interrupt button which is attached to pin 2 of Arduino Uno. When this button is pressed an interrupt will be generated and an LED which is connected to pin 8 will be turned ON and when you press it again it will be OFF.
So, when button is pressed xSemaphoreGiveFromISR() will be called from ISR function and xSemaphoreTake() function will be called from TaskLED function.
To make the system look multitasking, connect other LEDs with pin 7 which will be in always blinking state.
Semaphore Code Explanation
Let’s start writing code for by opening the Arduino IDE
1. First, include the Arduino_FreeRTOS.h header file. Now, if any kernel object is used like queue semaphore then a header file must also be included for it.
#include <Arduino_FreeRTOS.h>
#include <semphr.h>
2. Declare a variable of type SemaphoreHandle_t to store the values of semaphore.
SemaphoreHandle_t interruptSemaphore;
3. In void setup(), create two tasks(TaskLED and TaskBlink)using the xTaskCreate() API and then create a semaphore using xSemaphoreCreateBinary().Create a task with equal priorities and later on try to play with this number. Also, Configure pin 2 as an input and enable the internal pull-up resistor and attach the interrupt pin. Finally, start the scheduler as shown below.
void setup() {
  pinMode(2, INPUT_PULLUP);
  xTaskCreate(TaskLed,  "Led", 128, NULL, 0, NULL );
xTaskCreate(TaskBlink,  "LedBlink", 128, NULL, 0, NULL );
  interruptSemaphore = xSemaphoreCreateBinary();
  if (interruptSemaphore != NULL) {
    attachInterrupt(digitalPinToInterrupt(2), debounceInterrupt, LOW);
  }
}
4. Now, implement the ISR function. Make a function and name it the same as the second argument of attachInterrupt() function. To make the interrupt work properly, you need to remove the debounce problem of the pushbutton using millis or micros function and by adjusting the debouncing time. From this function, call interruptHandler() function as shown below.
long debouncing_time = 150;
volatile unsigned long last_micros;
void debounceInterrupt() {
if((long)(micros() - last_micros) >= debouncing_time * 1000) {
interruptHandler();
last_micros = micros();
}
}
In interruptHandler() function, call xSemaphoreGiveFromISR() API.
void interruptHandler() {
xSemaphoreGiveFromISR(interruptSemaphore, NULL);
}
This function will give a semaphore to TaskLed to turn ON the LED.
5. Create a TaskLed function and inside the while loop, call xSemaphoreTake() API and check if the semaphore is successfully taken or not. If it is equal to pdPASS (i.e 1) then make the LED toggle as shown below.
void TaskLed(void *pvParameters)
{
(void) pvParameters;
pinMode(8, OUTPUT);
while(1) {
if (xSemaphoreTake(interruptSemaphore, portMAX_DELAY) == pdPASS) {
digitalWrite(8, !digitalRead(8));
}
}
}
6. Also, create a function to blink other LED connected to pin 7.
void TaskLed1(void *pvParameters)
{
(void) pvParameters;
pinMode(7, OUTPUT);
while(1) {
digitalWrite(7, HIGH);
vTaskDelay(200 / portTICK_PERIOD_MS);
digitalWrite(7, LOW);
vTaskDelay(200 / portTICK_PERIOD_MS);
}
}
7. The void loop function will remain empty. Don’t forget it.
void loop() {}
That’s it, complete code can be found at the end of this tutorial. Now, upload this code and connect the LEDs and push-button with the Arduino UNO according to the circuit diagram.
Circuit Diagram

After uploading the code, you will see an LED is blinking after 200ms and when the button is pressed, immediately the second LED will glow as shown in the video given at the end.
In this way, semaphores can be used in FreeRTOS with Arduino where it needs to pass the data from one task to another without any loss.
Now, let’s see what is Mutex and how to use it FreeRTOS.
What is Mutex?
As explained above semaphore is a signaling mechanism, similarly, Mutex is a locking mechanism unlike the semaphore that has separate functions for increment and decrement but in Mutex, the function takes and gives in itself. It is a technique to avoid the corruption of shared resources.
To protect the shared resource, one assigns a token card (mutex) to the resource. Whoever has this card can access the other resource. Others should wait until the card returned. In this way, only one resource can access the task and others wait for their chance.
Let’s understand Mutex in FreeRTOS with the help of an example.
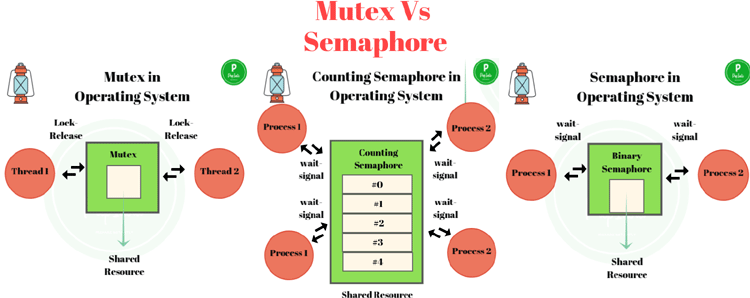
Here we have three tasks, One for printing data on LCD, second for sending LDR data to LCD task and last task for sending Temperature data on LCD. So here two tasks are sharing the same resource i.e. LCD. If the LDR task and temperature task send data simultaneously then one of the data may be corrupted or lost.
So to protect the data loss, we need to lock the LCD resource for task1 until it finished the display task. Then the LCD task will unlock and then task2 can perform its work.
You can observe the working of Mutex and semaphores in the below diagram.
How to use Mutex in FreeRTOS?
Mutexs are also used in the same way as semaphores. First, create it, then give and take using respective APIs.
Creating a Mutex:
To create a Mutex, use xSemaphoreCreateMutex() API. As its name suggests that Mutex is a type of Binary semaphore. They are used in different contexts and purposes. A binary semaphore is for synchronizing tasks while Mutex is used for protecting a shared resource.
This API does not take any argument and returns a variable of type SemaphoreHandle_t. If the mutex cannot be created, xSemaphoreCreateMutex() return NULL.
SemaphoreHandle_t mutex_v;
mutex_v = xSemaphoreCreateMutex();
Taking a Mutex:
When a task wants to access a resource, it will take a Mutex by using xSemaphoreTake() API. It is the same as a binary semaphore. It also takes two parameters.
xSemaphore: Name of the Mutex to be taken in our case mutex_v.
xTicksToWait: This is the maximum amount of time that the task will wait in Blocked state for the Mutex to become available. In our project, we will set xTicksToWait to portMAX_DELAY to make the task_1 to wait indefinitely in Blocked state until the mutex_v is available.
Giving a Mutex:
After accessing the shared resource, the task should return the Mutex so that other tasks can access it. xSemaphoreGive() API is used to give the Mutex back.
The xSemaphoreGive() function takes only one argument which is the Mutex to be given in our case mutex_v.
Using the above APIs, Let’s implement Mutex in the FreeRTOS code using Arduino IDE.
Mutex Code Explanation
Here the goal for this part is to use a Serial monitor as a shared resource and two different tasks to access the serial monitor to print some message.
1. The header files will remain the same as a semaphore.
#include <Arduino_FreeRTOS.h>
#include <semphr.h>
2. Declare a variable of type SemaphoreHandle_t to store the values of Mutex.
SemaphoreHandle_t mutex_v;
3. In void setup(), initialize serial monitor with 9600 baud rate and create two tasks(Task1 and Task2) using the xTaskCreate() API. Then create a Mutex using xSemaphoreCreateMutex(). Create a task with equal priorities and later on try to play with this number.
void setup() {
Serial.begin(9600);
mutex_v = xSemaphoreCreateMutex();
if (mutex_v == NULL) {
Serial.println("Mutex can not be created");
}
xTaskCreate(Task1, "Task 1", 128, NULL, 1, NULL);
xTaskCreate(Task2, "Task 2", 128, NULL, 1, NULL);
}
4. Now, make task functions for Task1 and Task2. In a while loop of task function, before printing a message on the serial monitor we have to take a Mutex using xSemaphoreTake() then print the message and then return the Mutex using xSemaphoreGive(). Then give some delay.
void Task1(void *pvParameters) {
while(1) {
xSemaphoreTake(mutex_v, portMAX_DELAY);
Serial.println("Hi from Task1");
xSemaphoreGive(mutex_v);
vTaskDelay(pdMS_TO_TICKS(1000));
}
}
Similarly, implement Task2 function with a delay of 500ms.
5. Void loop() will remain empty.
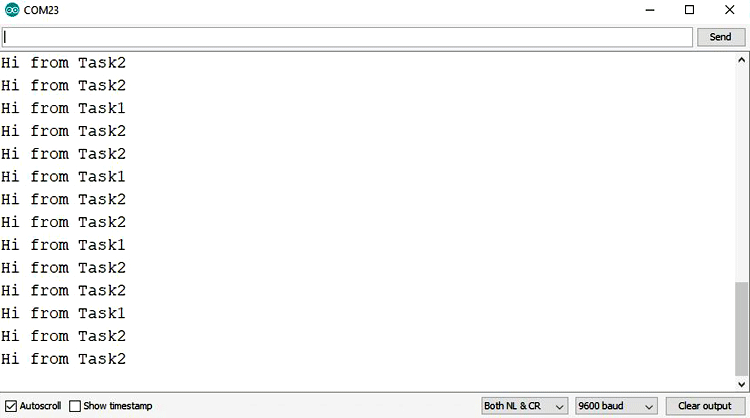
Now, upload this code on Arduino UNO and open the serial monitor.
You will see messages are printing from task1 and task2.
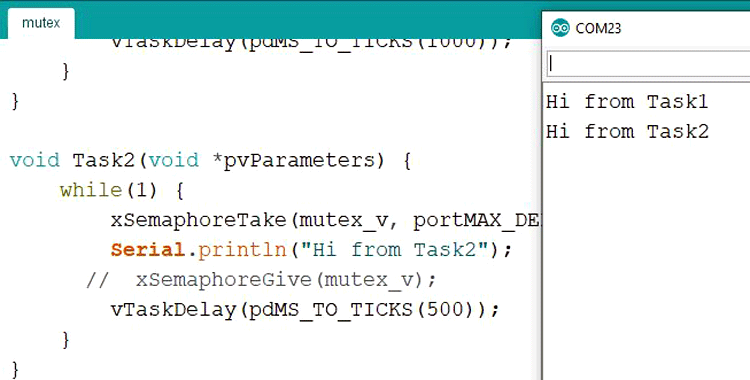
To test the working of Mutex, just comment xSemaphoreGive(mutex_v); from any task. You can see that the program hangs on the last print message.
This is how Semaphore and Mutex can be implemented in FreeRTOS with Arduino. For more information on Semaphore and Mutex, you can visit the official documentation of FreeRTOS.
Complete codes and video for Semaphore and Mutes are given below.
CODE for Semaphore:

#include <Arduino_FreeRTOS.h>
#include <semphr.h>
long debouncing_time = 150;
volatile unsigned long last_micros;

SemaphoreHandle_t interruptSemaphore;

void setup() {
  pinMode(2, INPUT_PULLUP);
  xTaskCreate(TaskLed,  "Led", 128, NULL, 0, NULL );
xTaskCreate(TaskBlink,  "LedBlink", 128, NULL, 0, NULL );
  interruptSemaphore = xSemaphoreCreateBinary();
  if (interruptSemaphore != NULL) {
    attachInterrupt(digitalPinToInterrupt(2), debounceInterrupt, LOW);
  }
}

void loop() {}

void interruptHandler() {
  xSemaphoreGiveFromISR(interruptSemaphore, NULL);
}

void TaskLed(void *pvParameters)
{
  (void) pvParameters;
  pinMode(8, OUTPUT);
  for (;;) {
    if (xSemaphoreTake(interruptSemaphore, portMAX_DELAY) == pdPASS) {
      digitalWrite(8, !digitalRead(8));
    }
  }
}
void TaskBlink(void *pvParameters)
{
  (void) pvParameters;
  pinMode(7, OUTPUT);
  for (;;) {
      digitalWrite(7, HIGH);
      vTaskDelay(200 / portTICK_PERIOD_MS);
      digitalWrite(7, LOW);
      vTaskDelay(200 / portTICK_PERIOD_MS);
  }
}
void debounceInterrupt() {
  if((long)(micros() - last_micros) >= debouncing_time * 1000) {
    interruptHandler();
    last_micros = micros();
  }
}

CODE for Mutex:
#include <Arduino_FreeRTOS.h>
#include <semphr.h>

SemaphoreHandle_t mutex_v;
void setup() {
    Serial.begin(9600);
    mutex_v = xSemaphoreCreateMutex();
    if (mutex_v == NULL) {
        Serial.println("Mutex can not be created");
    }
    xTaskCreate(Task1, "Task1", 128, NULL, 1, NULL);
    xTaskCreate(Task2, "Task2", 128, NULL, 1, NULL);
}

void Task1(void *pvParameters) {
    while(1) {
        xSemaphoreTake(mutex_v, portMAX_DELAY);
        Serial.println("Hi from Task1");
        xSemaphoreGive(mutex_v);
        vTaskDelay(pdMS_TO_TICKS(1000));
    }
}

void Task2(void *pvParameters) {
    while(1) {
        xSemaphoreTake(mutex_v, portMAX_DELAY);
        Serial.println("Hi from Task2");
        xSemaphoreGive(mutex_v);
        vTaskDelay(pdMS_TO_TICKS(500));
    }
}

void loop() {
}