
I started this project in order to get rid of various remotes at my home and build something single which could incorporate features of all of them. I got this idea when I saw one of my friend’s mobile phone with built in IR blaster, at that time I decided not to buy a similar phone rather make my own device which should be compatible with my existing handset. So here we are going to Convert an Android Phone into an IR Remote using Arduino to control various devices at home.
Components Required:
- Arduino Uno
- IR LED
- TSOP-IR receiver (1838T)
- Bluetooth module (HC05)
- Android Device (Phone, Tablet, etc.)
Working Explanation:
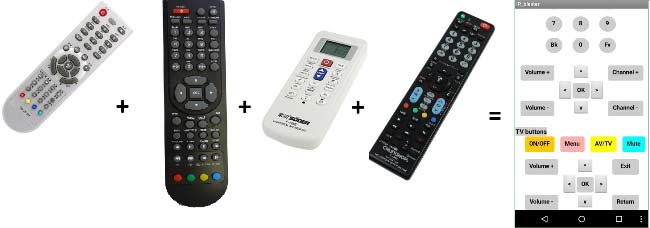
Generally we use two remotes to operate TV at home, one for television and one for Set-Top Box so here in this Project I am targeting these two remotes and making an Android Phone working as IR Blaster so that TV can be controlled with the Phone, without touching any of the Remotes.
Using an Arduino Uno board just made it easier for me to deal with the IR decoding and encoding part. The custom made shield just adds on to the convenience part of this project. The shield consists of a TSOP IR receiver (1838T), an IR LED and a Bluetooth module (HC-05), see the image below:
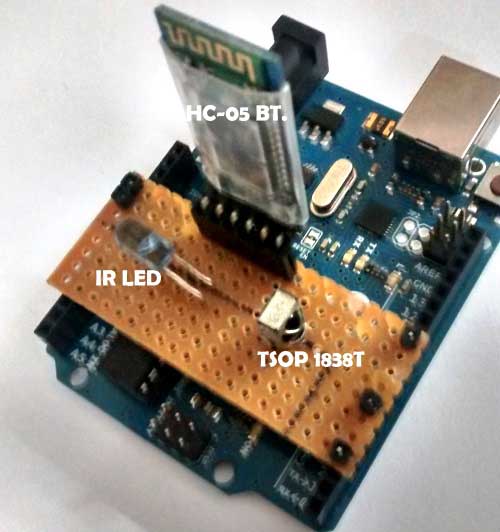
You can either build the custom shield or can directly connect the components to the Arduino as shown in the ‘Circuit Diagram’ in below section.
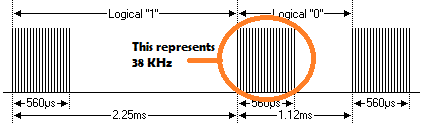
Before moving forward let us first discuss about ‘how the IR remotes work’. Most of the IR remotes work around 38 KHz frequencies (this is the reason why I have chosen 1838T). On further involving into this topic one will recognize that there’s no fixed representation for zeros and ones in these IR data transmission methods. These codes make use of various encoding techniques which we study in our engineering syllabus (since I am an electronics engineering student). The significance of 38 KHz is that it is the frequency at which signal oscillates when logically high i.e. this is the carrier frequency of the signal. Have a look at the picture below; this is an example of NEC Protocol. This will make your concept more clear:
So here’s how this IR Blaster works; a Android Phone with the custom made Android App sends the signal to Arduino circuit over Bluetooth, further the Arduino receives the signal through TSOP-IR receiver (1838T) and analyses it. Then Arduino commands the IR LED to blink in a particular pattern, corresponding to the button pressed on that Android Device App. This blinking pattern is captured by TV or Set-Top box’s IR receiver and it follows the instruction accordingly like changing the channel or increasing the volume.
But before that we need to decode the existing remotes. As mentioned earlier, in this project I have made use of two remotes, one which communicates with the TV while another is for the Set-top box connected to TV.
Circuit Diagram:

Decoding IR Remote Control Signals using Arduino:
The Arduino board here works in two phases, one is when you are using it to decode IR codes from remote and another is when you are using it as the IR blaster device.
Let us talk about the first phase. Now to decode the IR button codes, I have made use of Ken Shirriff’s IRremote header file. This header file has many predefined examples/codes just to make it easier for us to work with IR codes:
- You first need to download and install the IR remote library from here https://github.com/z3t0/Arduino-IRremote.
- Unzip it, and place it in your Arduino ‘Libraries’ folder. Then rename the extracted folder to IRremote.
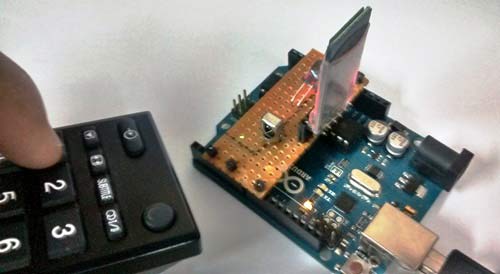
- Then burn the below provided code into Arduino, plug-in the custom shield as shown above and place a remote to be decoded in front of the TSOP IR receiver. Open up the serial monitor corresponding to this Arduino and press any desired button from the remote. You’ll see some information displayed over the terminal, this information involves the type of code, its value and the amount of bits involved with it. Here’s how it looks like:
#include <IRremote.h>
const int RECV_PIN = 6;
IRrecv irrecv(RECV_PIN);
decode_results results;
void setup()
{
  Serial.begin(9600);
  irrecv.enableIRIn(); // Start the receiver
  irrecv.blink13(true);
}
void loop() {
  if (irrecv.decode(&results)) {
    if (results.decode_type == NEC) {
      Serial.print("NEC ");
    } else if (results.decode_type == SONY) {
      Serial.print("SONY ");
    } else if (results.decode_type == RC5) {
      Serial.print("RC5 ");
    } else if (results.decode_type == RC6) {
      Serial.print("RC6 ");
    } else if (results.decode_type == UNKNOWN) {
      Serial.print("UNKNOWN ");
    }
    Serial.print("  ");
    Serial.print(results.value, HEX);
    Serial.print("  ");
    Serial.println(results.bits);
    irrecv.resume(); // Receive the next value
  }
}
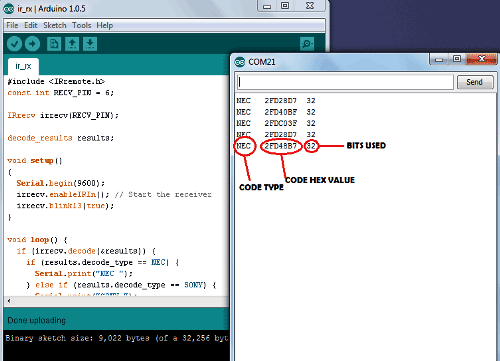
Once you are done with the desired decoding part, note down all the decode values and other information with their corresponding button name pressed. This will serve as a database for the next phase of Arduino. The above program is taken from IRremote library’s ‘examples’ folder, you can check out more examples to learn more about using the IR remote. So that’s how we decoded the IR remote output.
Now burn the Code, given in Code section at the end, onto this same board. Congratulations, you are done with the first half of this project.
Building the Android App for IR Blaster:
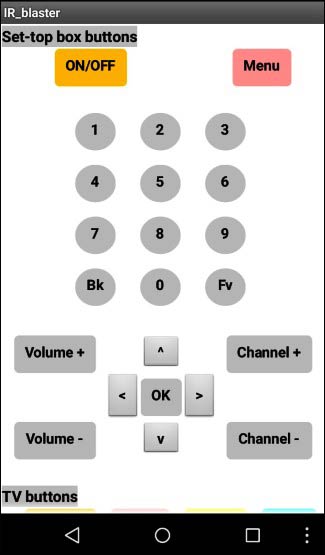
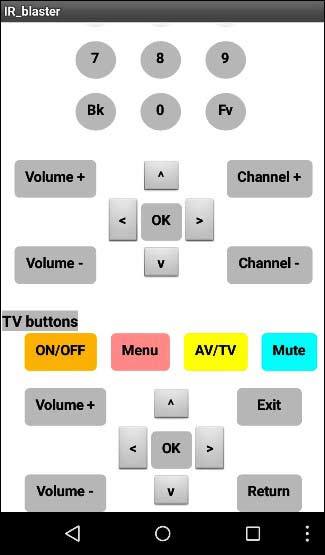
Here comes the second half, the Android App making. I simply prefer using MIT’s APP inventor-2 for making such kind of apps. If you are an amateur in Android coding, this will save your time and provide good results. The main components used in making of this app are not much, just few buttons and a Bluetooth client package. While coding the app, provide the corresponding text to be sent for each button pressed on the screen which would ask Arduino to blink IR LED in the same manner as it would have been done by the individual remote; also make sure that you provide the correct address of your Bluetooth HC-05 module. This is how the final App will look in your Android Smart Phone:
Here is the step by step process to build the app:
STEP 1:
Log on to this link: ai2.appinventor.mit.edu, or try and search out MIT appinventor-2 on Google. Signing-in to AI2 requires a Google account, so if you don’t have, create one.
STEP 2:
Once you log-in with your Google account, you’ll be redirected to AI2 working webpage, which looks like this:
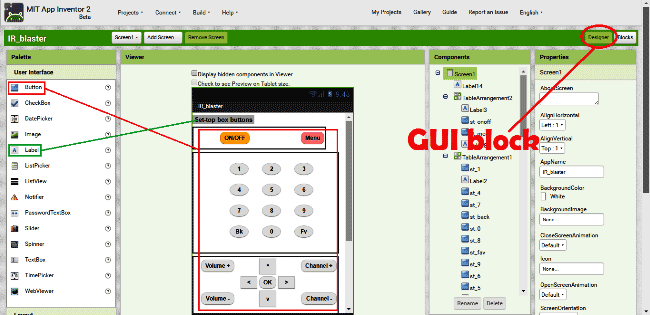
Start a new project by clicking “Projects” tab at the top and select “Start New Project”. When you are done with the naming part and all, a blank screen will be displayed to you in which you can place buttons and text as shown above. This is the GUI screen, in which you decide how the app would look like to a user.
To use a button package, select “Button” tab on the left side of the screen under “User Interface” section. Just drag any package from left-side menu and drop it onto the working screen. Similarly to display any text related stuff, make use of “Label” package.
STEP 3:
After arranging all your buttons and labels, now it’s time to make a code for this app. But before that we need to select a Bluetooth package as well for communicating with the Arduino.
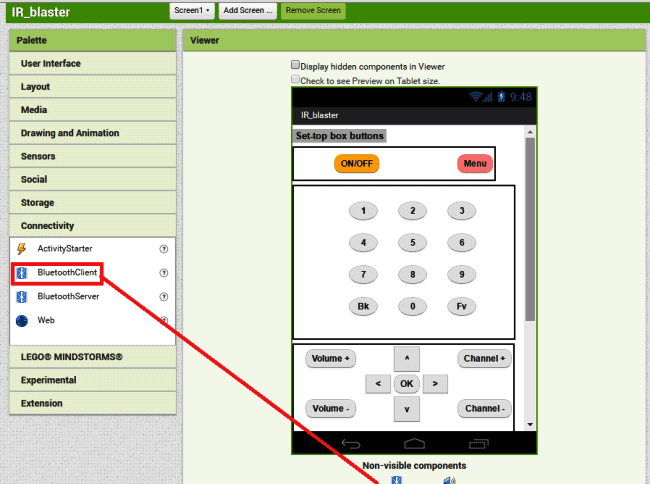
You’ll notice that this package is not displayed on the screen rather it comes under “Non-visible Components”. These are the components that have no significance in GUI make-up.
STEP 4:
Next comes the coding section, in which you’ll define the function for components that you have selected and you want to work with.
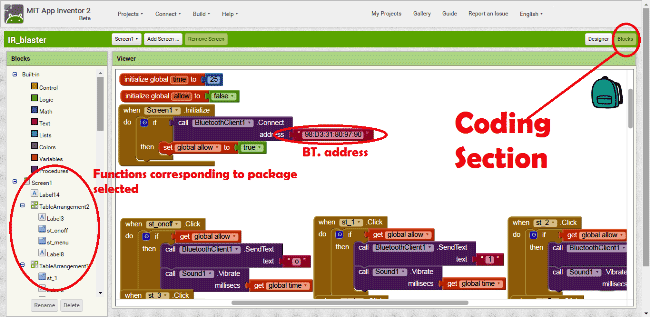
On the left side of screen you’ll notice all those packages that you have selected in the GUI section. The image above shows what all components are there in a particular package that you can make use of. Also notice that Bluetooth module’s address needs to be provided in a textual format.
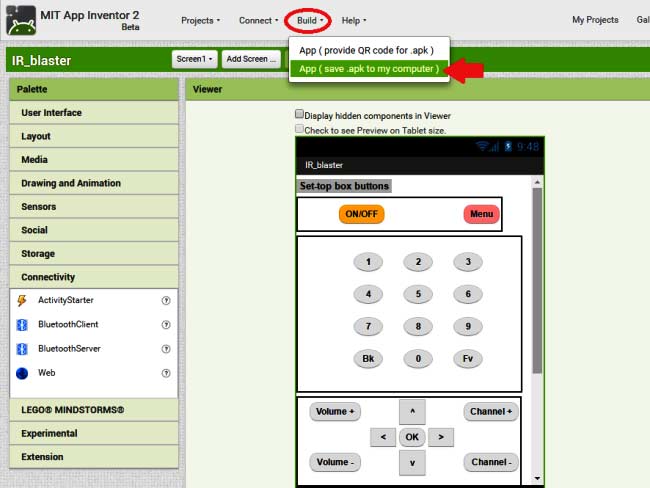
SETP 5:
When you feel that app is ready to be used and there are no errors as well, click on the “Build” tab as shown above and select the second option. This will download your own created app, onto the computer, in “.apk” format. Then just transfer this .apk file to any Android device and click on it to install.
So this is how you can control any IR remote controlled device with your Smart phone, you just need to decode the remote of any appliances which you want to control with your Phone and replace the decoded HEX code of remote buttons in the Arduino code.
Complete Project Code
#include <IRremote.h>
#include <SoftwareSerial.h>
IRsend irsend;

SoftwareSerial mySerial(9,10); // RX, TX
char ch;
int i=0;

void setup()
{
//  Serial.begin(9600);
  mySerial.begin(9600);
}
void loop()
{
  ch=mySerial.read();

  // TV buttons: ON/OFF, Mute, AV/TV, Vol+, Vol-, OK, UP, Down, Left, Right, Menu, Exit, Return
  // Set-top box buttons: ON/OFF, 1, 2, 3, 4, 5, 6, 7, 8, 9, 0, V+, V-, Ch+, Ch-, Back, OK, Up, Down, Left, Right, Menu, Fav
  switch(ch)
  {
    //TV
    case 'O':
    irsend.sendNEC(0x2FD48B7, 32);
    break;
    case 'X':
    irsend.sendNEC(0x2FD08F7, 32);
    break;
    case 'A':
    irsend.sendNEC(0x2FD28D7, 32);
    break;
    case '=':
    irsend.sendNEC(0x2FD58A7, 32);
    break;
    case '-':
    irsend.sendNEC(0x2FD7887, 32);
    break;
    case 'K':
    irsend.sendNEC(0x2FD847B, 32);
    break;
    case 'U':
    irsend.sendNEC(0x2FD9867, 32);
    break;
    case 'D':
    irsend.sendNEC(0x2FDB847, 32);
    break;
    case 'L':
    irsend.sendNEC(0x2FD42BD, 32);
    break;
    case 'R':
    irsend.sendNEC(0x2FD02FD, 32);
    break;
    case 'M':
    irsend.sendNEC(0x2FDDA25, 32);
    break;
    case 'E':
    irsend.sendNEC(0x2FDC23D, 32);
    break;
    case 'B':
    irsend.sendNEC(0x2FD26D9, 32);
    break;

    //Set-top box
    case 'o':
    irsend.sendNEC(0x80BF3BC4, 32);
    break;
    case '1':
    irsend.sendNEC(0x80BF49B6, 32);
    break;
    case '2':
    irsend.sendNEC(0x80BFC936, 32);
    break;
    case '3':
    irsend.sendNEC(0x80BF33CC, 32);
    break;
    case '4':
    irsend.sendNEC(0x80BF718E, 32);
    break;
    case '5':
    irsend.sendNEC(0x80BFF10E, 32);
    break;
    case '6':
    irsend.sendNEC(0x80BF13EC, 32);
    break;
    case '7':
    irsend.sendNEC(0x80BF51AE, 32);
    break;
    case '8':
    irsend.sendNEC(0x80BFD12E, 32);
    break;
    case '9':
    irsend.sendNEC(0x80BF23DC, 32);
    break;
    case '0':
    irsend.sendNEC(0x80BFE11E, 32);
    break;
    case '+':
    irsend.sendNEC(0x80BFBB44, 32);
    break;
    case '_':
    irsend.sendNEC(0x80BF31CE, 32);
    break;
    case 'C':
    irsend.sendNEC(0x80BF19E6, 32);
    break;
    case 'c':
    irsend.sendNEC(0x80BFE916, 32);
    break;
    case 'b':
    irsend.sendNEC(0x80BF43BC, 32);
    break;
    case 'k':
    irsend.sendNEC(0x80BF738C, 32);
    break;
    case 'u':
    irsend.sendNEC(0x80BF53AC, 32);
    break;
    case 'd':
    irsend.sendNEC(0x80BF4BB4, 32);
    break;
    case 'l':
    irsend.sendNEC(0x80BF9966, 32);
    break;
    case 'r':
    irsend.sendNEC(0x80BF837C, 32);
    break;
    case 'm':
    irsend.sendNEC(0x80BF11EE, 32);
    break;
    case 'f':
    irsend.sendNEC(0x80BFA35C, 32);
    break;
  }
 }
Comments
kindly add Android app.. with code or apk file. or full video to develop app. it will helpful to my project. thank you...
kindly add Android app.. with code or apk file. or full video to develop app. it will helpful to my project. thank you...
Hi, When I try attach the IR receiver, the "L" light goes blank. After trying to adjust the IR receiver, then the "L" light switches on and the IR signals get transmitted to the serial monitor. But there are multiple IR signals transmitted for single button.Please help. I used TSOP1738.
Can u please provide the .aia file for the app.
how should i connect it to the tv?
Please provide the app I'm unable to design that app
Pl. share the app code too.
Thanks for your Project idea, I succesfully done my project for Set top Box Remote (for TV Remote have some small issue). Androide App also coded and created for both Set-top-box and TV Remotes through MIT website. Now my Smart phone is being communicated with set-top-box without its Remote. 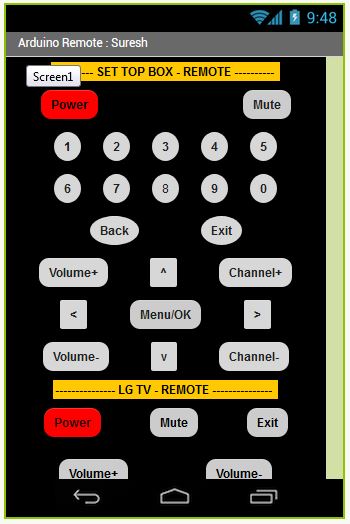
But I'm facing some communication issue for TV remote. TV Remote Hex code was decoded and tested for code mismatch by pressing number of times, getting same hex code ok. I have some issue over TV Remote. eg., while pressing TV remote 'mute' button set-top-box 'mute' is responding even though hex code is different. can you please help reg. this issue. I'm bit new to Arduino.
If the hex code of the set-up box and TV are different, then there is no way your TV would respond for your set-up box remote code.
I think there is some mistake on the programming side
I want to make this project but im not exactly getting it

A doubt, and there direct it the led to the TV receiver? to call etc?