
Thousands of lives are being lost every year due to IEDs (improvise explosive devices). IEDs were responsible for approximately 63% of coalition deaths in Iraq. An IED consists of a switch (activator), an initiator (fuse), container (body), charge (explosive), and a power source (battery) or manual ignition. Not every IED can be electronically diffuse but involves a great risk of touch explosion. so here comes the into play (MECV) Mobile Explosive Containment Vessels. But the challenging factor is weight to the mobility ratio. Generally, these vessels have a thickness from 25mm to 40 mm made of high-speed steel (HSS) which makes them too bulky for mobility. Finding the alternative, we can reduce the thickness of these Mobile Explosive Containment Vessels by replacing the steel thickness with a composite layer of non -Newtonian fluid which acts as a shock absorber. To do so, many factors need to be considered like the explosion pressure, time period, shockwave, etc. as the system involves dynamic forces. This is build with arduino uno. You can check out our previuosly build arduino based project.
Component Required for Disposing IED
- Arduino UNO,
- force sensor,
- jumper wires,
- breadboard.
Software
- Arduino IDE
Hardware and Software Selection
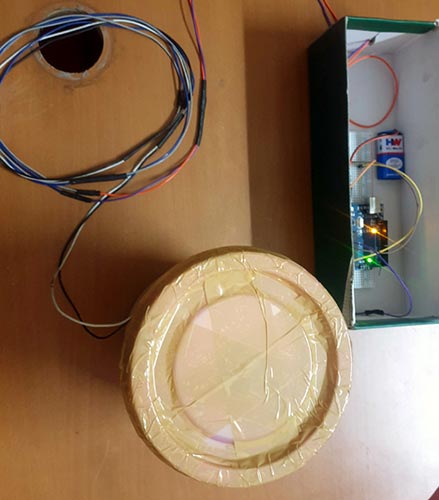
We have tried many hardwares like pressure sensors, pressure gauge. From all of this, force sensor is prefect to measure the impact of blast. and we have used Arduino IDE for admin/uploading the code to Arduino Uno.
IED Disposing Circuit Diagram
We have connected force sensor to Arduino Uno give it power by 9volt batteries.

General Calculations
Before the experiment is carried out environmental parameters are collected which would be used further for the design calculation. Material data and specifications are collected. Generally, the sutli bomb contains 25 grams of gun powder having 3 Mega Joules of energy per 1 kg that equals 3000 joules per 1 gram. By using Broads equation, we can estimate the pressure of the explosion.
2 KNO3+ S + 3 C → K2S + N2+ 3 CO2.
Atmospheric pressure (p) = 1.01 bar Chamber pressure (p2) Volume of container 1 =? = 0.003 m3 (cooker 3lts) Blastwave pressure when one sutli bomb containing 25g gunpowder explodes in the pressure cooker of 3liters (3000 X 25grams) = 75000 joules =0.7500 m3 bar As per brodes equation.
// Include Libraries
#include "Arduino.h"
#include "FSR.h"
// Pin Definitions
#define FSR_PIN_1	A3
// Global variables and defines
// object initialization
FSR fsr(FSR_PIN_1);
// define vars for testing menu
const int timeout = 10000;       //define timeout of 10 sec
char menuOption = 0;
long time0;
// Setup the essentials for your circuit to work. It runs first every time your circuit is powered with electricity.
void setup()
{
    // Setup Serial which is useful for debugging
    // Use the Serial Monitor to view printed messages
    Serial.begin(9600);
    while (!Serial) ; // wait for serial port to connect. Needed for native USB
    Serial.println("start");
    menuOption = menu();
}
// Main logic of your circuit. It defines the interaction between the components you selected. After setup, it runs over and over again, in an eternal loop.
void loop()
{
    if(menuOption == '1') {
    // Force Sensitive Resistor 0.5'' - Test Code
    // Read FSR resistance value. try also fsr.getResistance()
    // For more information see Sparkfun website - www.sparkfun.com/products/9375
    // Note, the default Vcc and external resistor values for FSR calculations are 5V ang 3300Okm, if you are not
    //       using these default valuse in your circuit go to FSR.cpp and change default values in FSR constructor
    float fsrForce = fsr.getForce();
    Serial.print(F("Force: ")); Serial.print(fsrForce); Serial.println(F(" [g]"));
    }
    if (millis() - time0 > timeout)
    {
        menuOption = menu();
    }
}
// Menu function for selecting the components to be tested
// Follow serial monitor for instrcutions
char menu()
{
    Serial.println(F("\nWhich component would you like to test?"));
    Serial.println(F("(1) Force Sensitive Resistor 0.5''"));
    Serial.println(F("(menu) send anything else or press on board reset button\n"));
    while (!Serial.available());
    // Read data from serial monitor if received
    while (Serial.available())
    {
        char c = Serial.read();
        if (isAlphaNumeric(c))
        {
            if(c == '1')
    			Serial.println(F("Now Testing Force Sensitive Resistor 0.5''"));
            else
            {
                Serial.println(F("illegal input!"));
                return 0;
            }
            time0 = millis();
            return c;
        }
    }
}