

You have seen Propellers in Aircrafts or in marine ships, if not in real then in movies for sure. In this session we are going to design a Propeller Display with Arduino, LEDs and a DC motor. In this Propeller Display, text will appear to be rotating in propeller fashion in a circular shape.
The propeller display also called as POV display is in a way like LED Matrix. It contains 8 LEDs (Light Emitting Diodes) which are arranged in the form of an 8*1 matrix (8 rows and 1 column). They are arranged in the form of a ladder one over the other. These 8 LEDs can be made to display any content like text, numbers, symbols etc. This is achieved by Perception of Vision (POV), in which many still images are moved quickly one by one in a sequence, which gives a perception of animation or a moving image. How this is done is explained in the tutorial, we have also built a colorful version of this called ws2812b POV display and a advanced POV display using ESP32 you can check them out if intrested.
Components Required:
- Arduino Uno
- DC Motor
- +3.6V LI-ION battery
- LED (8 pieces)
- 1KΩ resistor (8 pieces)
Construction of Propeller Display:
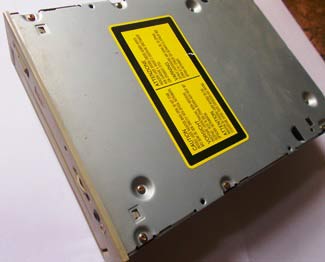
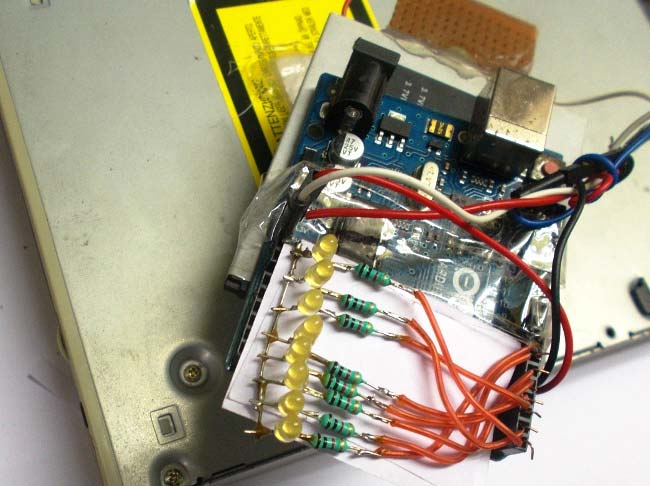
First take a stable base; I used a old PC DVD DRIVE which was lying around. You can get a wooden plank or a cardboard box. Then make a hole in the middle of DVD Drive (base) and insert the DC motor axis in it. Make sure the hole is tight enough to hold the motor and motor can rotate freely. I used Feviquick to put the axis in place.
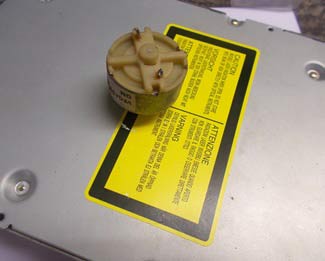
Support the top of Motor to equate the uneven bumps. I used a dot board over it and used quick glue again to stick it with DC motor.
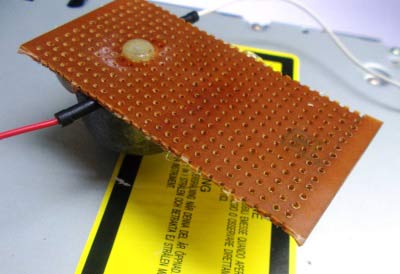
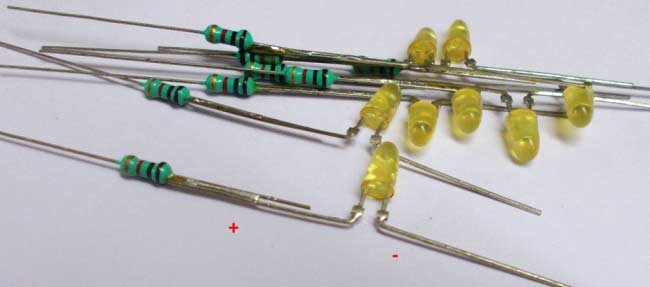
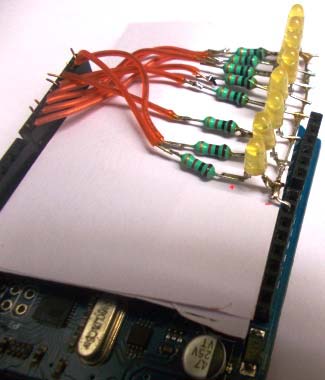
Attach the LI-ION battery on top. If you don’t have LI-ION battery of same size, just leave it. After that take each LED and test it with button cell or any other source. Then take some resistors and solder them with LEDs as per the picture and circuit diagram shown below.
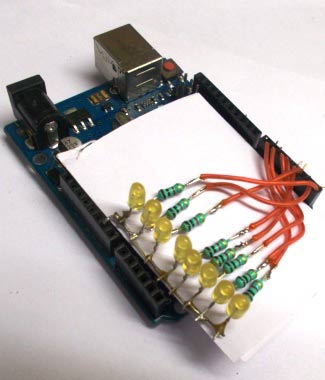
Connect the soldered LEDs and resistors with Arduino UNO as shown in below figure and circuit diagram.
Mount the UNO on to the top of DC MOTOR and secure it with the help of cello tape to finish the setup. So the final Propeller setup will look like below:
Circuit and Working Explanation:
Circuit of Arduino controlled POV Display is very simple, we simply connected 8 LEDs with Arduino Uno as per circuit diagram below.
PORTD, PIN0 ------------------LED8 POSITIVE TERMINAL
PORTD, PIN1 ------------------ LED7 POSITIVE TERMINAL
PORTD, PIN2 ------------------ LED6 POSITIVE TERMINAL
PORTD, PIN3 ------------------ LED5 POSITIVE TERMINAL
PORTD, PIN4 ------------------ LED4 POSITIVE TERMINAL
PORTD, PIN5 ------------------ LED3POSITIVE TERMINAL
PORTD, PIN6 ------------------ LED2 POSITIVE TERMINAL
PORTD, PIN7 ------------------ LED1POSITIVE TERMINAL

Like we add more columns in 8x8 LED Matrix to extend the display, in the same way instead of adding more LED COLUMNS we move the first LED COLUMN to the second LED COLUMN place by using the motion of DC MOTOR.
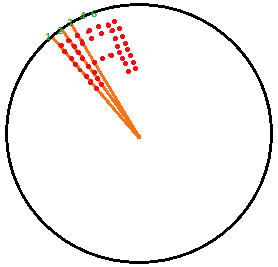
In order to understand the whole situation, say we want ‘A’ to be displayed by the propeller display. Consider the LED ‘needle’ is at POSITION1 at first as shown in figure below. LED Needle is the Column of 8 LEDs.
Now we will power the motor and it will start running.
At t=0ms: the needle will be at POSITION 1. At this position all the eight LEDs, from TOP LED (MSB) to BOTTOM LED (LSB), are powered on.
At t=1ms: the needle will be at POSITION 2. Same as Position 1, at this position all the eight LEDs, from TOP LED (MSB) to BOTTOM LED (LSB), are powered on.
At t=2ms: the needle will be at POSITION 3. At this position only LED7, LED6 & LED3 stay ON and remaining LEDs are turned OFF.
At t=3ms: the needle will be at POSITION 4. Same as Position 3, at this position only LED7, LED6 & LED3 stay ON and remaining LEDs are turned OFF.
At t=4ms: the needle will be at POSITION 5. Same as Position 3 & 4, at this position only LED7, LED6 & LED3 stay ON. Remaining LEDs are turned OFF.
At t=5ms: the needle will be at POSITION 6. At this position all the eight LEDs are again powered on, TOP led (MSB) to BOTTOM led (LSB) are turned ON.
At t=6ms: the needle will be at POSITION 7. Same as Position 6, at this position all the eight LEDs remain on.
As explained above, we will turn ON appropriate LEDs at the appropriate Needle Positions to display the necessary character. If the speed of movement of needle is slow we can see each LED column separately. But when the speed of motor is high and needle is moving too fast then the display will be seen as continuously showing “A” character.
Programming Explanation:
We have programmed the Arduino to power the appropriate LED at appropriate times while rotating so that LED column will show the text “CIRCUIT DIGEST” in circular position.
Programming of the Propeller display is easily understandable. A Char Array of 26x8 has been taken as volatile char ALPHA[26][8]. This Array consists 8 positions of the needle to display each of the 26 alphabets that makes it array of 26x8. 26 rows in Array represent the 26 alphabets and 8 columns in each row represent the eight position of needle to display the character while rotating. Now each cell consist a binary number which represents the on/off status of 8 LEDs in a particular position of Needle. Remember needle here refers to line of 8 LEDs connected to Arduino as explained above.
Now you just need to rotate the DC motor and use a ‘for loop’ with eight iterations to display a character. Like if you want to display 10 characters then you need to run 10 ‘for loops’ with eight iterations in each. So we have used 13 for loops to display the text CIRCUIT DIGEST. Check the full program code below with a demonstration video.
So this is how you can create a beautiful Persistence of Vision (POV) illusion with Arduino like a Text is rotating like a Propeller.
Complete Project Code
volatile char ALPHA[26][8]={{0,0b01111111,0b11111111,0b11001100,0b11001100,0b11001100,0b11111111,0b01111111},
    {0,0b00111100,0b01111110,0b11011011,0b11011011,0b11011011,0b11111111,0b11111111},
    {0,0b11000011,0b11000011,0b11000011,0b11000011,0b11100111,0b01111110,0b00111100},
    {0,0b01111110,0b10111101,0b11000011,0b11000011,0b11000011,0b11111111,0b11111111},
    {0,0b11011011,0b11011011,0b11011011,0b11011011,0b11011011,0b11111111,0b11111111},
    {0,0b11011000,0b11011000,0b11011000,0b11011000,0b11011000,0b11111111,0b11111111},
    {0b00011111,0b11011111,0b11011000,0b11011011,0b11011011,0b11011011,0b11111111,0b11111111},
    {0,0b11111111,0b11111111,0b00011000,0b00011000,0b00011000,0b11111111,0b11111111},
    {0b11000011,0b11000011,0b11000011,0b11111111,0b11111111,0b11000011,0b11000011,0b11000011},
    {0b11000000,0b11000000,0b11000000,0b11111111,0b11111111,0b11000011,0b11001111,0b11001111},
    {0,0b11000011,0b11100111,0b01111110,0b00111100,0b00011000,0b11111111,0b11111111},
    {0b00000011,0b00000011,0b00000011,0b00000011,0b00000011,0b00000011,0b11111111,0b11111111},
    {0b11111111,0b11111111,0b01100000,0b01110000,0b01110000,0b01100000,0b11111111,0b11111111},
    {0b11111111,0b11111111,0b00011100,0b00111000,0b01110000,0b11100000,0b11111111,0b11111111},
    {0b01111110,0b11111111,0b11000011,0b11000011,0b11000011,0b11000011,0b11111111,0b01111110},
    {0,0b01110000,0b11111000,0b11001100,0b11001100,0b11001100,0b11111111,0b11111111},
    {0b01111110,0b11111111,0b11001111,0b11011111,0b11011011,0b11000011,0b11111111,0b01111110},
    {0b01111001,0b11111011,0b11011111,0b11011110,0b11011100,0b11011000,0b11111111,0b11111111},
    {0b11001110,0b11011111,0b11011011,0b11011011,0b11011011,0b11011011,0b11111011,0b01110011},
    {0b11000000,0b11000000,0b11000000,0b11111111,0b11111111,0b11000000,0b11000000,0b00000000},
    {0b11111110,0b11111111,0b00000011,0b00000011,0b00000011,0b00000011,0b11111111,0b11111110},
    {0b11100000,0b11111100,0b00011110,0b00000011,0b00000011,0b00011110,0b11111100,0b11100000},
    {0b11111110,0b11111111,0b00000011,0b11111111,0b11111111,0b00000011,0b11111111,0b11111110},
    {0b01000010,0b11100111,0b01111110,0b00111100,0b00111100,0b01111110,0b11100111,0b01000010},
    {0b01000000,0b11100000,0b01110000,0b00111111,0b00111111,0b01110000,0b11100000,0b01000000},
    {0b11000011,0b11100011,0b11110011,0b11111011,0b11011111,0b11001111,0b11000111,0b11000011}};
void setup()
{
    DDRD = 0xFF;
    //a,b,c,d,e,f,g,...z
}
void loop()
{
    for (int i=7;i>0;i--)
    {
      PORTD = ALPHA[2][i];
      delay(1);
      PORTD=0;
    }
    delay(2);
    for (int i=7;i>0;i--)
    {
      PORTD = ALPHA[8][i];
      delay(1);
      PORTD=0;
    }
     delay(2);
    for (int i=7;i>0;i--)
    {
      PORTD = ALPHA[17][i];
      delay(1);
      PORTD=0;
    }
     delay(2);
    for (int i=7;i>0;i--)
    {
      PORTD = ALPHA[2][i];
      delay(1);
      PORTD=0;
    }
     delay(2);
    for (int i=7;i>0;i--)
    {
      PORTD = ALPHA[20][i];
      delay(1);
      PORTD=0;
    }
     delay(2);
    for (int i=7;i>0;i--)
    {
      PORTD = ALPHA[8][i];
      delay(1);
      PORTD=0;
    }
     delay(2);
    for (int i=7;i>0;i--)
    {
      PORTD = ALPHA[19][i];
      delay(1);
      PORTD=0;
    }
    delay(2);
    for (int i=7;i>0;i--)
    {
      PORTD = ALPHA[3][i];
      delay(1);
      PORTD=0;
    }
    delay(2);
    for (int i=7;i>0;i--)
    {
      PORTD = ALPHA[8][i];
      delay(1);
      PORTD=0;
    }
    delay(2);
    for (int i=7;i>0;i--)
    {
      PORTD = ALPHA[6][i];
      delay(1);
      PORTD=0;
    }
    delay(2);
    for (int i=7;i>0;i--)
    {
      PORTD = ALPHA[4][i];
      delay(1);
      PORTD=0;
    }
    delay(2);
    for (int i=7;i>0;i--)
    {
      PORTD = ALPHA[18][i];
      delay(1);
      PORTD=0;
    }
    delay(2);
    for (int i=7;i>0;i--)
    {
      PORTD = ALPHA[19][i];
      delay(1);
      PORTD=0;
    }
     delay(19);
}
Comments
If you carefully see in one
If you carefully see in one picture, battery is just below the Arduino and atleast 1000RPM speed is needed to get this POV effect.
Propeller led code
Hey Dilip
I making this project and get very good knowledge by your blog but I didn't understand the code can you please tell me the code to print "Hello world" to display on a led.
I am using ardiuno uno for this project
Thanks in advance
Cool stuff
In program where to change the alphabet , plz tell ... Willing to do this project. Thanks in advance
Hi vinayak,
Hi vinayak,
You use the same program with small changes to display your text. This changes has to be made to the line
PORTD = ALPHA[2][i];
which can be found in the void loop().
The default program display "CIRCUIT DIGEST"
So the first for loop display "C" by using the above line
Notice the number 2. This indicates that the 2nd Alpabet has to be displayed. (0 is for A, 1 is for B and 2 is for C)
Similarly to display "I" we use he line PORTD = ALPHA[8][i]; in the next for loop since "I" is the 8th alphabet.
You can just change these lines and display your preferred text.
Thanks
Instead of lithium ion
Instead of lithium ion battery can we use any alternate battery source to power up the Arduino.
Yes but lithium reduces the
Yes but lithium reduces the weight also does not occupy space. So if your motor is powerful enough you can use a 9V or 12V battery also
propeller clock
I making this project and get very good knowledge by your blog but I didn't understand the code can you please tell me the code to print my name to display on a led.
I have used arduino uno.
Hi pavithraa,
Hi pavithraa,
I am just pasting the comment from top
You use the same program with small changes to display your text. This changes has to be made to the line
PORTD = ALPHA[2][i];
which can be found in the void loop().
The default program display "CIRCUIT DIGEST"
So the first for loop display "C" by using the above line
Notice the number 2. This indicates that the 2nd Alpabet has to be displayed. (0 is for A, 1 is for B and 2 is for C)
Similarly to display "I" we use he line PORTD = ALPHA[8][i]; in the next for loop since "I" is the 8th alphabet.
You can just change these lines and display your preferred text.
Thanks
These resistors are called
These resistors are called current limiting resistors. For LED's normally a value of 1k is used. The values is decided based on how much current you wanna allow through the LED.
very good sir but i have a
very good sir but i have a one dought i.e., what is the speed of motor and if i change the speed of motor then its work or not
nice ..may i know how you
nice ..may i know how you calculated delay of led strip for displaying
Appreciation
I was always interested in this kind of a project. Thanks so much. Keep up the good work
Have you already come up with
Have you already come up with the analog clock?
Please send me the code for
Please send me the code for displaying name ARUN with led

Hi Dilip,
Great project and well explained!!
But, how did you use a 3.6V 18650 cell to power up arduino?
Where is the power source located in your project?
I guess your power source is rotating with the LEDs, Also what is the minimum RPM that would be required to achive POV.
Thanks in advance