

Nowadays, there are evolving projects in robotics, and many hobbyists are creating their own robots. For these Robots, displays are a vital component of an interactive user interface. If you're someone searching for ways to create amazing eye animations on an OLED display using the Arduino environment, you've likely encountered confusion due to the multitude of internet search results. Moreover, you might be uncertain about the reliability of the code and libraries you've found. Here, we've simplified this process.
After conducting research, we've identified the top five methods that can assist in achieving this task. This blog provides a comparison to help you get started.
This project can be built with easily available components such as Arduino Uno and an OLED display.
Components Required to Build Arduino OLED Eyes
The components used to build the Arduino OLED Eyes are listed below.
- Arduino UNO
- OLED Display - 0.96” 128*64
- Breadboard
- Jumper Wires - Male to Male
- Programming cable - USB-B to USB-A

Circuit Diagram to Interface OLED Display with Arduino UNO
As the OLED display uses the I2C protocol for its communication, we are going to utilize the hardware I2C port of the Arduino UNO via its pins A4 for Serial Data and A5 for Serial Clock. You can also check out our blog to know how to use oled displays with Arduino if you want to know more.
| OLED | Arduino UNO |
| GND | GND |
| VDD | 3V3 |
| SCK | A5 |
| SDA | A4 |
Connections are also shown in both the table and diagram below.
This circuit was made using Fritzing.

While building the above circuit, do keep in mind that the operating voltage of the OLED display is 3.3V, so the VDD pin must be connected to the 3.3V output of the Arduino UNO. It's best to use a logic level shifter between the data pins to increase the lifespan of the display, as some older displays may not have 5V tolerance.

To build the above circuit I have used my breadboard and Arduino UNO, you can see the set-up in the image below. To power the Arduino, I am using the programming cable and powering it with my laptop.
We will be using the same set-up shown above to display all kinds of OLED eyes and check out how it works, we will also discuss the pros and cons of each type to understand which might be the right option for you. Now, lets start with our first option.
Option 1: Eye Animation on OLED Display by Intellar
The first approach is by intellar. The Source code for this Eye Animation on OLED Display can be found in their git Repo. We have used the same code on our set-up and you can see the results in the GIF video below.
As you can see, they have introduced some functions to achieve these cool-looking eye animations, which can be easily utilized by anyone out there. Speaking about this code, it uses simple shapes to mimic the eyes, featuring three moods (Normal, Sleep, Smile), multiple eye positions, and blinking. We will discuss the code functions shortly below. First, let's discuss the pros and cons.
Pros:
It's easy to use with its simple functions. There are functions to adjust the eye position, enabling it to look in multiple directions like right, left, top, bottom, and all corners. One of the best features is the ability to draw and generate eyes with modifiable height and width by the user.
Cons:
Talking about moods, there are only three, which might not be enough for some projects.
Code Explanation for Intellar OLED Eyes
The function "draw_eyes" draws the eyes based on the last updated values of the variables: left_eye_x, left_eye_width, left_eye_y, left_eye_height, right_eye_x, right_eye_width, right_eye_y, right_eye_height, and ref_corner_radius, which are modified by the rest of the program.
void draw_eyes(bool update = true) {
  display.clearDisplay();
  //draw from center
  int x = int(left_eye_x - left_eye_width / 2);
  int y = int(left_eye_y - left_eye_height / 2);
  display.fillRoundRect(x, y, left_eye_width, left_eye_height, ref_corner_radius, SSD1306_WHITE);
  x = int(right_eye_x - right_eye_width / 2);
  y = int(right_eye_y - right_eye_height / 2);
  display.fillRoundRect(x, y, right_eye_width, right_eye_height, ref_corner_radius, SSD1306_WHITE);
  if (update) {
    display.display();
  }
}
Now let's discuss the available functions used to modify the shape of the eyes:
- "center_eyes" - This function is used to move the eyes to the center of the screen.
- "blink" - This function creates the animation of the eyes blinking. You can adjust the speed of the blink by passing the height parameter, which determines how much the eyes shrink during the blink. The height parameter should not be greater than the eye's height mentioned above.
- "sleep" - This function simply draws a thin line that might resemble closed eyes, giving the appearance of sleeping.
- "wakeup" - This function draws the animation of eyes opening from the sleep state created by the previous function.
- "happy_eye" - This function changes the shape of the eye to appear happy.
- "saccade" - This function is used to change the position of the eye with a quick movement. It does not change the size of the eye and maintains the eye's appearance in the new position. You should call the function with negative values to revert the eye back to its original position.
- "move_right_big_eye" - This function shows the animation of the eyes looking right, where the eyes move to the right along with changing their shapes.
- "move_left_big_eye" - Similar to the above function, this moves the eyes to the left.
- "move_big_eye" - This is the main function used in the above animations. Passing 1 will move the eyes to the right, and -1 will move them to the left.
void center_eyes(bool update = true) ;
void blink(int speed = 12) ;
void sleep() ;
void wakeup() ;
void happy_eye() ;
void saccade(int direction_x, int direction_y) ;
void move_right_big_eye() ;
void move_left_big_eye() ;
void move_big_eye(int direction) ;
Option 2: Simple Animated Eye Using Arduino by SpiderMaf
This second option was created by SpiderMaf. The author has posted the source code for this project in his Git repo, and he has also uploaded an explanation video about this Animated Eye using Arduino on his YouTube channel. You can refer to the video for the best explanation of the project.
He introduced the concept of circles here with some interesting customizable features. These eyes even have pupils, which is an added benefit as we can achieve precise eye movements. Comparing with others, these functions are compact. Now let's discuss the pros and cons.
Pros:
Every thing was same as the option by intellar, but here the movement of eyes towards corner is not given native. Here the size and position of the eye are adjustable.It has really small function while compared with others. Mainly it has a human feel because of the eyes with pupil.
Cons:
It's also similar to option 1 by intellar.
Code Explanation SpiderMaf’s Simple Eye Animation:
Below are the variables which can be edited according to the needs. The purpose are mentioned as comments.
#define EYE 16 // radius in pixel
#define PUPIL 7 // radius in pixel
#define TICK 500 // 500 ms
#define EXR 35 // X axis Horizontal position of Right Eye
#define EXL 95 // X axis Horizontal position of Left Eye

int vpos = 32;// Y axis - vertical position
Now let's review the available functions:
- "drawEyes": This is the main function responsible for drawing the eyes with the modified current values of position and radius.
- "displayTick": This function manages the delay between every screen data update.
- "Left": This function is used to make the eyes look left.
- "Right": This function is used to make the eyes look right.
- - "Up": This function is used to make the eyes look up.
- - "Down": This function is used to make the eyes look down.
- - "lookLeft": This function makes the eye look left and then return to the center.
- - "lookRight": This function makes the eye look right and then return to the center.
- - "Confuse": This function makes the eyes look confused.
- - "Eyeblink": This function animates the eye blinking.
void drawEyes(int plh, int prh, int plv, int vpos);
void displayTick();
void left(int vpos);
void right(int vpos);
void up(int vpos) ;
void down(int vpos);
void lookLeft(int vpos);
void lookRight(int vpos) ;
void confuse(int vpos) ;
void eyeblink(int vpos) ;
Option 3: Akno by AbdulsalamAbbod
This third option was created by AbdulsalamAbbod. The Source Code for Akno has been posted in the GitHub Repo. Unlike others, this author worked on an open-source robot project, where he utilized a small OLED to serve as the face of his project.
In this method, the author uses rectangular eyes but includes more expressions compared to others. Moreover, utilizing the U8g2lib library, which supports multiple display types, is an added advantage.
Pros:
This method likely includes functions for more expressions like sad, upset, wonder, happy, cute, angry, and suspicious than others. Its easy accessibility across many display types makes it a good fit for tiny, cute hobby robots, and among the lineup, it is notably lightweight.
Cons:
While it is well-suited for robots, it lacks human-like characteristics. And mainly there is no provision for changing the size and position of eyes.
Code Explanation of AbdulsalamAbbod’s Akno:
As discussed before, there are no customizable options like in other methods. Here, there are only functions to display the required expressions.
The functions available are:
- "blink"
- "normal"
- "sad"
- "upset"
- "wonder"
- "happy"
- "cute"
- "angry"
- "suspicious"
- “close”
These functions are used solely to display the corresponding expression animations.
void close() ;
void normal() ;
void blink(int time) ;
void sad() ;
void upset() ;
void wonder() ;
void happy() ;
void cute() ;
void angry() ;
void suspicious() ;
Additionally, there are functions named:
- "downeye"
- "righteye"
- "lefteye"
- "upeye"
These functions show the animation of the eyes moving towards the respective direction and then returning to the normal position.
void downeye();
void righteye();
void lefteye();
void upeye();
Option 4: OLED Moving Eyes Arduino by Vinny
This Fourth option was created by Mr.Vinny. The Source code of OLED Moving Eyes has been posted in his Git Repo. He doesn't stop here, he also has a good explanation video on his YouTube channel and a wonderful blog about this project.
We are not going through the whole process behind this method as the author already did. But I like to give an overview. The main concept behind this method is to draw the bitmap images directly into screens. There was a lot of process in converting the BMP images into c code and Anyone will work fine. We also have a blog that explains this process of “Displaying the BMP images in OLED Display using Arduino” in detail.
Let us discuss the pros and cons.
Pros:
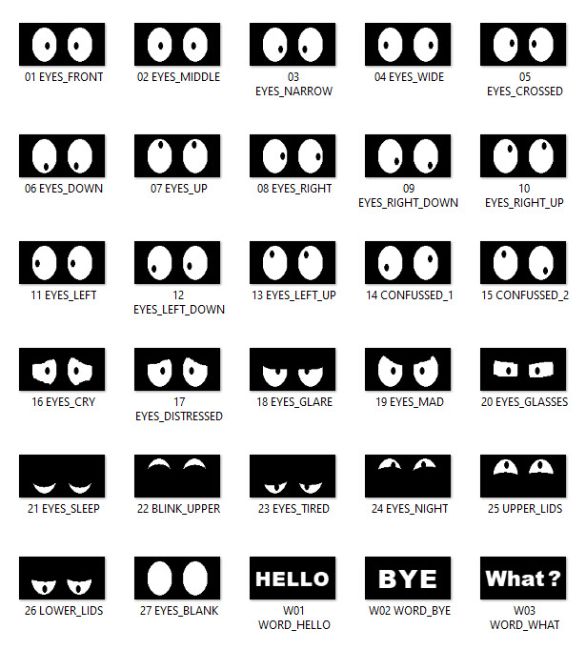
As it depends on the external image for displaying, we can render whatever we what, but even thought the author has a collection 30 expression sets for eyes. In comparing the programming difficulty it’s very easy by simply calling only one function.
Cons:
The Main problem with this method was its memory consumption. For one BMP image’s c data it needs 1K Bytes of data which was really huge. So only few can be displayed using Arduino UNO.
Programming Guidance for Vinny’s OLED Moving Eyes:
You can find the c code of all the expressions made by this author in his repo, simply add that in your main code and by using the drawBitmap function, you can display that image on the OLED screen.
Example:
Consider the Below as the selected c code, just as an example. For Real it will be huge having Several bytes of data, so, I am using ‘…’ here.
static const unsigned char PROGMEM image_data_EYES_FRONTarray[] = {...};
Below is the Function which is used to print the BMP image onto the display. Yes, it’s Simple.
// Displays EYES_FRONT on the screen
  display.drawBitmap(0, 0, image_data_EYES_FRONTarray, 128, 64, 1);
  display.display();
Option 5: Robotic Eye Animations Using Arduino UNO by Picaio:
This second option was created by Picaio. The source code of this project Robotic Eye Animation can be found in his GitHub Repo and he also has a video explaining the Concept of Robotic Eye Animation in his YouTube Channell. You can refer to the video for the best explanation of the project.
Out of the methods discussed, this approach demonstrates a very efficient and intelligent method for robotic eye animation on Arduino UNO. Similar to the previous method, this approach also utilizes the BMP (Bitmap) technique, but in a different way. Instead of generating C code for the entire display's resolution, they managed to generate C code only for the sections corresponding to the eyes. This optimization helps to reduce space and incorporate more expressions within the code.
Additionally, this method includes realistic eye movements such as looking up, down, left, and right, along with various expressions like hugging eyes, normal eyes, sleep eyes, angry eyes, tired eyes, and sad eyes. Unlike other methods, it can achieve any eye position with any mood, providing more versatility and realism in the animation.
Let’s discuss the pros and cons:
Pros:
It offers multiple moods of expression and notably realistic right and left eye movements.Its outstanding feature is simulating natural eye movements during idle time in the program.
Cons:
It may be a little complex for total beginners to understand initially.
Code Explanation Picaio’s Robotic Eye Animations:
Initially, we need to include a header file named “eyes.h”, which consists of bitmap graphics for every mood of the right and left eye individually.
At the end of the code, you can find the following lines used to retrieve the required BMP from the header file. Here is the explanation of the 3-dimensional array named "face":
- "face" is the name of the array.
- The first set of empty brackets ([]) signifies that "face" can have an unspecified number of elements along its first dimension, which corresponds to different moods (there are 6 moods here).
- [3]: This specifies that each element in the first dimension of "face" is a two-dimensional array with exactly 3 elements, representing different eye positions.
- [2]: Each of these 3-element arrays contains another array of 2 elements, representing the two eyes.
This structure allows for organizing and accessing the bitmap graphics for different eye moods and positions efficiently within the program.
// [mood][pos][l/r]
const unsigned char *face[][3][2]={
 { {   eye4,   eye4},{   eye5,   eye5},{   eye6,   eye6} },
 { {   eye1,   eye1},{   eye2,   eye2},{   eye3,   eye3} },
 { {   eye0,   eye0},{   eye0,   eye0},{   eye0,   eye0} },
 { { eye10d, eye10i},{ eye11d, eye11i},{ eye12d, eye12i} },
 { {   eye7,   eye7},{   eye8,   eye8},{   eye9,   eye9} },
 { { eye13d, eye13i},{ eye14d, eye14i},{ eye15d, eye15i} },
};
In the main arduino file, as usual, it includes the necessary files and code to communicate with the display. The following lines in the program can be modified:
● xp: Represents the x-axis position.
● mood: Indicates the current mood.
● XAdjustableStep: Controls the number of pixels to move each time the right or left movement function is called.
int xp = 16; // X axis Position
int mood = 1; // Mood Variable
int XAdjustableStep = 3; // X Position Adjustable Step Count
In the void setup() function, we initialize the serial communication at 115200 baud rate. Additionally, a serial-based function was implemented in void loop() to change the animation each time the 'N', 'M', 'R', 'L' keys are pressed via the Serial Monitor. Here's what each key does:
- N' is for Normal animation.
- 'M' is for Changing Mood.
- 'R' is for moving to the right.
- 'L' is for moving to the left.
This setup is designed for convenience, allowing you to easily use the eye animation functions wherever needed in the project.
Now, connect your Arduino Uno to the computer via USB and start pressing the respective keys in the Serial Monitor to see the demo. This code can be easily modified by the user according to their needs!
Conclusion:
The selection among these options depends purely on the user's personal preference and the requirements of the project. Here's my preference breakdown:
- If you prefer customization, simplicity, lightweight, and basic features, then Option 2 by SpiderMaf would suit you best.
- If you prefer more features, less customization, and the lightest alternative, then Option 3 by AbdulsalamAbbod would be ideal.
- If you plan to design your own user interface (UI), then Option 4 by Vinny is the way to go.
- If you want the eyes to move in all directions with basic moods and lightweight design, then Option 1 by Intellar would be suitable.
- f you need your robot to be more expressive, choose Option 5 by Picaio.
void draw_eyes(bool update = true) {
display.clearDisplay();
//draw from center
int x = int(left_eye_x - left_eye_width / 2);
int y = int(left_eye_y - left_eye_height / 2);
display.fillRoundRect(x, y, left_eye_width, left_eye_height, ref_corner_radius, SSD1306_WHITE);
x = int(right_eye_x - right_eye_width / 2);
y = int(right_eye_y - right_eye_height / 2);
display.fillRoundRect(x, y, right_eye_width, right_eye_height, ref_corner_radius, SSD1306_WHITE);
if (update) {
display.display();
}
}
void center_eyes(bool update = true) ;
void blink(int speed = 12) ;
void sleep() ;
void wakeup() ;
void happy_eye() ;
void saccade(int direction_x, int direction_y) ;
void move_right_big_eye() ;
void move_left_big_eye() ;
void move_big_eye(int direction) ;
#define EYE 16 // radius in pixel
#define PUPIL 7 // radius in pixel
#define TICK 500 // 500 ms
#define EXR 35 // X axis Horizontal position of Right Eye
#define EXL 95 // X axis Horizontal position of Left Eye
int vpos = 32;// Y axis - vertical position
void drawEyes(int plh, int prh, int plv, int vpos);
void displayTick();
void left(int vpos);
void right(int vpos);
void up(int vpos) ;
void down(int vpos);
void lookLeft(int vpos);
void lookRight(int vpos) ;
void confuse(int vpos) ;
void eyeblink(int vpos) ;
void close() ;
void normal() ;
void blink(int time) ;
void sad() ;
void upset() ;
void wonder() ;
void happy() ;
void cute() ;
void angry() ;
void suspicious() ;
void downeye();
void righteye();
void lefteye();
void upeye();
static const unsigned char PROGMEM image_data_EYES_FRONTarray[] = {...};
// Displays EYES_FRONT on the screen
display.drawBitmap(0, 0, image_data_EYES_FRONTarray, 128, 64, 1);
display.display();
// [mood][pos][l/r]
const unsigned char *face[][3][2]={
{ { eye4, eye4},{ eye5, eye5},{ eye6, eye6} },
{ { eye1, eye1},{ eye2, eye2},{ eye3, eye3} },
{ { eye0, eye0},{ eye0, eye0},{ eye0, eye0} },
{ { eye10d, eye10i},{ eye11d, eye11i},{ eye12d, eye12i} },
{ { eye7, eye7},{ eye8, eye8},{ eye9, eye9} },
{ { eye13d, eye13i},{ eye14d, eye14i},{ eye15d, eye15i} },
};
int xp = 16; // X axis Position
int mood = 1; // Mood Variable
int XAdjustableStep = 3; // X Position Adjustable Step Count
