Downloading and seeding Torrents from the computer or any other dedicated server consumes a very fair amount of energy, if you are seeding it 24x7. And it’s also not justified to put the laptop on all the time to just download the Torrent. So here our Pocket sized computer comes into picture: Raspberry Pi. It is a perfect choice for Torrent box as it consumes very little amount of power and can be remained on for long time. So you can have a cheap Torrent Box running all the time in a negligible running cost, downloading torrents for you. You can also run some other programs which require Raspberry Pi to be on for long time, like you can use it as Motion capture surveillance camera and can download the torrent at the same time. So let’s start!
There are mainly two most popular solutions for downloading Torrents in Linux System (Raspberry Pi): Transmission and Deluge. Here in this Tutorial I am using Transmission, as I found it simpler, lighter and easier than Deluge. Here is the little comparison:
Transmission vs Deluge:
As mentioned earlier that Transmission is simple and light weight torrent client in comparison with Deluge. On the other hand Deluge has more feature but little heavier, but you won’t feel any extra load on computer as computers are much faster today.
Transmission comes with Web Interface out of the box, through which you can access the torrents on the Desktop, as well as on Smartphones using the web browser. Deluge also has Web UI but you need to download and configure it separately, Deluge also has a nice torrent client for desktops but it also needs to be downloaded separately on desktop. Apart from that, Transmission can handle Torrent magnet links very smoothly than Deluge.
My primary purpose is to just download the Torrents without messing around the configuration and I don’t want to install another Torrent client on my desktop (already have uTorrent), so I have used Transmission. They both are good and have basic options like Stop, Start, pause or delete etc.
Converting Raspberry Pi into a TorrentBox in Few Minutes:
First of all if you are a beginner with Raspberry Pi then go through our previous Tutorials on Installing the Raspbian OS in Raspberry Pi and Getting started with Raspberry Pi. Also check our all other Raspberry Pi Projects here.
If you have Raspberry Pi model below than version 3, then you may need a Wi-Fi dongle to wirelessly connect the Raspberry Pi to router or you can directly connect the Raspberry Pi to router using Ethernet cable. Raspberry Pi 3 has Wi-Fi inbuilt in it. Here we have used Raspberry Pi 2 Model B with a Wi-Fi dongle. So make sure that Raspberry Pi is connected to the internet, either using LAN or Wi-Fi and then follow below steps:
Step 1: First run the below command to update and upgrade the Raspbian OS on Raspberry Pi:
sudo apt-get update
sudo apt-get upgrade
Step 2: Now download and install the Transmission using below command:
sudo apt-get install transmission-daemon
Step 3: Now all we need to do some changes in the configuration file of Transmission. First open the configuration file using nano editor:
sudo nano /etc/transmission-daemon/settings.json
And add the LAN IPs in “rpc-whitelist" setting option and set the "rpc-whitelist-enabled" to ‘true’ like below. This is the IP which will be allocated to our Raspberry Pi by our Router.
"rpc-whitelist": "127.0.0.1,192.168.*.*",
"rpc-whitelist-enabled": true,

You can also see some other settings like “rpc-username” and “rpc-password”, this will be required to login when we open the Web UI in web browser. You can change them accordingly; I left the username to default and changed the password. Password will automatically get encrypted when the file is saved.
Step 4: The location of downloaded files are defined in settings.json file as shown below. Default location is /var/lib/transmission-daemon/downloads
sudo nano /etc/transmission-daemon/settings.json

To avoid any “Permission denied error”, we need to make sure that the owner of these directories must be the same user who owns the Transmission Daemon. The user, who owns the Transmission daemon, is “debian-transmission”, so we are making it owner of Downloading directories along with the directories which contains settings file:
sudo chown -R debian-transmission:debian-transmission /etc/transmission-daemon
sudo chown -R debian-transmission:debian-transmission /etc/init.d/transmission-daemon
sudo chown -R debian-transmission:debian-transmission /var/lib/transmission-daemon
Step 5: Finally start the Transmission daemon and reload the settings:
sudo service transmission-daemon start
sudo service transmission-daemon reload
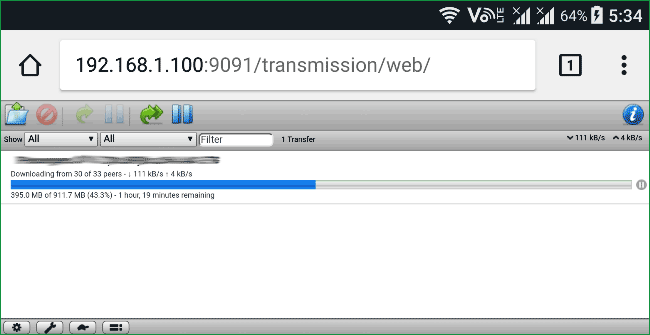
Step 6: Now you are all set to download your Torrent files on Raspberry Pi. Just open the web browser and enter the IP of you Raspberry Pi with the port 9091 like http://192.168.1.100:9091. You will be presented with Login popup where you need to enter the same username and password which we have set in Step 3. And you have your Torrent user interface in front of you like below:
http://IP_of_your_Raspberry_Pi:9091


Now Click on the Open torrent icon in the top left and upload the torrent file or paste URL of magnet link to start the download. It’s pretty simple and straight forward to use it, you will easily understand it.


This is same like any other BitTorrent client and you can just explore the options using the interface. We can add, remove, schedule the torrents and magnet links works very smoothly.
Step 7: One final step is to load the Transmission settings on startup. Although Transmission, by default, starts on boot and start downloading the queued torrents but the Web Interface doesn’t start automatically on startup until we fire “sudo service transmission-daemon reload” command.
So to automate this thing, first create a file named “transmission-boot” inside /etc/init.d
sudo nano /etc/init.d/transmission-boot
And enter the following text in that file:
#!/bin/sh
### BEGIN INIT INFO
# Provides: transmission-daemon-reload
# Required-Start: $all
# Required-Stop:
# Default-Start: 2 3 4 5
# Default-Stop: 0 1 6
# Short-Description: Reload the transmission-daemon
# Description: Reload the transmission-daemon at startup.
### END INIT INFO

sleep 20
service transmission-daemon reload
Finally make the file executable and add it to rc.d by using following commands:
sudo chmod +x /etc/init.d/transmission-boot
sudo update-rc.d /etc/init.d/transmission-boot defaults
Its all done now, you can start using your Always-on Raspberry Pi Torrent downloading Machine.
Optional Settings:
Change Default Download Location:
If you are not comfortable with default download location (/var/lib/transmission-daemon/downloads) or you are using some External Hard disk to save the downloaded files then you can change the download location using settings.json file as shown in Step 4 above. But remember that the owner of these directories must be the same who owns the Transmission daemon to avoid any Permission Denied Error, as explained in Step 4.
Change Transmission Daemon user:
As we know that the default user who owns the Transmission daemon is “debian-transmission”. It is defined in /etc/init.d/transmission-daemon file and we can change the user from there:
sudo nano /etc/init.d/transmission-daemon

I left most of the settings at defaults including this one as mentioned earlier that I only want to download the files and don’t have any specific requirement. But you can change this user to some other user like “pi” by editing the above file. But whoever the user is, we need to make this user, as owner of the directories where the downloads will be saved and where the settings files are kept.
Also to change the user, we first need to stop the Transmission and then start it after the change by using below commands:
sudo service transmission-daemon stop
sudo service transmission-daemon start
Set Download-Upload Speed:
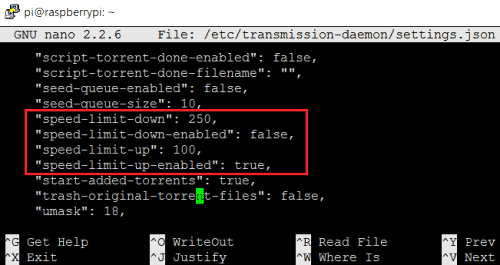
There are many configuration options to control the Torrent like download and upload Speed of torrent. We can limit and set the download and upload speed in the settings.json file like below. We can also change the speeds form the Web UI. The speeds are shown in KB/s:
sudo nano /etc/transmission-daemon/settings.json

Further explore the settings file to change it according to your requirement. You can find all the details regarding the various options and variables in this file here.
Anonymous Torrenting:
Finally if you want to hide your torrent activities from the ISP or some government Agencies then there are various paid and free services to hide you actual IP address from other people in the network. One way is to use some Proxy Torrent Service to hide your IP and/or encrypt the transferring data like BTGuard, Torguard etc. And other way to use some VPN Service to route all you Torrent Traffic from the VPN, so that no one can see your actual IP but they will see the IP of VPN, like StrongVPN, Proxy.sh etc. This way you can Anonymize Your BitTorrent Traffic completely.
So this is how you can convert your Raspberry Pi into low power Torrent Box. Check our other Interesting IoT projects here.


Sir, you did a good work, i used it probably didnt worked at first instance but afterwards it ran smoothly, though the speed is not satisfying :P.
anyway hatsoff :)