
Hardware Required:
- 128×64 OLED display Module (SSD1306)
- Raspberry Pi
- Breadboard
- Connecting Wires
- Power supply
Getting to know about OLED Displays:
The term OLED stands for “Organic Light emitting diode” it uses the same technology that is used in most of our televisions but has fewer pixels compared to them. It is real fun to have these cool looking display modules to be interfaced with the Raspberry Pi since it will make our projects look cool. We have covered a full Article on OLED displays and its types here. Here, we are using a Monochrome 4-pin SSD1306 0.96” OLED display. This LCD can only work with the I2C mode.


Below are the connections of OLED with Raspberry pi:
| OLED Pin | RPI Pin |
| VCC | 3.3v |
| GND | GND |
| SDA | SDA (Physical pin 3) |
| SCL | SCL (Physical pin 5) |
Circuit Diagram:


Connecting OLED with Raspberry Pi:
RPI community has already given us a lot of Libraries which can be directly used to make this a lot simpler. I tried out a few libraries and found that the Adafruit_SSD1306 OLED Library was very easy to use and has a handful of graphical options hence we will use the same in this tutorial.
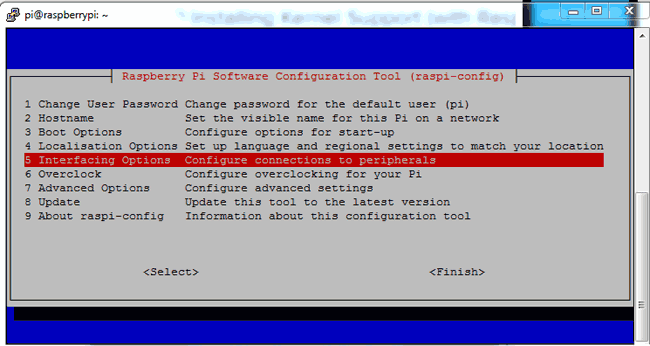
Step 1: Enable I2C communication
Before installing Adafruit SSD1306 library we need to enable I2C communication in Raspberry Pi.
To do this type in Raspberry Pi console:
sudo raspi-config
And then a blue screen will appear. Now select interface option
After this, we need to need to select I2C
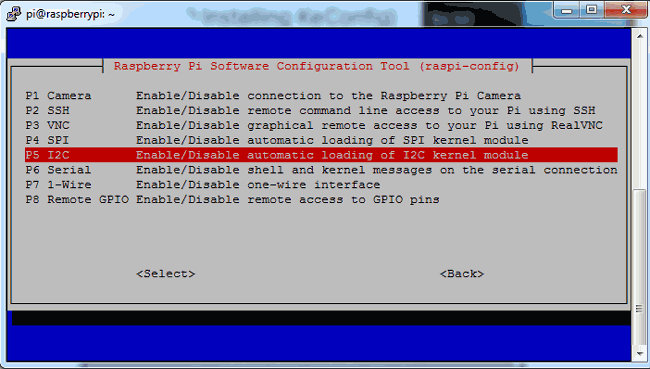
After this, we need to select yes and press enter and then ok
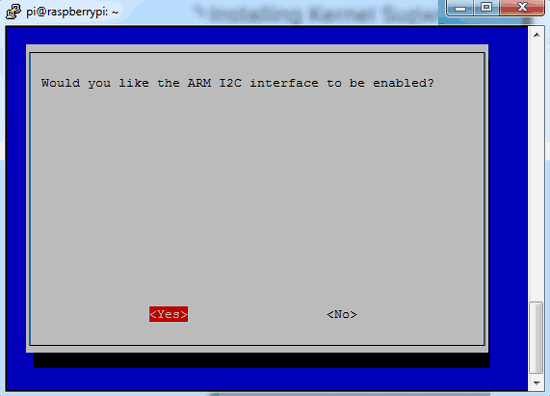
After this, we need to reboot raspberry pi by issuing below command:
sodo reboot
Step 2: Find OLED I2C address and update it
Then we need to find OLED I2C address by using given command and you will see a hex address.
sudo i2cdetect –y 1

Then update Raspberry Pi using given command:
sudo apt-get update
Step 3: Install python-pip and GPIO Library
After this we need to install pip by using given command:
sudo apt-get install build-essential python-dev python-pip
And install Raspberry Pi GPIO library
sudo pip installs RPi.GPIO
Step 4: Install the Python Imaging Library and smbus library
Finally, we need to install the Python Imaging Library and smbus library in Raspberry Pi by using given command:
sudo apt-get install python-imaging python-smbus

Step 5: install the Adafruit SSD1306 python library
Now its time to install the Adafruit SSD1306 python library code and examples by using given commands:
sudo apt-get install git
git clone https://github.com/adafruit/Adafruit_Python_SSD1306.git
cd Adafruit_Python_SSD1306
sudo python setup.py install

Now user can find the code of OLED interfacing in Raspberry Pi and you can play directly or customize it yourself. Here we have customized a example code for demonstration. You can find full Python code at the end of the article.

Programming Explanation:
Programming part for interfacing OLED with RPi project is easy. first, we need to import some necessary libraries.
import time
import Adafruit_GPIO.SPI as SPI
import Adafruit_SSD1306
from PIL import Image
from PIL import ImageDraw
from PIL import ImageFont
import subprocess
After this initialize the display
RST = 0

disp = Adafruit_SSD1306.SSD1306_128_64(rst=RST)
disp.begin()
disp.clear()
disp.display()

width = disp.width
height = disp.height

image1 = Image.new('1', (width, height))

draw = ImageDraw.Draw(image1)
draw.rectangle((0,0,width,height), outline=0, fill=0)

padding = -2
top = padding

bottom = height-padding
x = 0
font = ImageFont.load_default()
# Write two lines of text.

disp.clear()
disp.display()
draw.text((x, top),       "OLED Interfacing " ,  font=font, fill=255)
draw.text((x, top+8),     "Circuit Digest", font=font, fill=255)
draw.text((x, top+16),    "For more Videos",  font=font, fill=255)
draw.text((x, top+25),    "Visit at",  font=font, fill=255)
draw.text((x, top+34),    "www.circuitdigest.com",  font=font, fill=255)

# Display image.
disp.image(image1)
disp.display()
time.sleep(2)

if disp.height == 64:
   image = Image.open('img1.png').convert('1')
else:
   image = Image.open('img1.png').convert('1')

disp.image(image)
disp.display()
time.sleep(2)

if disp.height == 64:
   image = Image.open('img3.jpg').convert('1')
else:
   image = Image.open('img3.jpg').convert('1')
This OLED comes in two variants one is 128*32 and other is 128*64 so the user can select anyone accordingly while initializing OLED. Here we have written this code for both. The user needs to only initialize OLED for 128*64 pixel like:
disp = Adafruit_SSD1306.SSD1306_128_64(rst=RST)
All the code and functions are easy to understand and no further explanation is needed. Just start and try playing with height, width & images and try some other functions to create some more cool geometric figures.
Full python code and Demonstration Video is given below and here you find the images which we have used in this program.
Also check OLED Interfacing with Arduino.
import time
import Adafruit_GPIO.SPI as SPI
import Adafruit_SSD1306
from PIL import Image
from PIL import ImageDraw
from PIL import ImageFont
import subprocess
RST = 0
disp = Adafruit_SSD1306.SSD1306_128_64(rst=RST)
disp.begin()
disp.clear()
disp.display()
width = disp.width
height = disp.height
image1 = Image.new('1', (width, height))
draw = ImageDraw.Draw(image1)
draw.rectangle((0,0,width,height), outline=0, fill=0)
padding = -2
top = padding
bottom = height-padding
x = 0
font = ImageFont.load_default()
while True:
draw.rectangle((0,0,width,height), outline=0, fill=0)
# Write two lines of text.
disp.clear()
disp.display()
draw.text((x, top), "OLED Interfacing " , font=font, fill=255)
draw.text((x, top+8), "Circuit Digest", font=font, fill=255)
draw.text((x, top+16), "For more Videos", font=font, fill=255)
draw.text((x, top+25), "Visit at", font=font, fill=255)
draw.text((x, top+34), "www.circuitdigest.com", font=font, fill=255)
# Display image.
disp.image(image1)
disp.display()
time.sleep(2)
if disp.height == 64:
image = Image.open('img1.png').convert('1')
else:
image = Image.open('img1.png').convert('1')
disp.image(image)
disp.display()
time.sleep(2)
if disp.height == 64:
image = Image.open('img3.jpg').convert('1')
else:
image = Image.open('img3.jpg').convert('1')
disp.image(image)
disp.display()
time.sleep(2)
if disp.height == 64:
image = Image.open('img4.jpg').convert('1')
else:
image = Image.open('img4.jpg').convert('1')
disp.image(image)
disp.display()
time.sleep(2)
Comments
Hi, appreciate this page is a
Hi, appreciate this page is a little older, but Im having problems finding the images from the source code. The link to the zip from the page returns page not found.
The requested page "/microcontroller-projects/sites/default/files/OLED-Raspberry-Pi-interfacing-pics.zip" could not be found.
Does anyone have them to post anywhere? Hoping to finish this tutorial with the images.
thankyou
Yout issue has been noted. we
Yout issue has been noted. we are trying to fix this issue as soon as possible.
Thank you
Yout issue has been noted. we
Yout issue has been noted. we are trying to fix this issue as soon as possible.
Thank you

I'm getting an import error that says No module named 'Adafruit_GPIO' when trying to run the python code. Any ideas on how to resolve?