
Hi guys, today I will be showing how to turn the Raspberry Pi into a wireless access point to which other devices can connect to, basically we are turning the raspberry pi into a wireless “router”. As a bonus, I will also be showing us how to setup the wireless access point created to provide (share) internet access to(with) connected devices. So let’s begin creating Wi-Fi Hotspot with Raspberry Pi.
Required Components:
The following components will be needed to set up a raspberry pi as a wireless access point:
- Raspberry Pi 2
- 8GB SD card
- WiFi USB dongle
- Ethernet cable
- Power supply for the Pi.
- Monitor (optional)
- Keyboard (optional)
- Mouse (optional)
While the Raspberry Pi 3 and Pi zero are widely available and could have been used, for this tutorial, I will be using the Raspberry Pi 2 because my Pi3 is currently busy performing some heavy computer vision related task, which I hope to share in a tutorial here soon. This procedure however, also works for the pi 3 and should (note the emphasis) also work for the Raspberry Pi zero W. When using the Raspberry Pi 3 or the Zero W there won’t be a need for an external Wi-Fi module as these two boards already have Wi-Fi on board.
To define the goals of this tutorial more intricately, we will be giving our Raspberry Pi the ability to serve as a wireless access point and to achieve this, we will need to install and setup a software that equips the raspberry pi with this functionality along with a DHCP server software to provide a network address for the devices which will be connected to the access point. To satisfy this software requirement, we will be using the dnsmasq and the hostapd softwares.
This tutorial will be based on the Raspbian stretch OS, so to proceed as usual, I will assume you are familiar with setting up the Raspberry Pi with the Raspbian stretch OS, and you know how to SSH into the raspberry pi using a terminal software like putty. If you have issues with any of this, there are tons of Raspberry Pi Tutorials on this website that can help.
Steps for Setting up Raspberry Pi as Wireless Access Point:
By following the following key steps, one after the other, we will be able to setup the raspberry pi as a wireless access point. It should be noted that some wireless USB dongle wont work in AP mode but after trying this dongle and it worked, I am tempted to say 5 out of 8 dongles will work.
Step 1: Update the Pi
As usual, we update the raspberry pi to ensure we have the latest version of everything. This is done using;
sudo apt-get update
followed by;
sudo apt-get upgrade
With the update done, reboot your pi to effect changes.
Step 2: Install “dnsmasq” and “hostapd”
Next, we install the software that makes it possible to setup the pi as a wireless access point and also the software that helps assign network address to devices that connect to the AP. We do this by running;
sudo apt-get install dnsmasq
followed by;
sudo apt-get install hostapd
or you could combine it by running;
sudo apt-get install dnsmasq hostapd
Step 3: Stop the software from Running
Since we don’t have the software configured yet there is no point running it, so we disable them from running in the underground. To do this we run the following commands to stop the systemd operation.
sudo systemctl stop dnsmasq
sudo systemctl stop hostapd
Step 4: Configure a Static IP address for the wireless Port
Confirm the wlan port on which the wireless device being used is connected. For my Pi, the wireless is on wlan0. Setting up the Raspberry Pi to act as a server requires us to assign a static IP address to the wireless port. This can be done by editing the dhcpcd config file. To edit the configuration file, run;
sudo nano /etc/dhcpcd.conf
Scroll to the bottom of the config file and add the following lines.
Interface wlan0
static ip_address=192.168.4.1/24
After adding the lines, the config file should look like the image below.
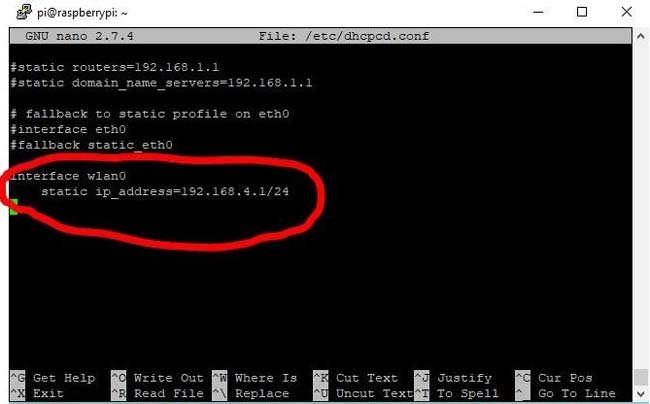
Note: This IP address can be changed to suit your preferred configuration.
Save the file and exit using; ctrl+x followed by Y
Restart the dhcpcd service to effect the changes made to the configuration using;
Sudo service dhcpcd restart
Step 5: Configure the dhcpcd server
With a static IP address now configured for the Raspberry Pi wlan, the next thing is for us to configure the dhcpcd server and provide it with the range of IP addresses to be assigned to devices that connect to the wireless access point. To do this, we need to edit the configuration file of the dnsmasq software but the config file of the software contains way too much info and a lot could go wrong If not properly edited, so instead of editing, we will be creating a new config file with just the amount of information that is needed to make the wireless access point fully functional.
Before creating the new config file, we keep the old on safe by moving and renaming it.
sudo mv /etc/dnsmasq.conf /etc/dnsmasq.conf.old
Then launch the editor to create a new configuration file;
sudo nano /etc/dnsmasq.conf
with the editor launched, copy the lines below and paste in or type directly into it.
Interface = wlan0  #indicate the communication interface which is usually wlan0 for wireless
dhcp-range = 192.168.4.2, 192.168.4.20, 255.255.255.0,24h
the content of the file should look like the image below.

Save the file and exit. The content of this config file is just to specify the range of IP address that can be assigned to devices connected to the wireless access point.
With this done, we will be able to give an identity to devices on our network.
The next set of steps will help us configure the access point host software, setup the ssid, select the encrytpion etc.
Step 6: Configure hostapd for SSID and Password
We need to edit the hostapd config file(run sudo nano /etc/hostapd/hostapd.conf) to add the various parameters for the wireless network being setup including the ssid and password. Its should be noted that the password (passphrase) should be between 8 and 64 characters. Anything lesser won’t work.
interface=wlan0
driver=nl80211
ssid=piNetwork
hw_mode=g
channel=7
wmm_enabled=0
macaddr_acl=0
auth_algs=1
ignore_broadcast_ssid=0
wpa=2
wpa_passphrase=emmanuel # use a very secure password and not this
wpa_key_mgmt=WPA-PSK
wpa_pairwise=TKIP
rsn_pairwise=CCM
The content of the file should look like the image below.

Feel free to change the ssid and password to suit your needs and desire.
Save the config file and exit.
After the config file has been saved, we need to point the hostapd software to where the config file has been saved. To do this, run;
sudo nano /etc/default/hostapd
find the line with daemon_conf commented out as shown in the image below.

Uncomment the DAEMON_CONF line and add the line below in between the quotes in front of the “equal to” sign.
/etc/hostapd/hostapd.conf
Step 7: Fire it up
Since we disabled the two software initially, to allow us configure them properly, we need to restart the system after configuration to effect the changes.
Use;
sudo systemctl start hostapd
sudo systemctl start dnsmasq
Step 8: Routing and masquerade for outbound traffic
We need to add routing and masquerade for outbound traffic.
To do this, we need to edit the config file of the systemctl by running:
sudo nano /etc/sysctl.conf
Uncomment this line net.ipv4.ip_forward=1(highlighted in the image below)

Save the config file and exit using ctrl+x followed by y.
Next we move to masquerading the outbound traffic. This can be done by making some changes to the iptable rule. To do this, run the following commands:
sudo iptables -t nat -A POSTROUTING -o eth0 -j MASQUERADE
then save the Iptables rule using:
sudo sh -c "iptables-save > /etc/iptables.ipv4.nat"
Step 9: Create Wireless Access Point on startup:
For most wireless access point application, it is often desired that the access point comes up as soon as the system boots. To implement this on the raspberry pi, one of the easiest ways is to add instructions to run the software in the rc.local file so we put commands to install the iptable rules on boot in the rc.local file.
To edit the rc.local file, run:
sudo nano /etc/rc.local
and add the following lines at the bottom of the system, just before the exit 0 statement
iptables-restore < /etc/iptables.ipv4.nat
Step 9: Reboot! and Use
At this stage, we need to reboot the system to effect all the changes and test the wireless access point starting up on boot with the iptables rule updated.
Reboot the system using:
sudo reboot
As soon as the system comes back on, you should be able to access the wireless access point using any Wi-Fi enabled device and the password used during the setup.
Accessing the Internet from the Raspberry Pi’s Wi-Fi Hotspot
Oh yes, so I will be adding a bonus tutorial to show how the wireless access point created can be used to provide internet connection for the devices connected to it. The internet access distributed to the devices is provided via the Ethernet port on the Pi which can be connected to a router or any similar devices.
To implement this, we need to put a “bridge” in between the wireless device and the Ethernet device on the Raspberry Pi (the wireless access point) to pass all traffic between the two interfaces. To set this up, we will use the bridge-utils software. Install hostapd and bridge-utils. While we have installed hostapd before, run the installation again to clear all doubts.
sudo apt-get install hostapd bridge-utils
Next, we stop hostapd so as to configure the software.
sudo systemctl stop hostapd
When a bridge is created, a higher level construct is created over the two ports being bridged and the bridge thus becomes the network device. To prevent conflicts, we need to stop the allocation of IP addresses by the DHCP client running on the Raspberry Pi to the eth0 and wlan0 ports. This will be done by editing the config file of the dhcpcd client to include denyinterfaces wlan0 and denyinterfaces eth0 as shown in the image below.
The file can be edited by running the command;
sudo nano /etc/dhcpcd.conf

Note: From this point on, ensure you don’t disconnect the Ethernet cable from your PC if you are running in headless mode as you may not be able to connect via SSH again since we have disabled the Ethernet port. If working with a monitor, you have nothing to fear.
Next, we create a new bridge called br0
sudo brctl addbr br0
Next, we connect the ethernet port (eth0) to the bridge (br0) using;
sudo brctl addif br0 eth0
Next, we edit the interfaces file using sudo nano /etc/network/interfaces so various devices can work with the bridge. Edit the interfaces file to include the information below;
#Bridge setup auto br0 iface br0 inet manual bridge_ports eth0 wlan0
Lastly we edit the hostapd.conf file to include the bridge configuration. This can be done by running the command: sudo nano /etc/hostapd.conf and editing the file to contain the information below. Note the bridge was added below the wlan0 interface and the driver line was commented out.
interface=wlan0
bridge=br0
#driver=nl80211
ssid=NameOfNetwork
hw_mode=g
channel=7
wmm_enabled=0
macaddr_acl=0
auth_algs=1
ignore_broadcast_ssid=0
wpa=2
wpa_passphrase=AardvarkBadgerHedgehog
wpa_key_mgmt=WPA-PSK
wpa_pairwise=TKIP
rsn_pairwise=CCMP
With this done, save the config file and exit.
To effect the changes made to the Raspberry Pi, reboot the system. Once it comes back up, you should now be able to access the internet by connecting to the Wireless access point created by the Raspberry Pi. This of course will only work if internet access is available to the pi via the Ethernet port.
While this project can be used to extend Wi-Fi around the house or office or an entire compound, there are several applications I find very interesting and useful like the raspberry pi as a home automation hub so several Wi-Fi enabled home automation devices can connect to the internet using the raspberry pi’s wireless access point. Do you have any other cool Idea, to which this can be applied, feel free to share via the comment section to inspire others.
Testing Raspberry Pi Wireless Access Point:
To test these instructions, use a mobile phone or any other device capable of connecting to a WiFi hotspot network, you should see the name pop up. You can then connect to it by using that terrible password we specified “emmanuel”. Be sure to use a more secure password when implementing. I only used that password to make things easier to follow.
Also note, it might take a while for the Wireless access point to become visible after reboot as the Pi needs to boot up before the network activities start.

That’s it for this tutorial guys. It's a long one, thanks for taking time out to read. Feedback and comments are always welcome.
Till next time!
Comments
Hi, It means the last number
Hi, It means the last number of the IP address can be anything from 1 to 24. I hope it helps.
Configuration without DHCP
I need to connect to a network where it is not allowed for devices to act as a DHCP server. I previously connected a router to the network, and unfortunately the IT manager picked up that someone was connecting a wifi router access point. He then told me it is not allowed to have a DHCP router on the network.
I since also installed a small portable TP Link travel router, where you can choose if you want to use the DHCP option.
Hope you can help me with the Pi 3.
dnsmasq error
when restarting the dnsmasq i am getting this error message:
"Job for dnsmasq.service failed because the control process exited with error code.
See "systemctl status dnsmasq.service" and "journalctl -xe" for details."
has anyone else had this happen, and could anyone recommend the next steps to work around this.
hello guys, i had te same
hello guys, i had te same trouble that rc21, but i've read the error code and found that the conf file is case sensitive. so i changed "interface" instead of "Interface" (/etc/dnsmasq.conf) and that solved the problem, hope also works for you
No Router Access
Hi, Is it possible to do this without having access to the router? I mean without knowing routers username and password? and is it possible to use this device in a public WiFi network? Thank you.

Thank you for an excellent and informative tutorial which I shall attempt on one of my Pi's. Can you explain a few things please.
What does 192.168.4.1/24 mean? I am used to IP addresses like 192.168.1.78 but I have not seen the /24 notation before.
How many IP addresses can the Pi allocate?
Can one allocate different address ranges like 192.168.5.1/24?
Thanks