

The Iconic name “Nokia 5110” itself should have bought memories of the robust Nokia mobile phone which was very popular during the 90’s. The model 5110 came with a Graphical Display which was sufficient enough to act as a display screen for the mobile back then. This screen was capable of displaying everything from alphanumeric characters to small graphics that is everything required for mobile phone. As the earth revolved new techs with shiny touch screens popped in and this display are no longer in use. But hopefully they can be used in electronics applications where a small graphics has to be displayed and avoid spending money on big LCD screens. So in this tutorial we will learn how to interface a Nokia 5110 Graphical LCD with Arduino and get it working.
These LCD have black and white pixels of dimensions 84 × 48. They might look monotonous but still can be used to display decent graphics for your projects and can be easily used with microcontrollers like Arduino. So let’s get started....!
Materials Required:
- Arduino Board (any version)
- Nokia 5110 display
- Connecting wires
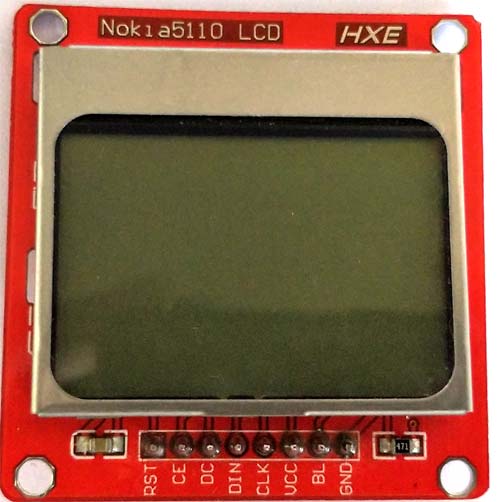
Nokia 5110 Graphical Display module:
There are two types of these Graphical LCDs available in the market. One with solder pads both above and below the display and the other with solder pads only on the bottom of the display. The one that we are using belong to type 2, where there are pads only under the display. Both the modules work the same and hence the connections are the same for both. So irrespective of what module it is you can follow the tutorial.
As said earlier Nokia 5110 Graphical LCD has 84 pixels in horizontal and 48 pixels in vertical. The total display size is 1.72’ x 1.72’. The module has 6 input pins using which we can interface it to any microcontroller through SPI communication. The interfacing IC that communicates between the display and the Arduino is the Philips PCD8544 display controller IC whose datasheet can be found here. However if you are using Arduino to communicate with this IC then we need not worry about the datasheet since there are libraries that are ready to be downloaded and used. The module that we are using here is shown below.
Circuit Diagram:
The complete circuit diagram for connecting Nokia5110 Graphical LCD with Arduino is given below.

The display module has 8 pins which are used to set up an SPI communication with Arduino. The module is powered with the 3.3V pin of the Arduino board. Note that these modules work on 3.3V logic and hence do not supply 5V to the Vcc pin of the displays. I have directly wired the Pin of display to Arduino, even though the LCD works on 3.3V logic and Arduino on 5V logic because only then I found the LCD to work properly. You can use a voltage divider to convert 5V to 3.3V if required, but for me it works only without the logic conversion. The connections are pretty simple and straight forward to make. Once you are done with the connections your set-up would look something like this shown below.

Arduino Program and Working:
Follow the below steps to program your Arduino for the Nokia 5110 Display. The steps assume that you have already installed the Arduino IDE and familiar with using it.
Step 1: Open the Arduino IDE on your Computer and select the appropriate board under tools menu after connecting your Arduino to your computer.
Step 2: Click here to download Nokia 5110 Display Library by Adafruit library from GitHub repository.
Step 3: Once the Zip file is downloaded, select Sketch -> Include Library -> Add .ZIP library and browse to the location where the ZIP was downloaded.
Note: You will also have to download the Adafruit GFX Graphics core which does all the circles, text, rectangles, etc. You can get it from https://github.com/adafruit/Adafruit-GFX-Library and install it same way.
Step 4: Now open the example program by selecting File -> Examples -> Adafruit PCD Nokia 5110 LCD Library -> pcdtest and click on upload button

Step 5: Once the program is uploaded, press the reset button on the Arduino and you should see the example program displaying all animations as shown in the video given at the end of this tutorial.
You can read through the example program to understand the various built in function that could be used to perform various graphics design on the LCD. But let us go one step further and try displaying CircuitDigest Logo on the LCD screen.
Now open the required image in Paint and resize the image. The maximum image size that we can use for our display is 84 × 48.

After resizing the image, save the image as bitmap (black and white) by using the save as option in Paint. To display image as a bitmap on our LCD screen we will need software that could convert bitmap image into code. You can download the software by clicking here. Once downloaded unzip the file and click on “BitmapEncoder” to launch the application. Open the bitmap image that we just saved using this software to get the array of encoded values. You can directly copy these values and paste it in your Arduino array. The value shown by software for our logo is shown below

As you can see the array begins with value 48, 48 this is the size of our image. We should not add this in our array. So, remove the first two values and use the rest as the array value in the program. The array will look like below. The complete program is given at the end of this page for your reference.
static const unsigned char PROGMEM Logo[] =
{B00000000,B00000000,B00000000,B00000000,B00000000,B00000000,
B00000000,B00000000,B00001111,B11111000,B00000000,B00000000,
B00000000,B00000000,B00001111,B11111111,B00000000,B00000000,
B00000000,B00000011,B00011111,B11111111,B11000000,B00000000,
B00000000,B00001110,B00111110,B00111111,B11110000,B00000000,
B00000000,B00111110,B00111110,B10000000,B01111100,B00000000,
B00000000,B01111100,B01111100,B11000000,B00111110,B00000000,
B00000000,B11111100,B01111110,B00000000,B00001111,B00000000,
B00000001,B11111000,B11111111,B00111111,B10000111,B10000000,
B00000011,B11111000,B11111111,B11111111,B11000011,B11000000,
B00000111,B11110001,B11111111,B11111111,B11100000,B11100000,
B00000111,B11100001,B11111111,B11100011,B11111000,B01100000,
B00000000,B00000011,B11100000,B00001001,B11111100,B00000000,
B00000000,B00000111,B11100000,B00011001,B11111110,B00000000,
B00000000,B00000111,B11000000,B00000001,B11111111,B10000000,
B00011111,B11111111,B11000111,B11100011,B11111111,B11111000,
B00111111,B11111111,B10001111,B11111111,B11111111,B11111100,
B00111111,B11111111,B00011111,B11111111,B11111111,B11111100,
B00111111,B11111111,B00011111,B11111111,B11111111,B11111100,
B00111111,B11111110,B00111111,B00111111,B11111111,B11111110,
B01111111,B11111110,B00111110,B00000000,B01111111,B11111100,
B01111111,B11111100,B01111100,B11000000,B00000000,B00000000,
B01111111,B11111100,B01111110,B10000000,B00000000,B00000000,
B00000000,B00000000,B11111110,B00111111,B11111111,B11111110,
B00000000,B00000001,B11111111,B11111111,B11111111,B11111110,
B01111111,B11111111,B11111111,B11111111,B11111111,B11111110,
B01111111,B11111111,B11111111,B11111111,B11111111,B11111110,
B01111111,B11111111,B11000111,B11111111,B11111111,B11111110,
B00111111,B11111111,B10000011,B11111110,B00000000,B00000000,
B00111111,B11111111,B10110011,B11111000,B00000000,B00000000,
B00111111,B11111111,B10000001,B11100000,B00000000,B00000000,
B00111111,B11111111,B11000000,B10000001,B11111111,B11111100,
B00000000,B00011111,B11111000,B00000111,B11111111,B11111000,
B00000000,B00000111,B11111110,B00011111,B11111111,B11111000,
B00000000,B00000001,B11111111,B01111111,B11111111,B11110000,
B00001111,B11100000,B11111111,B11111111,B11111111,B11110000,
B00000111,B11111000,B00001111,B11111111,B11000000,B00000000,
B00000011,B11111100,B00100111,B11111111,B00000000,B00000000,
B00000011,B11111111,B00110111,B11111100,B00000000,B00000000,
B00000001,B11111111,B10000111,B11011000,B00111111,B10000000,
B00000000,B11111111,B11001111,B10000000,B11111111,B00000000,
B00000000,B01111111,B11111111,B10110001,B11111110,B00000000,
B00000000,B00011111,B11111111,B10110111,B11111100,B00000000,
B00000000,B00001111,B11111111,B10000111,B11110000,B00000000,
B00000000,B00000011,B11111111,B11111111,B11000000,B00000000,
B00000000,B00000000,B11111111,B11111111,B00000000,B00000000,
B00000000,B00000000,B00001111,B11110000,B00000000,B00000000,
B00000000,B00000000,B00000000,B00000000,B00000000,B00000000};
Now to display this bitmap we have to use the following lines of code. Where the previous data on screen is erased and the new bitmap image is written.
  display.clearDisplay();
  display.drawBitmap(20, 0,  Logo, 48, 48, 1);
  display.display();
The line display.drawBitmap(20, 0, Logo, 48, 48, 1); display the position, size and color of the bitmap image. The syntax can be given as.
display.drawBitmap (X_Position, Y_Position, Name of Array, length of image, breadth of image);
The length and breadth of the image can be obtained from the first two element of the array respectively as told earlier. When this code is run we will get the bitmap displayed on our LCD screen as shown below.

You can also display simple text as shown below:
![]()
Hope you understood the tutorial and got your Nokia 5110 LCD interfaced with Arduino. With this graphical display up in your sleeve you can create many projects that require minor graphics details. The complete working can be found in the video given below. If you face any problem in getting this to work you can use the forum to post your problem or the comment sections below.
// Nokia5110 display demo program to display logo
// web: www.circuitdigest.com
// RST - Pin 3
// CE - Pin 4
// DC - Pin 5
// DIN - Pin 6
// CLK - Pin 7
#include <Nokia5110.h>#include <SPI.h>
#include <Adafruit_GFX.h>
#include <Adafruit_PCD8544.h>
Adafruit_PCD8544 display = Adafruit_PCD8544(7, 6, 5, 4, 3);
/*You can create your own logo by reading the instructions on the tutorial*/
static const unsigned char PROGMEM Logo[] =
{B00000000,B00000000,B00000000,B00000000,B00000000,B00000000,
B00000000,B00000000,B00001111,B11111000,B00000000,B00000000,
B00000000,B00000000,B00001111,B11111111,B00000000,B00000000,
B00000000,B00000011,B00011111,B11111111,B11000000,B00000000,
B00000000,B00001110,B00111110,B00111111,B11110000,B00000000,
B00000000,B00111110,B00111110,B10000000,B01111100,B00000000,
B00000000,B01111100,B01111100,B11000000,B00111110,B00000000,
B00000000,B11111100,B01111110,B00000000,B00001111,B00000000,
B00000001,B11111000,B11111111,B00111111,B10000111,B10000000,
B00000011,B11111000,B11111111,B11111111,B11000011,B11000000,
B00000111,B11110001,B11111111,B11111111,B11100000,B11100000,
B00000111,B11100001,B11111111,B11100011,B11111000,B01100000,
B00000000,B00000011,B11100000,B00001001,B11111100,B00000000,
B00000000,B00000111,B11100000,B00011001,B11111110,B00000000,
B00000000,B00000111,B11000000,B00000001,B11111111,B10000000,
B00011111,B11111111,B11000111,B11100011,B11111111,B11111000,
B00111111,B11111111,B10001111,B11111111,B11111111,B11111100,
B00111111,B11111111,B00011111,B11111111,B11111111,B11111100,
B00111111,B11111111,B00011111,B11111111,B11111111,B11111100,
B00111111,B11111110,B00111111,B00111111,B11111111,B11111110,
B01111111,B11111110,B00111110,B00000000,B01111111,B11111100,
B01111111,B11111100,B01111100,B11000000,B00000000,B00000000,
B01111111,B11111100,B01111110,B10000000,B00000000,B00000000,
B00000000,B00000000,B11111110,B00111111,B11111111,B11111110,
B00000000,B00000001,B11111111,B11111111,B11111111,B11111110,
B01111111,B11111111,B11111111,B11111111,B11111111,B11111110,
B01111111,B11111111,B11111111,B11111111,B11111111,B11111110,
B01111111,B11111111,B11000111,B11111111,B11111111,B11111110,
B00111111,B11111111,B10000011,B11111110,B00000000,B00000000,
B00111111,B11111111,B10110011,B11111000,B00000000,B00000000,
B00111111,B11111111,B10000001,B11100000,B00000000,B00000000,
B00111111,B11111111,B11000000,B10000001,B11111111,B11111100,
B00000000,B00011111,B11111000,B00000111,B11111111,B11111000,
B00000000,B00000111,B11111110,B00011111,B11111111,B11111000,
B00000000,B00000001,B11111111,B01111111,B11111111,B11110000,
B00001111,B11100000,B11111111,B11111111,B11111111,B11110000,
B00000111,B11111000,B00001111,B11111111,B11000000,B00000000,
B00000011,B11111100,B00100111,B11111111,B00000000,B00000000,
B00000011,B11111111,B00110111,B11111100,B00000000,B00000000,
B00000001,B11111111,B10000111,B11011000,B00111111,B10000000,
B00000000,B11111111,B11001111,B10000000,B11111111,B00000000,
B00000000,B01111111,B11111111,B10110001,B11111110,B00000000,
B00000000,B00011111,B11111111,B10110111,B11111100,B00000000,
B00000000,B00001111,B11111111,B10000111,B11110000,B00000000,
B00000000,B00000011,B11111111,B11111111,B11000000,B00000000,
B00000000,B00000000,B11111111,B11111111,B00000000,B00000000,
B00000000,B00000000,B00001111,B11110000,B00000000,B00000000,
B00000000,B00000000,B00000000,B00000000,B00000000,B00000000};
void setup()
{
display.begin();
display.setContrast(50);
display.display(); // show splashscreen
delay(2000);
display.clearDisplay(); // clears the screen and buffer
}
void loop()
{
display.clearDisplay();
display.drawBitmap(20, 0, Logo, 48, 48, 1); // display.drawBitmap (X_Position, Y_Position, Name of Array, length of image, breadth of image);
display.display();
}
Comments
Never tried with NodeMCU. It
Never tried with NodeMCU. It should work if the library is already developed. Not sure though

hi
i have problem compiling the code for nodemcu v3