
In this tutorial we will learn about Servo Motor and How to interface Servo with MSP430. The MSP-EXP430G2 is a Development Tool a.k.a LaunchPad provided by the Texas Instruments to learn and practice on how to use their Microcontrollers. This board falls under the MSP430 Value Line category where we can program all the MSP430 series Microcontrollers. If you are new to MSP then check our getting started with MSP430 tutorial.
Servo Motor and PWM:
Before going into detail, first we should know about Servo Motors.
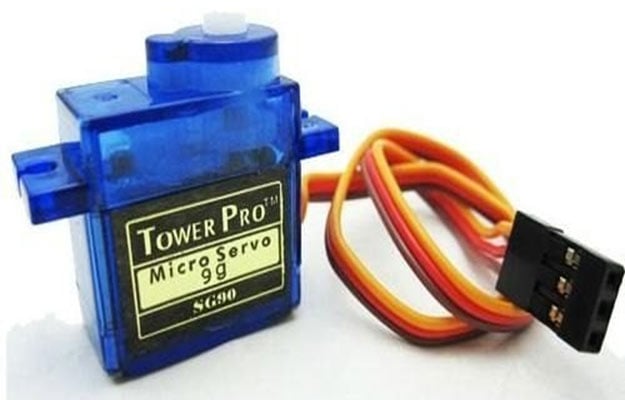
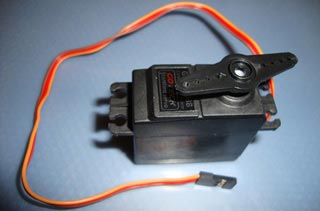
A Servo Motor is a combination of DC motor, position control system and gears. Servos have many applications in the modern world and with that, they are available in different shapes and sizes. We will be using SG90 Servo Motor in this tutorial, it is one of the popular and cheapest one. SG90 is a 180 degree servo. So with this servo we can position the axis from 0-180 degrees.
A Servo Motor mainly has three wires, one is for positive voltage, another is for ground and last one is for position setting. The Red wire is connected to power, Brown wire is connected to ground and Yellow wire (or WHITE) is connected to signal.
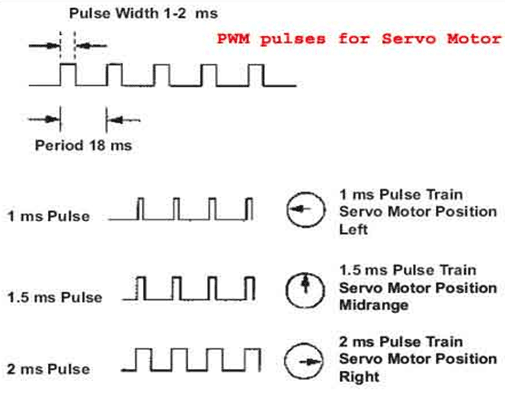
Each servo motor operates on a different PWM frequencies (most common frequency is 50HZ which is used in this tutorial) so get the datasheet of your motor to check the on which PWM period your Servo motor works.
The frequency of PWM (Pulse Width Modulated) signal can vary based on type of servo motor. The important thing here is the DUTY RATIO of the PWM signal. Based on this DUTY RATION the control electronics adjust the shaft.
As shown in figure below, for the shaft to be moved to 9o clock the TURN ON RATION must be 1/18.ie. 1ms of ON time and 17ms of OFF time in a 18ms signal.
 <
<
For the shaft to be moved to 12o clock the ON time of signal must be 1.5ms and OFF time should be 16.5ms. This ratio is decoded by control system in servo and it adjusts the position based on it. This PWM in here is generated by using MSP430. Learn more about generating PWM with MSP430 here.
Before Connecting Servo to MSP430, you can test your servo with the help of this Servo Motor Tester Circuit. Also check our below Servo projects:
- Servo Motor Control using Arduino
- Servo Motor Control with Arduino Due
- Servo Motor Interfacing with 8051 Microcontroller
- Servo Motor Control using MATLAB
- Servo Motor Control by Flex Sensor
- Servo Position Control with Weight (Force Sensor)
Materials Required:
- MSP430
- SG90 servo
- Male-Female wires
Circuit Diagram and Explanatin:

In MSP430, we have libraries which are predefined and PWM functions are written already in these libraries so, we don’t have to worry about PWM values. You have to just put the Angle by which you want to rotate the shaft and rest is operated by these libraries and microcontroller.
Here, we are using PIN 6 i.e. P1.4, which is PWM pin of MSP430. But you can use any PIN. It is not necessary to use PWM pin for servo because all PWM functionalities are written in the library itself.
Header file used to control the servo is “servo.h”.
We will use Energia IDE to write our code. Code is simple and easy to understand. It is same as for Arduino and can be found in the Example menu. Complete code and Video is given below, you can edit the code as per your need and upload it to MSP430
That is it!! We have interfaced a servo motor with a PIC Microcontroller, now you can use your own creativity and find out applications for this. There are lots of projects out there which use a servo motor.
#include <Servo.h>
Servo sg90servo; // create servo object to control a servo
int angle = 0; // variable to store the servo position
void setup()
{
Sg90servo.attach(4); // attaches the servo on pin 4 to the servo object
}
void loop()
{
for(angle = 0; angle< 180; angle++) // goes from 0 degrees to 180 degrees
{ // in steps of 1 degree
Sg90servo.write(angle); // tell servo to go to position in variable 'angle’
delay(20); // waits 20ms for the servo to reach the position
}
for(angle = 180;angle>=1; angle--) // goes from 180 degrees to 0 degrees
{
Sg90servo.write(angle); // tell servo to go to position in variable 'angle'
delay(20); // waits 20ms for the servo to reach the position
}
}
