

Using a thermistor is an easy and cheap way to sense the temperature. And to measure the exact temperature with thermistor, a microcontroller will be needed. So here we are using Arduino with Thermistor to read the temperature and a LCD to display the temperature. It is useful in various projects like remote weather station, home automation, and protection and controlling of industrial and electronics equipment’s.
In this tutorial, we are going to interface Thermistor with Arduino and display the temperature on LCD. You can make various electronic circuit based projects using thermistor some of them are listed below:
Components Required:
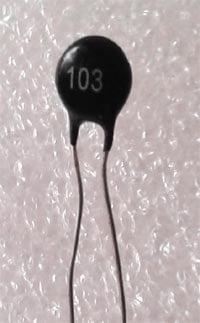
- NTC thermistor 10k
- Arduino (Any version)
- 10k ohm Resistor
- Connecting Wires
Circuit Diagram

Thermistor provides temperature value as per the change in the electrical resistance in it. In this circuit, the analog pin in the Arduino is connected with the thermistor and can provide the ADC values only, so the electrical resistance of thermistor is not calculated directly. So the circuit is made to be like a voltage divider circuit as shown in figure above, by connecting a known resistance of 10k ohm in series with the NTC. Using this Voltage divider we can get the voltage across Thermistor and with that voltage we can derive the Resistance of Thermistor at that moment. And finally we can get the temperature value by putting the resistance of thermistor in Stein-Hart equation as explained in below sections.
Thermistor
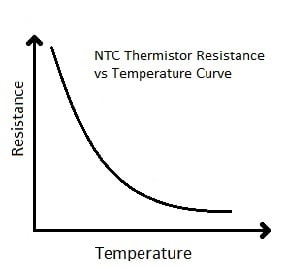
The key component in this circuit is Thermistor, which has been used to detect the rise in temperature. Thermistor is temperature sensitive resistor, whose resistance changes according to the temperature. There are two types of thermistor NTC (Negative Temperature Co-efficient) and PTC (Positive Temperature Co-efficient), we are using a NTC type thermistor. NTC thermistor is a resistor whose resistance decreases as rise in temperature while in PTC it will increase the resistance as rise in temperature.
Calculating Temperature using Thermistor:
We know from the Voltage divider circuit that:
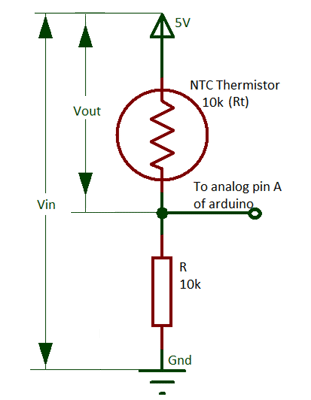
Vout= (Vin * Rt) / (R + Rt)
So the value of Rt will be:
Rt = R (Vin/Vout) – 1
Here, Rt will be the resistance of thermistor and R will be 10k ohm resistor. You can also calculate the values from this voltage divider calculator.
This equation is used for the calculation of thermistor resistance from the measured value of output voltage Vo. We can get the value of Voltage Vout from the ADC value at pin A0 of Arduino as shown in the Arduino Code given below.
Calculation of Temperature from the thermistor resistance:
Mathematically the thermistor resistance can only be compute with the help of the Stein-Hart equation.
T = 1 / (A + Bln(Rt) + Cln (Rt)3 )
Where, A, B and C are the constants, Rt is the thermistor resistance and ln represents log.
The constant value for the thermistor used in the project is A = 1.009249522×10⁻³, B = 2.378405444×10⁻⁴, C = 2.019202697×10⁻⁷. These constant values can be obtained from the calculator here by entering the three resistance values of thermistor at three different temperatures. You can either get these constant values directly from the datasheet of the Thermistor or you can get three resistance values at different temperature and get the Constants values using the given calculator.

So, for calculating the temperature we need the value of thermistor resistance only. After getting the value of Rt from the calculation given above put the values in the Stein-hart equation and we will get the value of temperature in the unit kelvin. As there is minor change in the output voltage cause change in the temperature.
Arduino thermistor code
Complete Arduino Code for Interfacing Thermistor with Arduino is given at the end of this article. Here we have explained few parts of it.
For performing mathematical operation we use Header file “#include <math.h>” and for LCD header file is “#include <LiquidCrystal.h>". We have to assign the pins of the LCD by using the code
LiquidCrystal lcd(44,46,40,52,50,48);
For setup the LCD at the time of start we have to write code in the void setup part
Void setup(){
 lcd.begin(16,2);
 lcd.clear();
}
For the calculation of temperature by Stein-Hart equation using the electrical resistance of thermistor we perform some simple mathematical equation in code as explained in calculation above:
float a = 1.009249522e-03, b = 2.378405444e-04, c = 2.019202697e-07;
float T,logRt,Tf,Tc;
float Thermistor(int Vo) {
 logRt = log(10000.0*((1024.0/Vo-1)));
 T = (1.0 / (A + B*logRt + C*logRt*logRt*logRt));// We get the temperature value in Kelvin from this Stein-Hart equation
 Tc = T - 273.15;                     // Convert Kelvin to Celsius
 Tf = (Tc * 1.8) + 32.0;              // Convert Kelvin to Fahrenheit
 return T;
}
In the below code the function thermistor is reading the value from the analog pin of the Arduino,
lcd.print((Thermistor(analogRead(0))));
and that value is taken in the code below and then the calculation is start printing
float Thermistor(int Vo)
Measuring Temperature with Thermistor and Arduino:

To give the supply to the Arduino you can power it via USB to your laptop or connecting 12v adapter. A LCD is interfaced with Arduino to display temperature values and Thermistor is connected as per circuit diagram. The analog pin (A0) is used to check the voltage of thermistor pin at every moment and after the calculation using Stein-Hart equation through the Arduino code we are able to get the temperature and display it on LCD in the Celsius and Fahrenheit.
#include <math.h>
#include "LiquidCrystal.h"
LiquidCrystal lcd(44,46,40,52,50,48);
float A = 1.009249522e-03, B = 2.378405444e-04, C = 2.019202697e-07;
float T,logRt,Tf,Tc;
float Thermistor(int Vo) {
logRt = log(10000.0*((1024.0/Vo-1)));
T = (1.0 / (A + B*logRt + C*logRt*logRt*logRt)); // We get the temperature value in Kelvin from this Stein-Hart equation
Tc = T - 273.15; // Convert Kelvin to Celcius
Tf = (Tc * 1.8) + 32.0; // Convert Kelvin to Fahrenheit
return T;
}
void setup(){
lcd.begin(16,2);
lcd.clear();
}
void loop()
{
lcd.setCursor(0,0);
lcd.print("Temp:");
lcd.print((Thermistor(analogRead(0))));
lcd.print("k ");
lcd.setCursor(0,1);
lcd.print((Tc));
lcd.print(" C ;");
lcd.setCursor(9,1);
lcd.print((Tf));
lcd.print(" F");
delay(800);
}
Comments
I appreciate your tutorials
I appreciate your tutorials and this is a nice one. However, there are some mistakes in the presentation.
The way the circuit is set up in the circuit diagram, A0 is sensing the voltage across the fixed resistor, not the thermistor. In the diagram of the voltage divider, Vout is shown across the thermistor, but A0 is sensing the voltage across the fixed resistor (closest to ground), so Vout should be shown across the fixed resistor, not the thermistor.
Both equations immediately below the voltage divider diagram are wrong for this circuit. The first equation should be Vout=Vin*R/(R+Rt). Solving this correct equation for Rt gives Rt=R*(Vin/Vout - 1).
The Arduino code works because this correct equation is what it actually implements, not the one shown in the tutorial.
The equation for Vout is also incorrect in the flow chart.
Best regards.

sir i have made the same circuit of arduino thermistor interfacing,
but i also want to switch a relay when temperature is below 37 C.
and how can i use two switches to minimize or maximize the set point of temperature like in industrial temperature controllers.
waiting for your reply.
ahsan