
In previous tutorial we have learned about ZigBee protocol, its architecture and also learned about XBee modules and AT Commands. In this tutorial we will interface two XBee modules with two Computers and make the computers communicate wirelessly using those XBee modules. In the end, we will be able to send text from one computer to another like a Chatting application.
Detecting attached XBee module in Computer:
You can detect your XBee radio module in Linux and Mac OSX, by opening a Terminal, you can type a few commands to see if the module is recognized by your computer. Additionally while connected to more than one module we can see you have to be a bit more careful. After opening terminal you need to use the following command lines to see if your device is properly recognized by your system or not.
In Linux and MAC, you need to type
dmesg | tail
You will see something like FTDI USB serial Device converter now connected to or cp210x in this case attached to “ttyUSB0”
ls/dev/tty (mac users must enter ls/dev/tty.*)
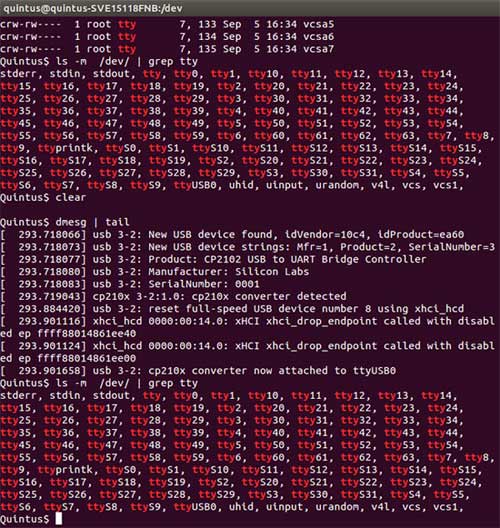
As shown in image above you will see /dev/ttyUSB0, ensure that you have not connected other USB devices in that case the USB1, 2 or x. This directory would be very useful while communicating XBee with python.
For windows go Control Panel-> device manager-> Look for Com ports in the devices as shown below in case you are using putty or using python. Alternatively now you can use XCTU for the same.
Connecting XBee module to Computer for communication:
There are variety of terminal applications are available for various platforms to communicate with XBee, for simplicity we will use CoolTerm as it is compatible with Windows and MAC, the software is free and available for all the OSes like MAC, Windows, Linux.
For MAC OS:
Download the CoolTerm for mac from here.
Drag the CoolTermMac folder from Downloads folder to Applications folder and CoolTerm icon will appear on the Launchpad automatically.
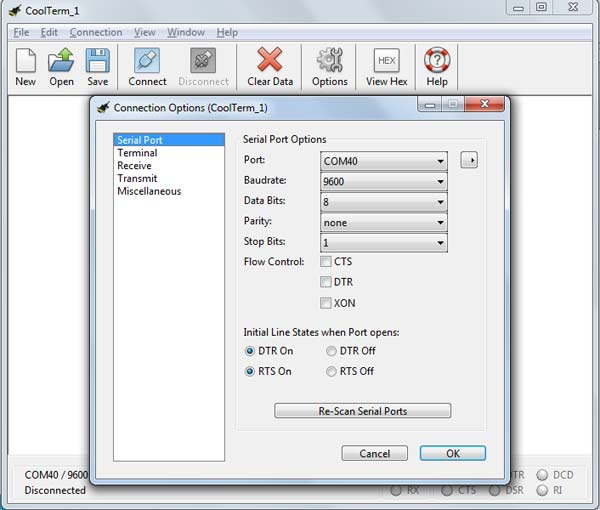
Now open the CoolTerm Applications by clicking on its icon and then go to Connection menu -> Opitons. After Clicking on options a new window will open, Scan for ports using button “ReScan Serial Ports” once you get the COM port set the:
- baud rate as 9600,
- Databits 8,
- Parity None and
- Stop bits 1.
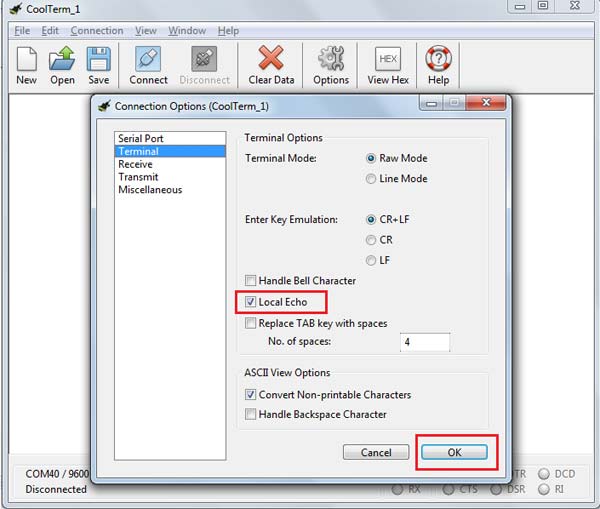
To see what you are writing properly in terminal you will need additional enable the Local Echo. For that click on Terminal as shown below in the image and check Local Echo and then click on OK.
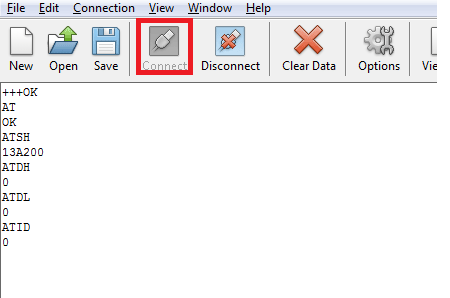
Click on Connect button as shown in the image below, after clicking
- Type +++ (don't press enter) if you get OK as a response appear then proceed. If not then wait for more than 10 seconds and retype +++ to renter command
- Type ATSH and hit enter and you can see as shown below the higher address 32 bit address which is static address assigned by digi.
Now you can type other commands to see the parameters,
If you get problem in connecting XBee with your computer then:
- Check settings like baud rate settings.
- Reconnect your module and check if it is properly connected.
- Try to update firmware which may solve if it is not working due to do some previous settings.
- Reset the settings incase if it is sleeping mode.
For Linux:
Linux user can simply install putty using terminal in Linux (debian versions)
sudo apt-get install putty
For other distribution download the source file and go to the directory using terminal and type following commands
sudo make
sudo install
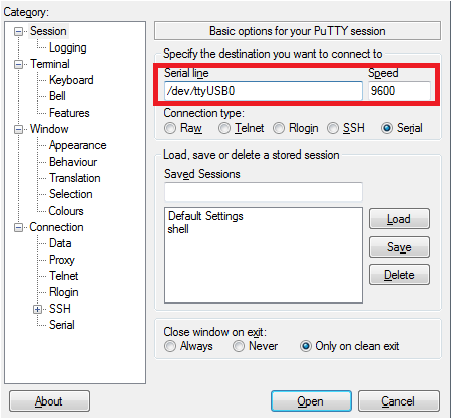
1. Now open putty and Click on the Serial radio button and enter text into text box “/dev/ttyusb0” as shown in the below image. And set the baud rate 9600.
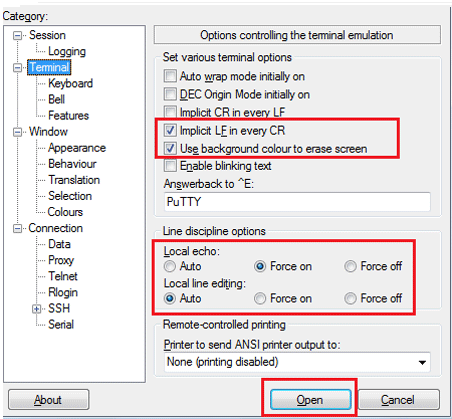
2. After that, click on Terminal change the settings as shown in settings above, change
Implicit LF in every CR. Change the Local echo option to Force on. Then click on Open.
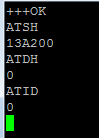
3. Then on terminal type “+++” (Without pressing enter) then after getting OK you may type other AT Commands as shown below.
For Windows:
Windows users can simply download the CoolTerm zip file from here, extract it and then click on the coolterm.exe you are good to go.
A simple project of communicating two XBee modules
Well we are now ready to communicate two PCs using two XBee transceivers. The idea is to send text information in ASCII values from one computer and send it to other computer. We will use XCTU console modem.
You need below required things to proceed:
- Two XBee modules in our case its XB24-ZB family
- Two XBee adapter boards
- Two PC’s with serial communication terminals
But before proceeding we need to configure our XBee module and add the XBee radio modules. Now follow the steps to communicate with other XBee:
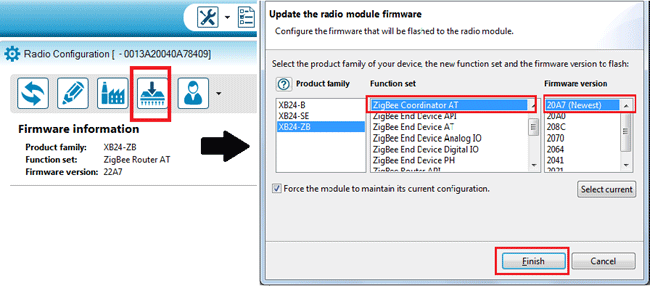
Step 1: First let us update the firmware for our coordinator, just open configuration mode, Then in Radio Configuration menu update firmware by clicking on the image as shown below:
Step 2: After noting down the address at the back of the radio module i.e “0013A200–Higher XXXXXXXX-Lower (your radio’s address)”.We have to configure using commands as listed below in table
|
Function |
Command |
Parameter |
|
PAN ID |
ATID |
1001 (any address from 0 to FFFE will do) |
|
Destination address high |
ATDH |
0013A200 |
|
Destination address low |
ATDL |
(See lower address of your Router Xbee module) |
|
Write function |
ATWR |
NA |
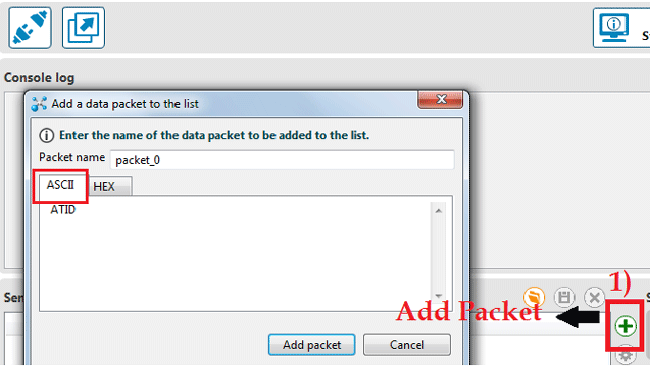
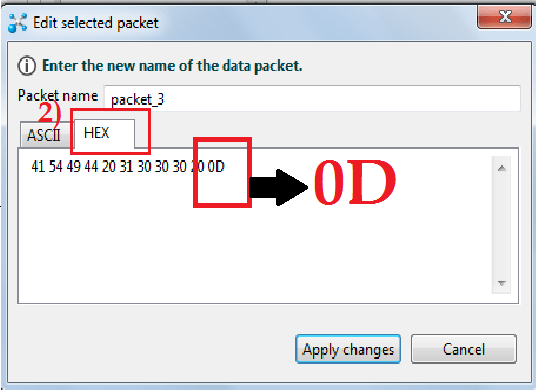
Step 3: Now Go to Console mode and Click on Add Packet button as show below in the image you will add our commands in ASCII format as ATID, after adding commands go to hex editor and here add 0D (Enter key substitute) you need to repeat the same procedure for every command except “+++” .
The order of the commands to be added shown below:
Step 4: As shown below add packets and make a sequence this will save your time as you can reuse by saving these packets for later use, After adding packets in sequence as shown below, set the transmit interval to 1000ms.
Step 5: Open the serial connection with XBee radio module in console Now Click on the button at the bottom of the console “Start sequence”, your console session may look as shown in image below.
Note: You can also use both Putty and CoolTerm but XCTU save more time and is hassle free in user experience

Console session for coordinator:
+++OK
ATID 1000
OK
ATDH 0013A200
OK
ATDL 40ADFB32
OK
ATID
1000
ATDH
13A200
ATDL
40ADFB32
ATWR
OK
XBee Router Configuration:
Similarly you need to configure your router using following parameters as listed in the table below:
|
Function |
Command |
Parameter |
|
PAN ID |
ATID |
1001 (any address from 0 to FFFE will do) |
|
Destination address high |
ATDH |
0013A200 |
|
Destination address low |
ATDL |
(See lower address of your Coordinator XBee module) |
|
Write function |
ATWR |
NA |
The console session for router will look like this:
Router
+++OK
ATID 1000
OK
ATDH 0013A200
OK
ATDL 40A78409
OK
ATID
1000
ATDH
13A200
ATDL
40A78409
ATWR
OK
Sending Text from One PC to other using XBee:
Now time for some action, download CoolTerm/Putty or even XCTU in two PC’s, plug your XBee with adapter board to them, here we as shown below we are using CoolTerm. Now open serial connection and connect your XBee module as you learned early in this tutorial.
In any one of the console write any character you will see the same character popping in other console window also. Here one XBee module works as Transmitter and other as Receiver.
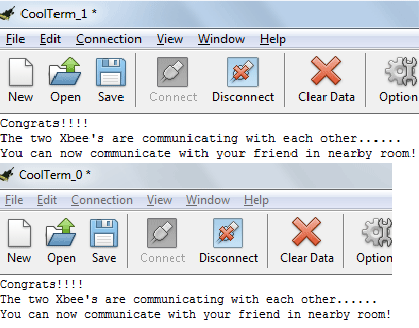
So including our previous tutorial on Introduction to ZigBee, we have till now covered basics of XBee architecture and networking keeping in mind XBee ecosystem, we also acquired knowledge of AT commands and using terminals. In this tutorial we have learned how a XBee module can be interfaced with computer for communication between two computers. We can now communicate with our friends in nearby rooms using XBee radios!!! The next topic will be based on application of Arduino and XBee as an.
Do-it-Yourself
- Download python IDE from: https://www.python.org/ftp/python/2.7.8/python-2.7.8.msi, download serial libraries of python and send AT commands using python.
- Use AT commands to hook up LEDs at Digital I/O and control them remotely.
- Configure an XBee module to get Analog inputs from a Potentiometer http://examples.digi.com/sensors/802-15-4-analog-input-with-a-potentiometer
- Using python’s Tkinter you can make an interactive application to track motion by using an accelerometer and XBee, to make get gestures.
- Plug in XBee module and receive the data of your grass using humidity sensor you can extend this project by plotting the data in using pythons Matplotlib.
